环境要求:

  • JDK8 及以上
  • Maven 3.5 及以上

参考资料

学习的前置知识:

课程单元 前置知识 要求
基础篇 Java 基础语法 面向对象,封装,继承,多态,类与接口,集合,IO,网络编程等
基础篇 SpringSpringMVC 知道 Spring 是用来管理 Bean,能够基于 RESTful 实现页面请求交互功能
基础篇 Mybatis 与 MybatisPlus 基于 Mybatis 和 MybatisPlus 能够开发出包含基础 CRUD 功能的标准 Dao 模块
基础篇 数据库 MySQL 能够读懂基础 CRUD 功能的 SQL 语句
基础篇 服务器 知道服务器与 web 工程的关系,熟悉web服务器的基础配置
基础篇 Maven 知道 Maven 的依赖关系,知道什么是依赖范围,依赖传递,排除依赖,可选依赖,继承
基础篇 WEB 技术(含vue,ElementUI) 知道 vue 如何发送 ajax 请求,如何获取响应数据,如何进行数据模型双向绑定
应用篇 Linux(CenterOS7) 熟悉常用的 Linux 基础指令,熟悉 Linux 系统目录结构
应用篇 实用开发技术 缓存:Redis、MongoDB、……
消息中间件:RocketMq、RabbitMq、……
原理篇 Spring 了解 Spring 加载 Bean 的各种方式,知道 Spring 容器底层工作原理,能够阅读简单的 Spring 底层源码

一、基础篇

1 快速创建 SpringBoot 项目

使用 spring 提供的快速构建

步骤 1:创建一个空的项目,然后创建新模块,选择 Spring Initializr,并配置模块相关基础信息;如果外网访问不了,或者是构建的时候太慢了,那么就可以在创建工程时,切换选择 starter 服务路径(点击 Server URL 就可以切换),然后手工收入阿里云提供给我们的使用地址即可。地址:

1
2
3
http://start.aliyun.com

https://start.aliyun.com

其他的步骤和下面的类似,只不过是变成中文的了;
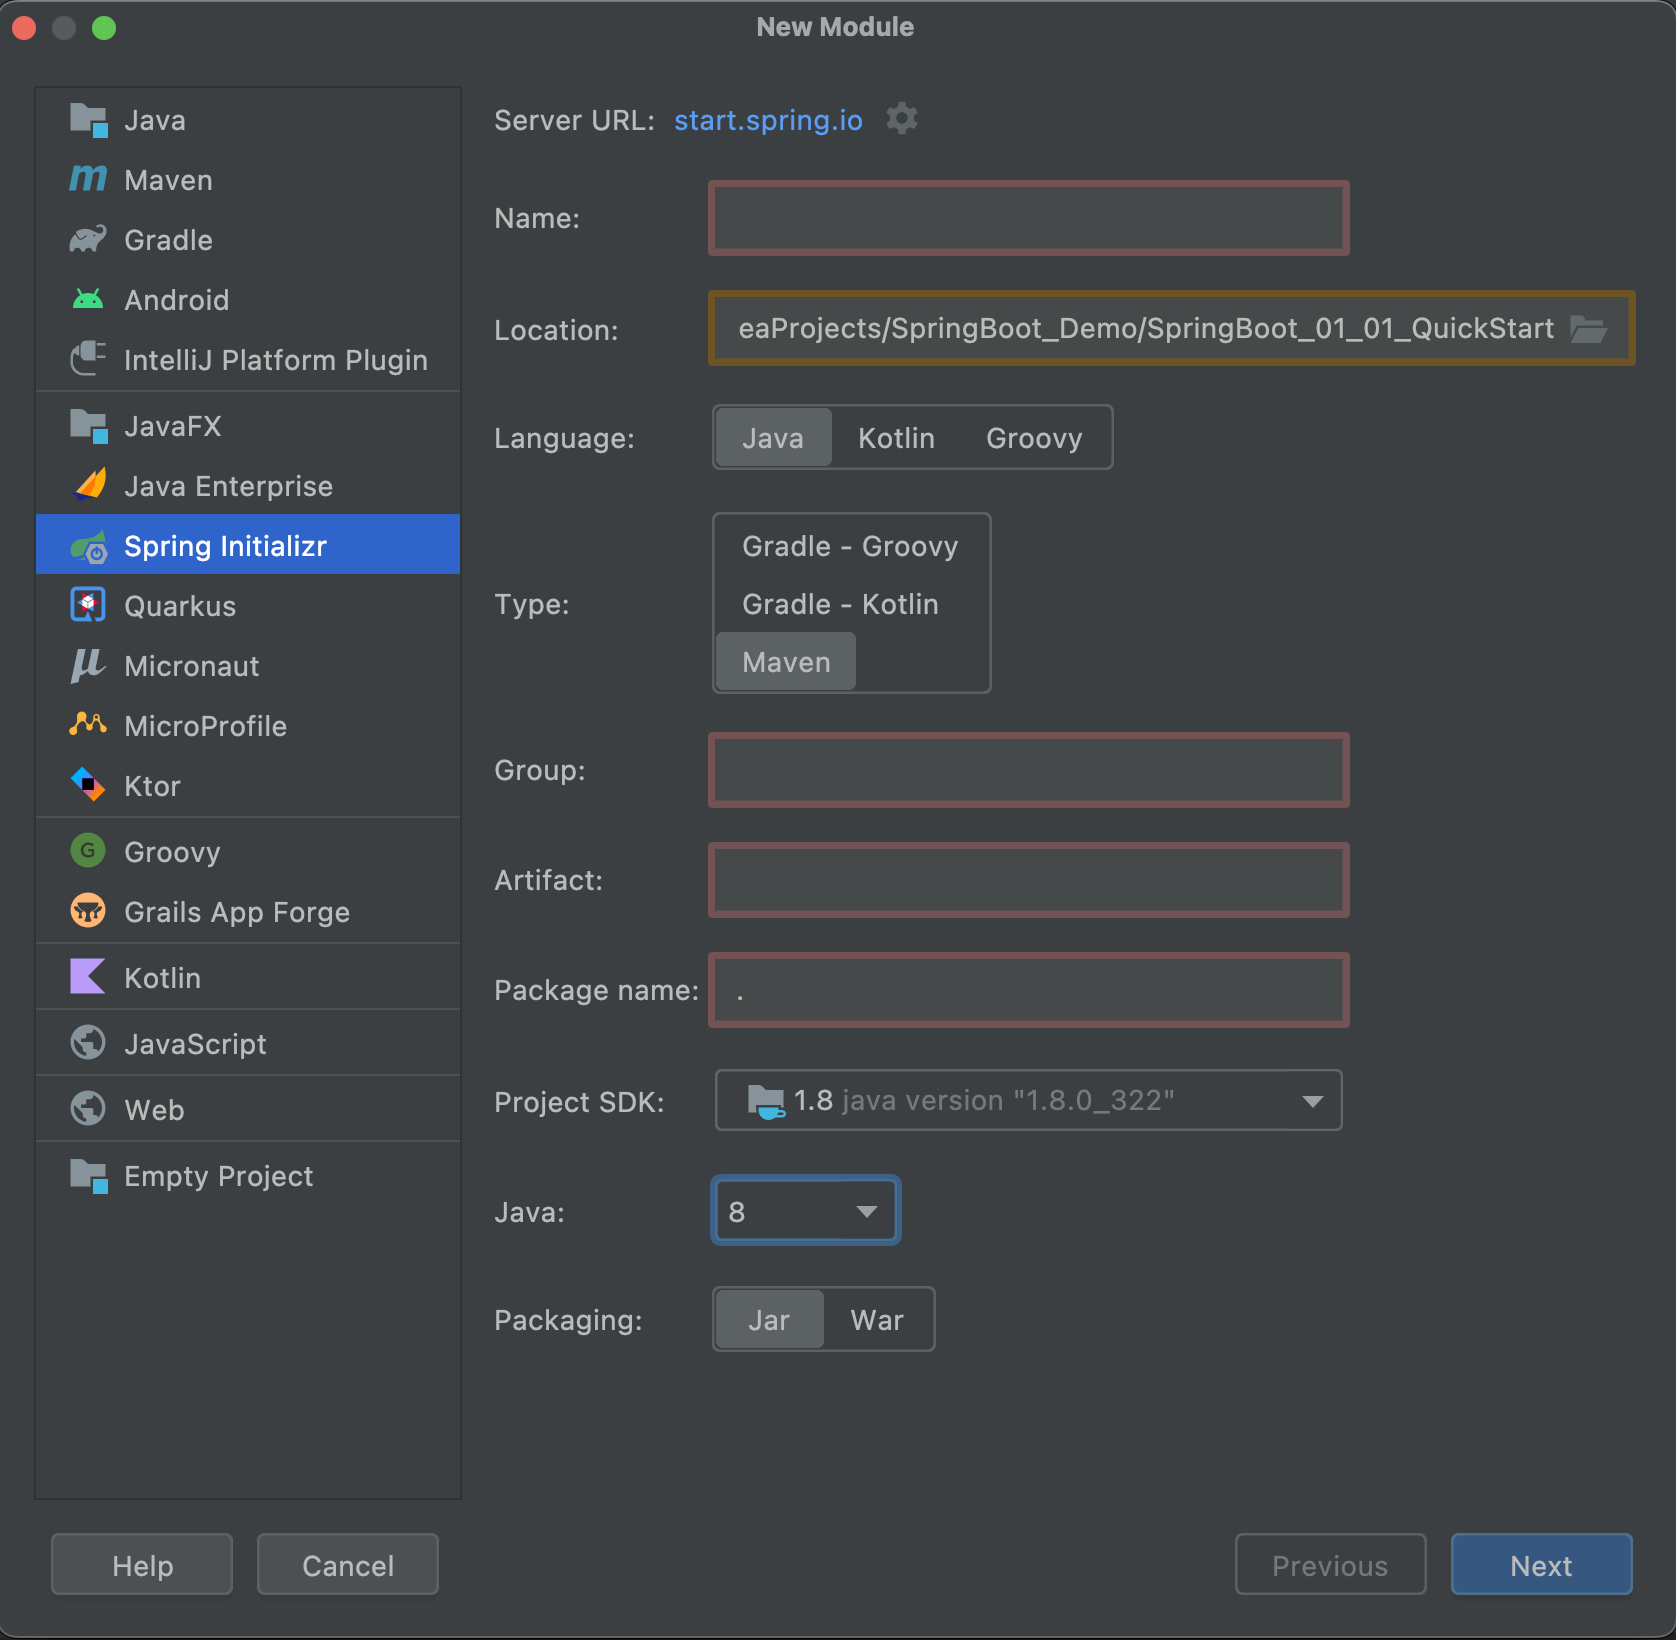
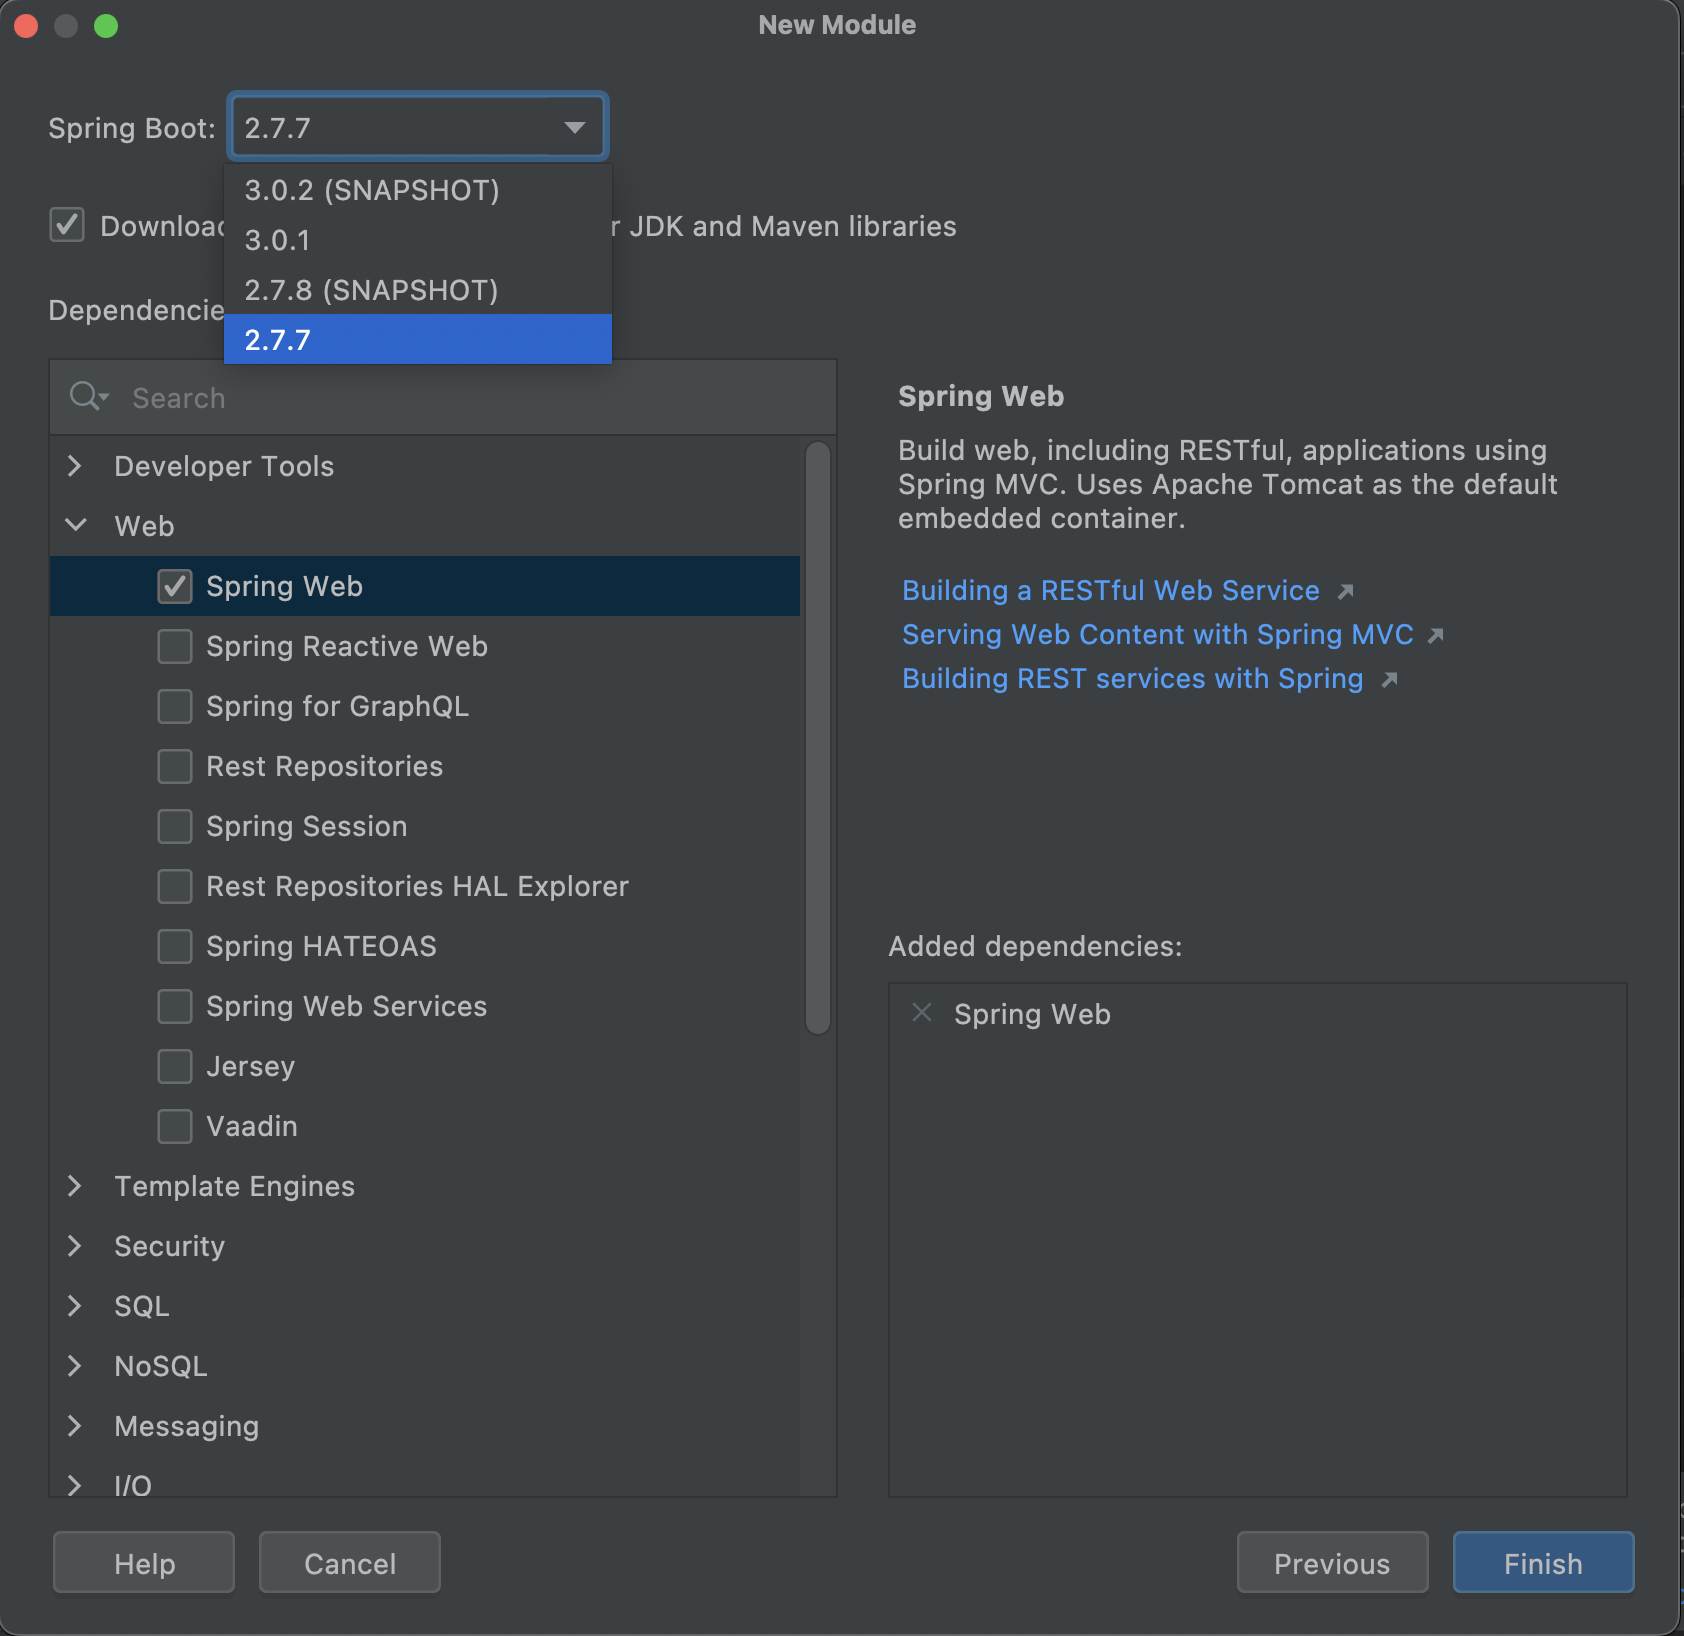
image-20221228122550154

步骤 2:选择要创建的 SpringBoot 项目的版本依赖,这里我们创建的是 web 项目,注意右下角的依赖是和我们左边打勾的依赖是一致的;

image-20221228123216835

步骤 3:开发控制器类 Controller,以测试环境是否可用。

入门案例制作的 SpringMVC 的控制器基于 REST 风格开发,当然此处使用原始格式制作 SpringMVC 的程序也是没有问题的,上例中的 @RestController@GetMapping 注解是基于 RESTful 开发的典型注解。

1
2
3
4
5
6
7
8
9
10
11
12
13
14
package fr.gdai.controller;

// RESTful 风格
@RestController
@RequestMapping("/books")
public class BookController {

@GetMapping
public String getById() {
String s = "SpringBoot is running";
System.out.println(s);
return s;
}
}

步骤 4:运行自动生成的 Application

1
2
3
4
5
6
7
8
package fr.gdai;

@SpringBootApplication
public class SpringBoot0101QuickStartApplication {
public static void main(String[] args) {
SpringApplication.run(SpringBoot0101QuickStartApplication.class, args);
}
}

image-20221228123815377

步骤⑤:至此,服务器已经启动完成,可以使用浏览器访问启动的服务器。

1
http://localhost:8080/books

基于 Maven 的手动构建

步骤 1:创建工程时,选择手工创建 Maven 工程;

步骤 2:参照标准 SpringBoot 工程的 pom.xml 文件,书写自己的 pom.xml 文件即可:

1
2
3
4
5
6
7
8
9
10
11
12
13
14
15
16
17
18
19
20
21
22
23
24
25
26
27
28
29
30
31
32
33
34
35
36
37
38
39
40
<?xml version="1.0" encoding="UTF-8"?>
<project xmlns="http://maven.apache.org/POM/4.0.0"
xmlns:xsi="http://www.w3.org/2001/XMLSchema-instance"
xsi:schemaLocation="http://maven.apache.org/POM/4.0.0 http://maven.apache.org/xsd/maven-4.0.0.xsd">
<modelVersion>4.0.0</modelVersion>

<parent>
<groupId>org.springframework.boot</groupId>
<artifactId>spring-boot-starter-parent</artifactId>
<version>2.7.7</version>
</parent>

<groupId>fr.gdai</groupId>
<artifactId>SpringBoot_01_02_QuickStart</artifactId>
<version>1.0-SNAPSHOT</version>
<packaging>jar</packaging>

<dependencies>
<dependency>
<groupId>org.springframework.boot</groupId>
<artifactId>spring-boot-starter-web</artifactId>
</dependency>

<dependency>
<groupId>org.springframework.boot</groupId>
<artifactId>spring-boot-starter-test</artifactId>
<scope>test</scope>
</dependency>
</dependencies>

<build>
<plugins>
<plugin>
<groupId>org.springframework.boot</groupId>
<artifactId>spring-boot-maven-plugin</artifactId>
</plugin>
</plugins>
</build>

</project>

步骤 3:之前运行 SpringBoot 工程需要一个 Application 类,我们自己手动创建一个,建议按照之前的目录结构来创建。

1
2
3
4
5
6
7
8
package fr.gdai;

@SpringBootApplication
public class Application {
public static void main(String[] args) {
SpringApplication.run(Application.class, args);
}
}
  • 注意 ⚠️:类上面的注解 @SpringBootApplication 千万忘记,后面再介绍;
  • 注意 ⚠️:Application 类名可以自定义,只要保障下面代码中使用的类名和你自己定义的名称一样即可,也就是 run() 方法中的那个 .class 对应的名称。

步骤 4:和之前一样,我们可以自己创建一个 Controller 测试一下是否能用。

其实,通过向导或者网站创建的 SpringBoot 工程其实就是帮你写了一些代码,而现在是自己手写,写的内容都一样,仅此而已。

2 SpringBoot 简介

SpringBoot 是由 Pivotal 团队设计的全新框架,其目的就是为了用来简化 Spring 应用的初始搭建以及开发过程。结合前面的入门程序搭建来看,SpringBoot 为我们极大的简化了 web 项目的搭建,这些简化操作主要体现在下面四个方面:

  • Mavenparent
  • Mavenstarter
  • 引导类 @SpringBootApplication
  • 内嵌 tomcat

parent

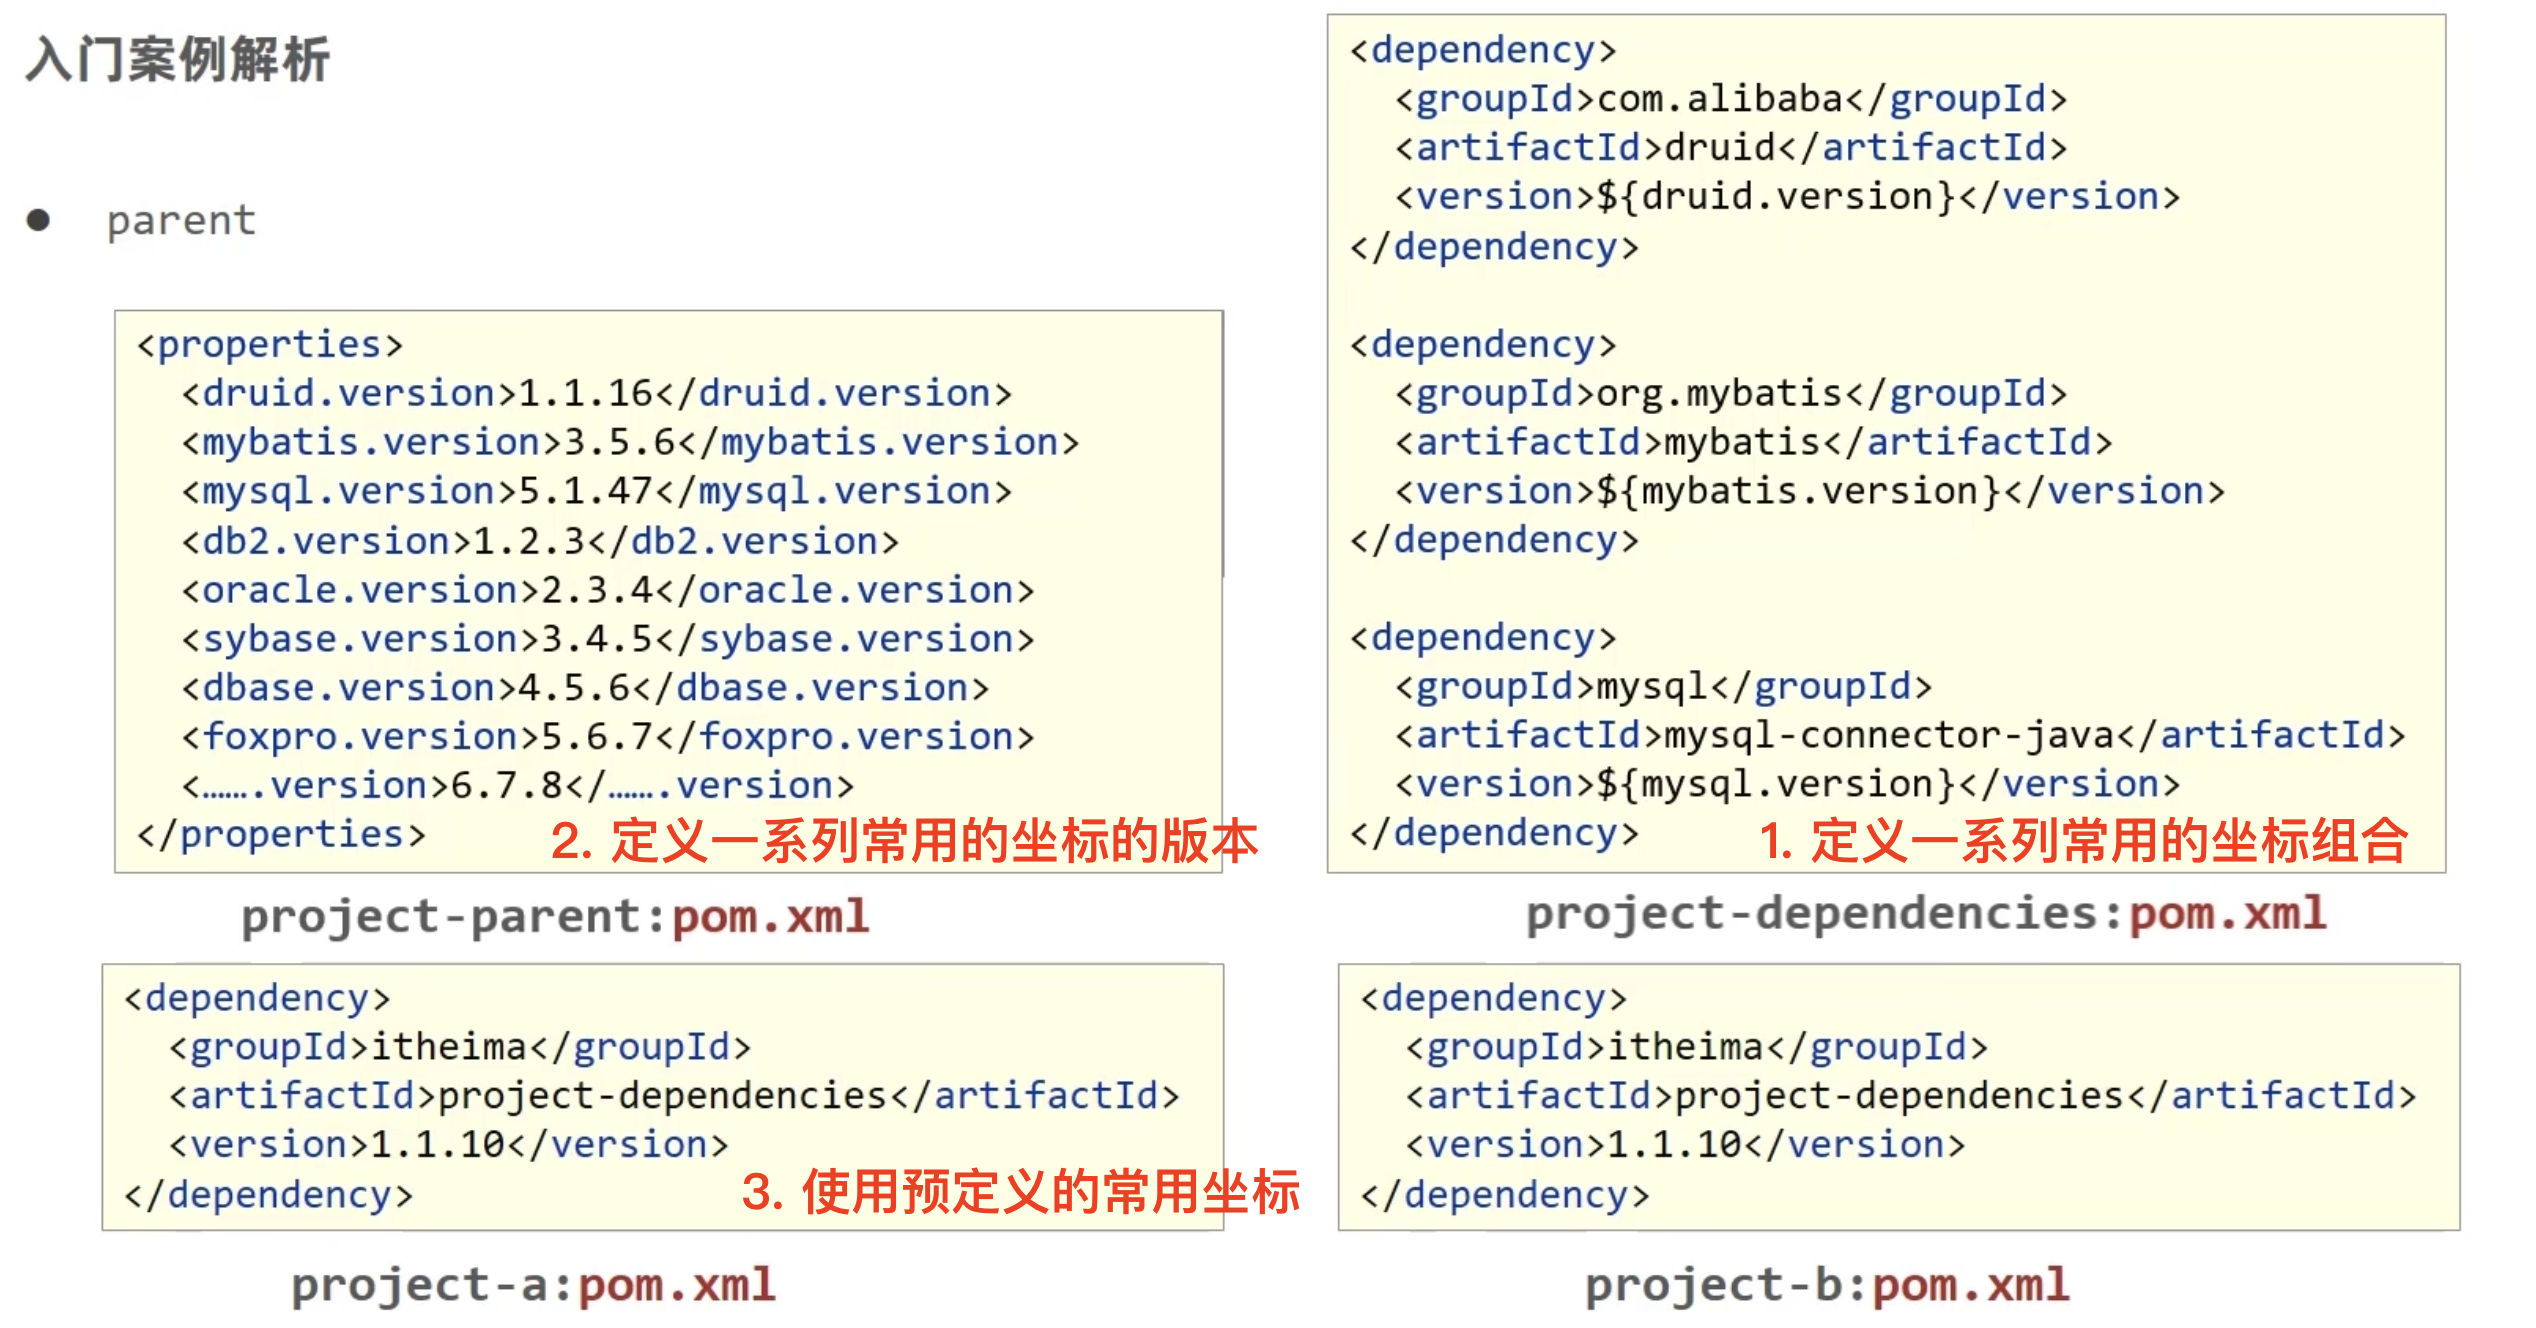
我们在之前的编程实践中经常会遇到 Maven 中的依赖之间版本不匹配从而项目无法正常运行的情况,在 SpringBoot 里,官方给出了若干个基于不同项目种类的依赖组合(如 webthymeleaf 等)。这些依赖的组合及其版本都被预先定义在 spring-boot-starter-parent 中:

1
2
3
4
<parent>
<groupId>org.springframework.boot</groupId>
<artifactId>spring-boot-starter-parent</artifactId>
</parent>

我们在使用时就不用担心冲突问题了。

注意 ⚠️:spring-boot-starter-parent 仅仅帮我们进行版本管理,它不负责导入坐标,即使用什么依赖还是由我们自己决定,只不过版本不需要我们管理了。整体上来说,使用 spring-boot-starter-parent 可以帮助开发者进行版本的统一管理。

那么这种机制是如何实现的呢?

其实 parent 是有 Maven 提供的特性,我们以下面这个例子为例:

image-20221228155227575

  • 我们可以跟踪一下 spring-boot-starter-parent.xml 配置如下(只摘抄了部分重点配置):
1
2
3
4
5
<parent>
<groupId>org.springframework.boot</groupId>
<artifactId>spring-boot-dependencies</artifactId>
<version>2.7.7</version>
</parent>
  • 我们继续跟踪 spring-boot-dependencies.xml 配置如下(只摘抄了部分重点配置):
1
2
3
4
5
6
7
8
9
10
11
12
13
14
15
16
17
18
19
20
21
22
23
24
25
26
27
28
29
30
31
32
33
34
35
36
37
38
39
<properties>
<!-- 版本信息 -->
<activemq.version>5.16.5</activemq.version>
<antlr2.version>2.7.7</antlr2.version>
<appengine-sdk.version>1.9.98</appengine-sdk.version>
<artemis.version>2.19.1</artemis.version>
<aspectj.version>1.9.7</aspectj.version>
...
</properties>

<dependencyManagement>
<!-- 依赖坐标信息 -->
<dependencies>
<dependency>
<groupId>org.apache.activemq</groupId>
<artifactId>activemq-amqp</artifactId>
<version>${activemq.version}</version>
</dependency>
<dependency>
<groupId>org.apache.activemq</groupId>
<artifactId>activemq-blueprint</artifactId>
<version>${activemq.version}</version>
</dependency>
...
</dependencies>
</dependencyManagement>

<build>
<pluginManagement>
<plugins>
<plugin>
<groupId>org.codehaus.mojo</groupId>
<artifactId>build-helper-maven-plugin</artifactId>
<version>${build-helper-maven-plugin.version}</version>
</plugin>
...
</plugins>
</pluginManagement>
</build>

从上面的 spring-boot-starter-dependenciespom.xml 中我们可以发现,一部分坐标的版本依赖管理插件管理已经定义好,但并未使用

小结

  1. 开发 SpringBoot 程序要继承 spring-boot-starter-parent
  2. spring-boot-starter-parent 中定义了若干个依赖管理
  3. 继承 parent 模块可以避免多个依赖使用相同技术时出现依赖版本冲突
  4. 继承 parent 的形式也可以采用引入依赖的形式实现效果

starter

上面我们通过 parents 可知,一部分坐标的版本依赖管理插件管理已经定义好,但并未使用

这一节我们将介绍的 starter 将介绍这些依赖坐标的使用。

我们继续分析项目的 pom.xml 文件,我们发现其中有如下设置:

1
2
3
4
5
6
7
<dependencies>
<dependency>
<groupId>org.springframework.boot</groupId>
<artifactId>spring-boot-starter-web</artifactId>
</dependency>
...
</dependencies>

我们追踪一下 spring-boot-starter-web,配置如下(只摘抄了部分重点配置):

1
2
3
4
5
6
7
8
9
<dependencies>
<dependency>
<groupId>org.springframework.boot</groupId>
<artifactId>spring-boot-starter</artifactId>
<version>2.7.7</version>
<scope>compile</scope>
</dependency>
...
</dependencies>

从上面的 spring-boot-starter-webpom.xml 中我们可以发现,spring-boot-starter-web 就是将 web 开发要使用的 spring-webspring-webmvc 等坐标进行了“打包”,这样我们的工程只要引入 spring-boot-starter-web 起步依赖的坐标就可以进行 web 开发了,同样体现了依赖传递的作用。

  • starter
    • SpringBoot 中常见项目名称,定义了当前项目使用的所有依赖坐标,以达到减少依赖配置的目的
  • parent
    • 所有 SpringBoot 项目要继承的项目,定义了若干个坐标版本号(依赖管理,而非依赖),以达到减少依赖冲突的目的
    • spring-boot-starter-parent 各版本间存在着诸多坐标版本不同
  • 实际开发
    • 使用任意坐标时,仅书写 GAV(groupId, artifactId, version) 中的 G 和 A,V 由 SpringBoot 提供,除非 SpringBoot 未提供对应版本 V
    • 如发生坐标错误,再指定 Version(要小心版本冲突)

小结

  • 开发 SpringBoot 程序需要导入坐标时通常导入对应的 starter
  • 每个不同的 starter 根据功能不同,通常包含多个依赖坐标
  • 使用 starter 可以实现快速配置的效果,达到简化配置的目的

引导类

引导类是整个程序的入口。与 Spring 的基本框架类似,SpringBoot 中也存在 Bean 的容器 ConfigurableApplicationContext。我们可以通过这个容器获取到 Bean 对象

1
2
3
4
5
6
7
8
9
10
11
package fr.gdai;

@SpringBootApplication
public class Application {
public static void main(String[] args) {
ConfigurableApplicationContext ctx =
SpringApplication.run(Application.class, args);
BookController book = ctx.getBean(BookController.class);
System.out.println(book);
}
}

@SpringBootApplication 注解相当于普通 Spring 框架中的包扫描+配置类

1
2
3
4
5
6
7
8
9
10
11
12
@Target(ElementType.TYPE)
@Retention(RetentionPolicy.RUNTIME)
@Documented
@Inherited
@SpringBootConfiguration
@EnableAutoConfiguration
@ComponentScan(excludeFilters = {
@Filter(type = FilterType.CUSTOM,
classes = TypeExcludeFilter.class),
@Filter(type = FilterType.CUSTOM,
classes = AutoConfigurationExcludeFilter.class) })
public @interface SpringBootApplication {...}
  • SpringBoot 的引导类是工程的执行入口,运行 main() 方法就可以启动项目
  • SpringBoot 工程运行后初始化 Spring 容器,扫描引导类所在包加载 Bean

小结

  1. SpringBoot 工程提供引导类用来启动程序
  2. SpringBoot 工程启动后创建并初始化 Spring 容器

内嵌 tomcat

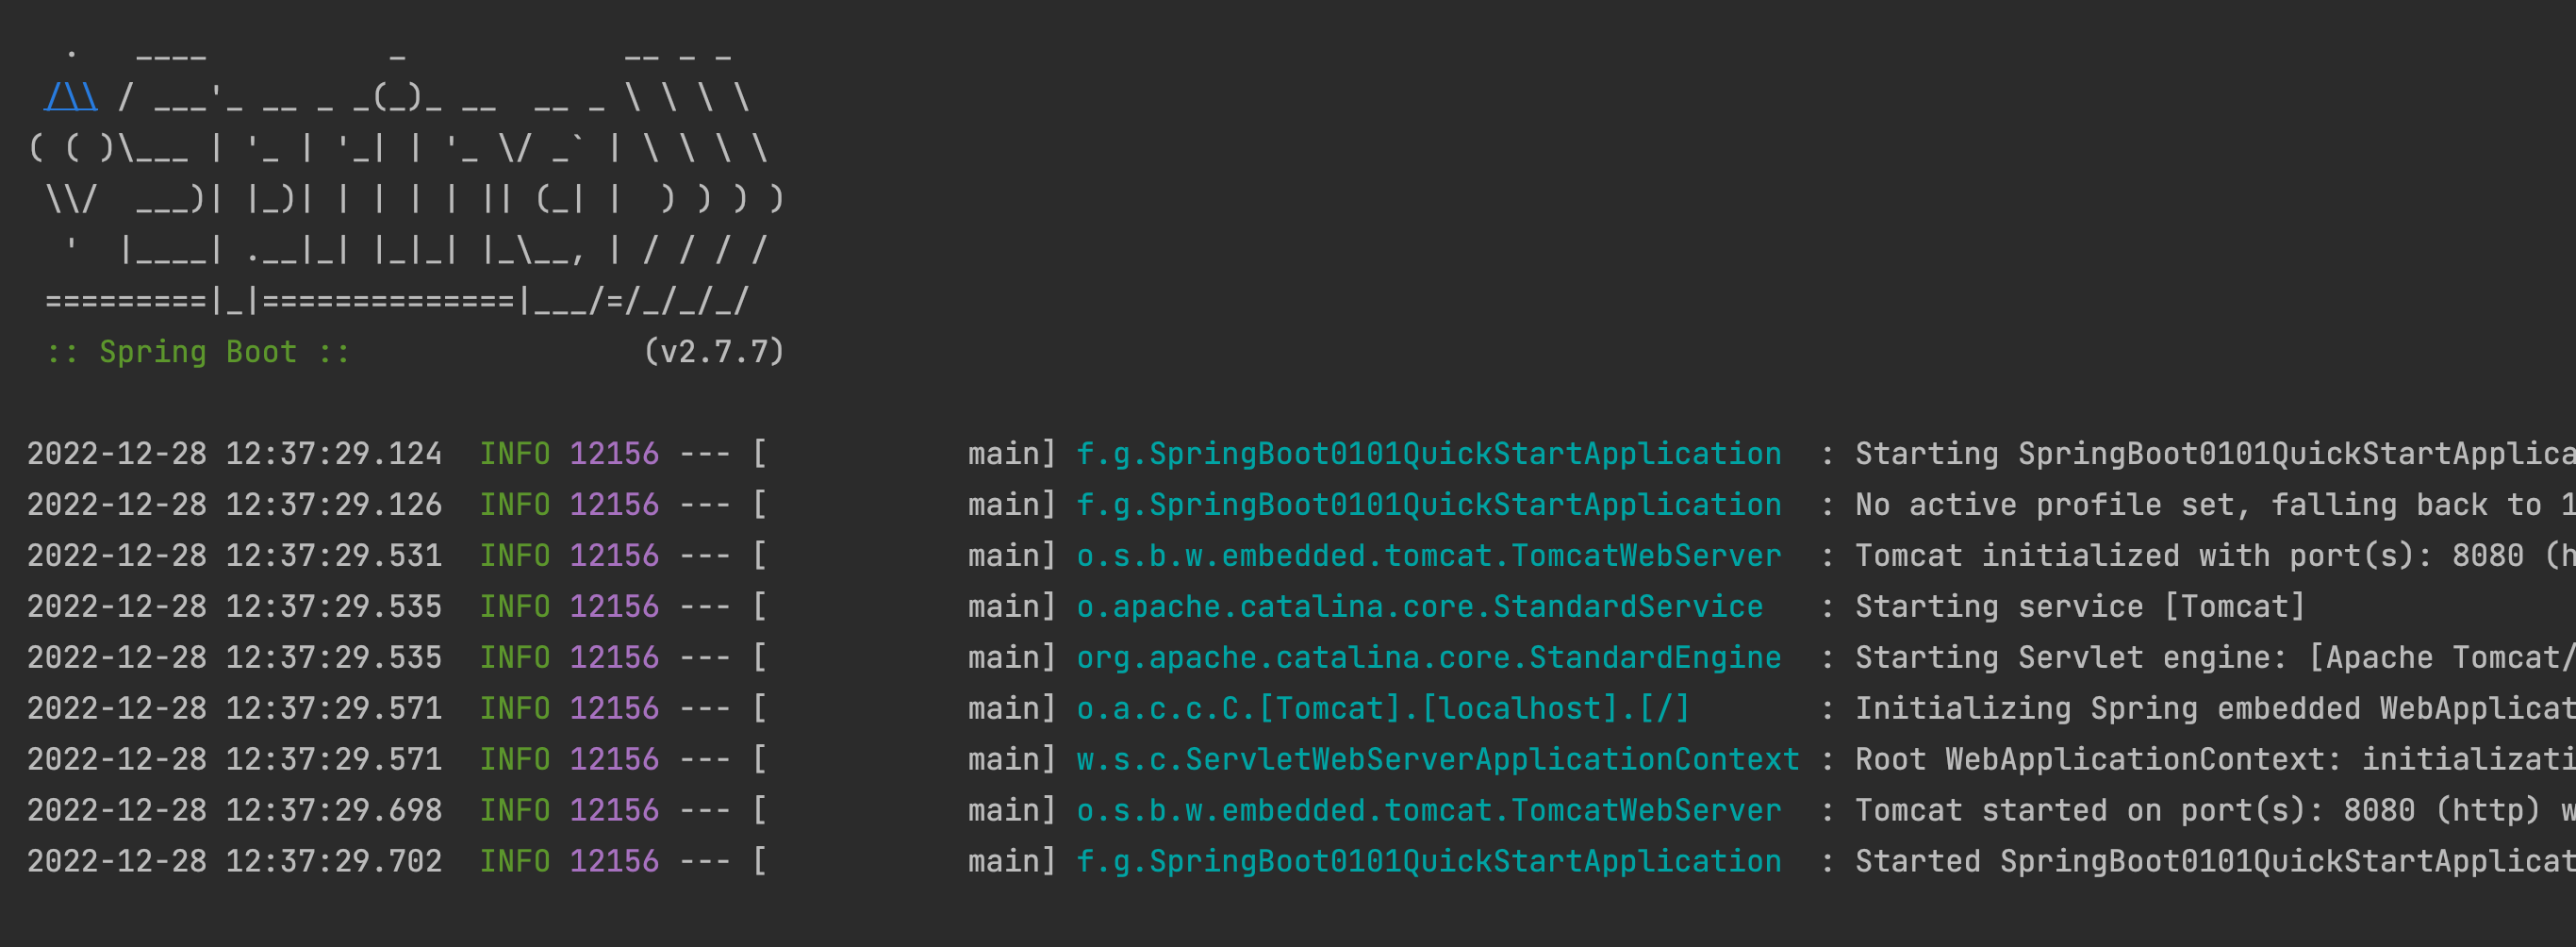
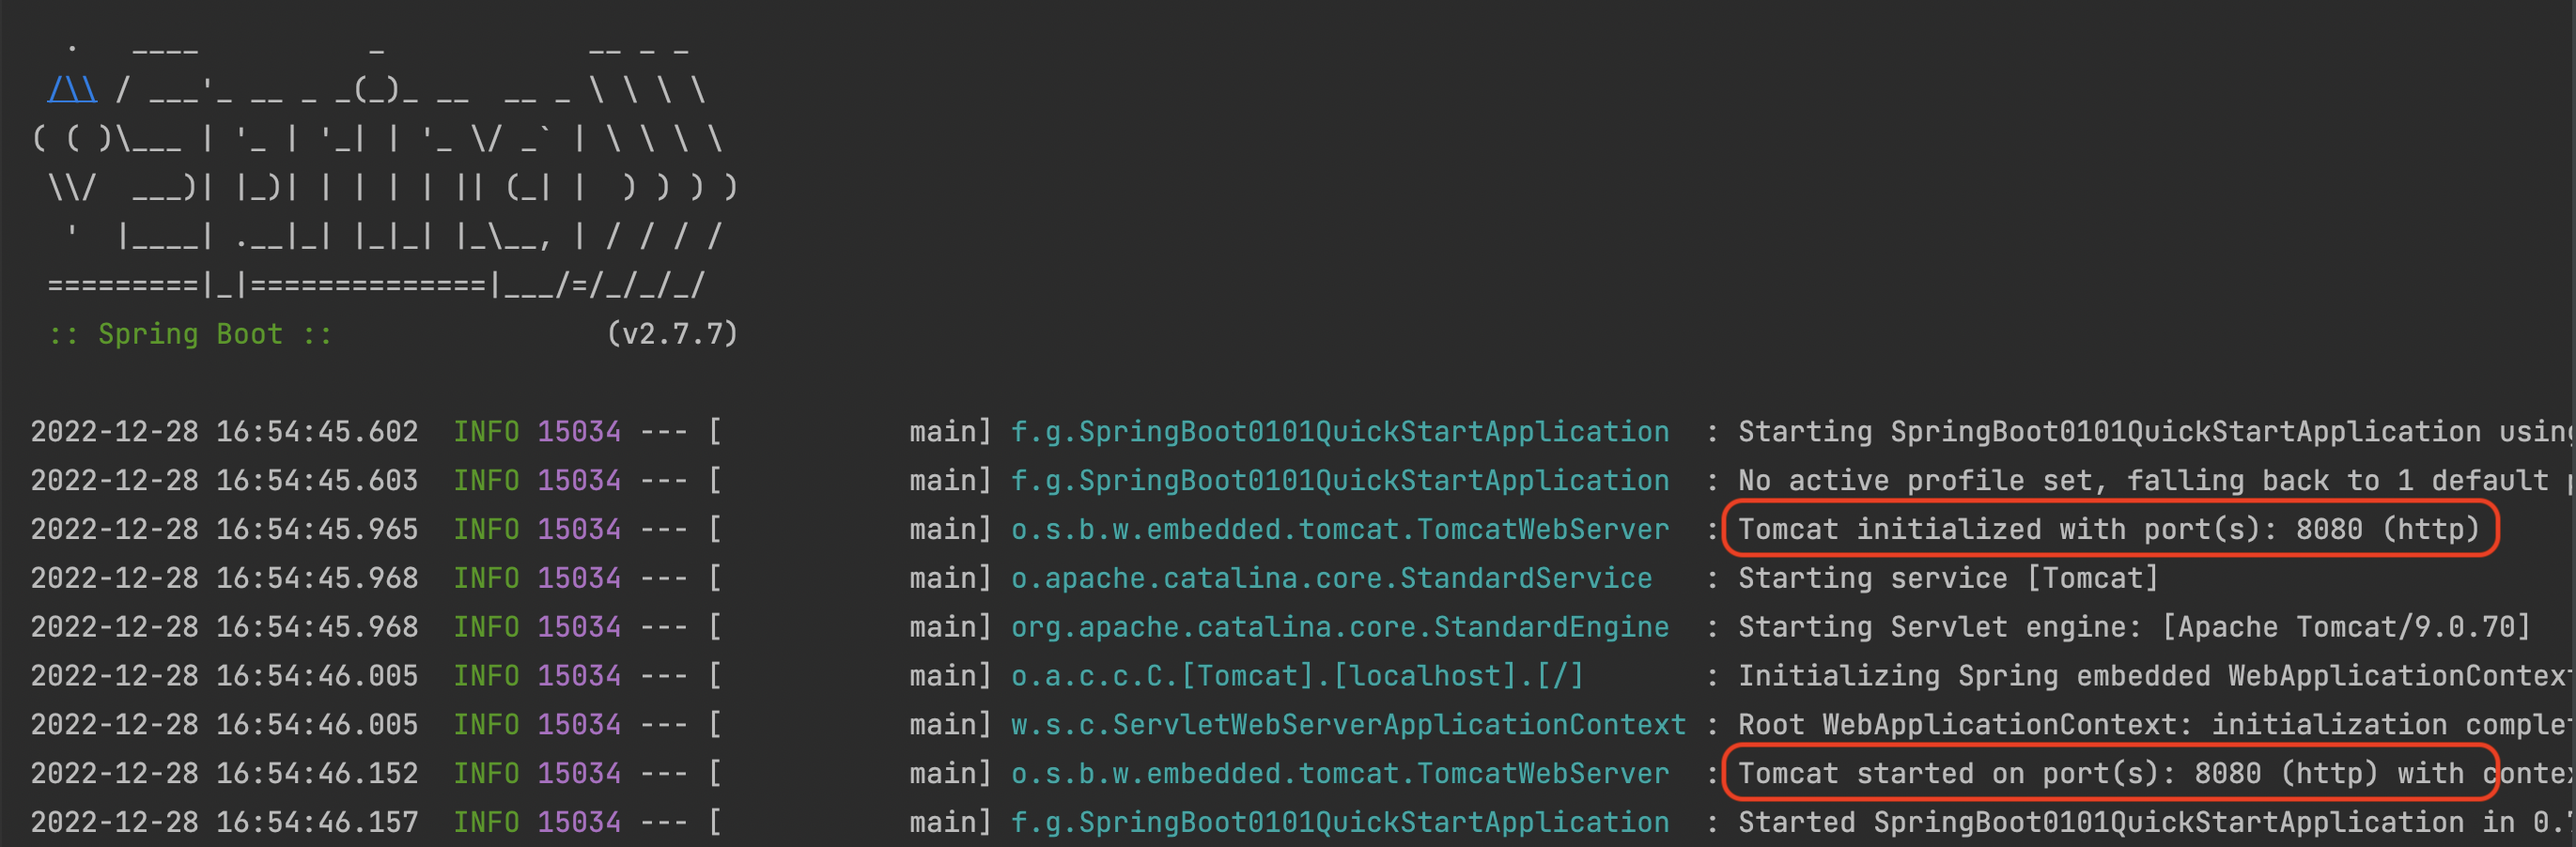
在第一章,我们快速创建好项目并启动测试时,我们并没有配置任何服务器信息(如 tomcat 等)。但是在控制台打印的信息中我们可以清楚的看到 tomcat 服务器被启动,且端口为 8080

image-20221228165616941

我们可以继续检查 pom.xml 文件:

1
2
3
4
5
6
7
<dependencies>
<dependency>
<groupId>org.springframework.boot</groupId>
<artifactId>spring-boot-starter-web</artifactId>
</dependency>
...
</dependencies>

spring-boot-starter-web

1
2
3
4
5
6
7
8
9
10
<dependencies>
...
<dependency>
<groupId>org.springframework.boot</groupId>
<artifactId>spring-boot-starter-tomcat</artifactId>
<version>2.7.7</version>
<scope>compile</scope>
</dependency>
...
</dependencies>

spring-boot-starter-tomcat

1
2
3
4
5
6
7
8
9
10
11
12
13
14
15
16
<dependencies>
...
<dependency>
<groupId>org.apache.tomcat.embed</groupId>
<artifactId>tomcat-embed-core</artifactId>
<version>9.0.70</version>
<scope>compile</scope>
<exclusions>
<exclusion>
<artifactId>tomcat-annotations-api</artifactId>
<groupId>org.apache.tomcat</groupId>
</exclusion>
</exclusions>
</dependency>
...
</dependencies>

此时我们可以看到,SpringBoot 之所以没有安装 tomcat 服务器却依然可以使用,是因为 SpringBoottomcat 内嵌到运行环境中(tomcat-embed-core),将其作为 Bean 对象,使用 Spring 容器进行管理

tomcat 服务器是一款使用 java 开发的软件,可以将其对象使用 Spring 容器进行管理。

当然,我们可以使用 Maven 的排除依赖 <exclusion> 来排除 tomcat 依赖,从而实现更换服务器的目的。操作如下:

1
2
3
4
5
6
7
8
9
10
11
12
13
14
15
16
17
18
19
20
<dependencies>
<dependency>
<groupId>org.springframework.boot</groupId>
<artifactId>spring-boot-starter-web</artifactId>
<exclusions>
<!-- 排除 tomcat 服务器 -->
<exclusion>
<groupId>org.springframework.boot</groupId>
<artifactId>spring-boot-starter-tomcat</artifactId>
</exclusion>
</exclusions>
</dependency>

<!-- 添加 jetty 服务器 -->
<dependency>
<groupId>org.springframework.boot</groupId>
<artifactId>spring-boot-starter-jetty</artifactId>
</dependency>
...
</dependencies>

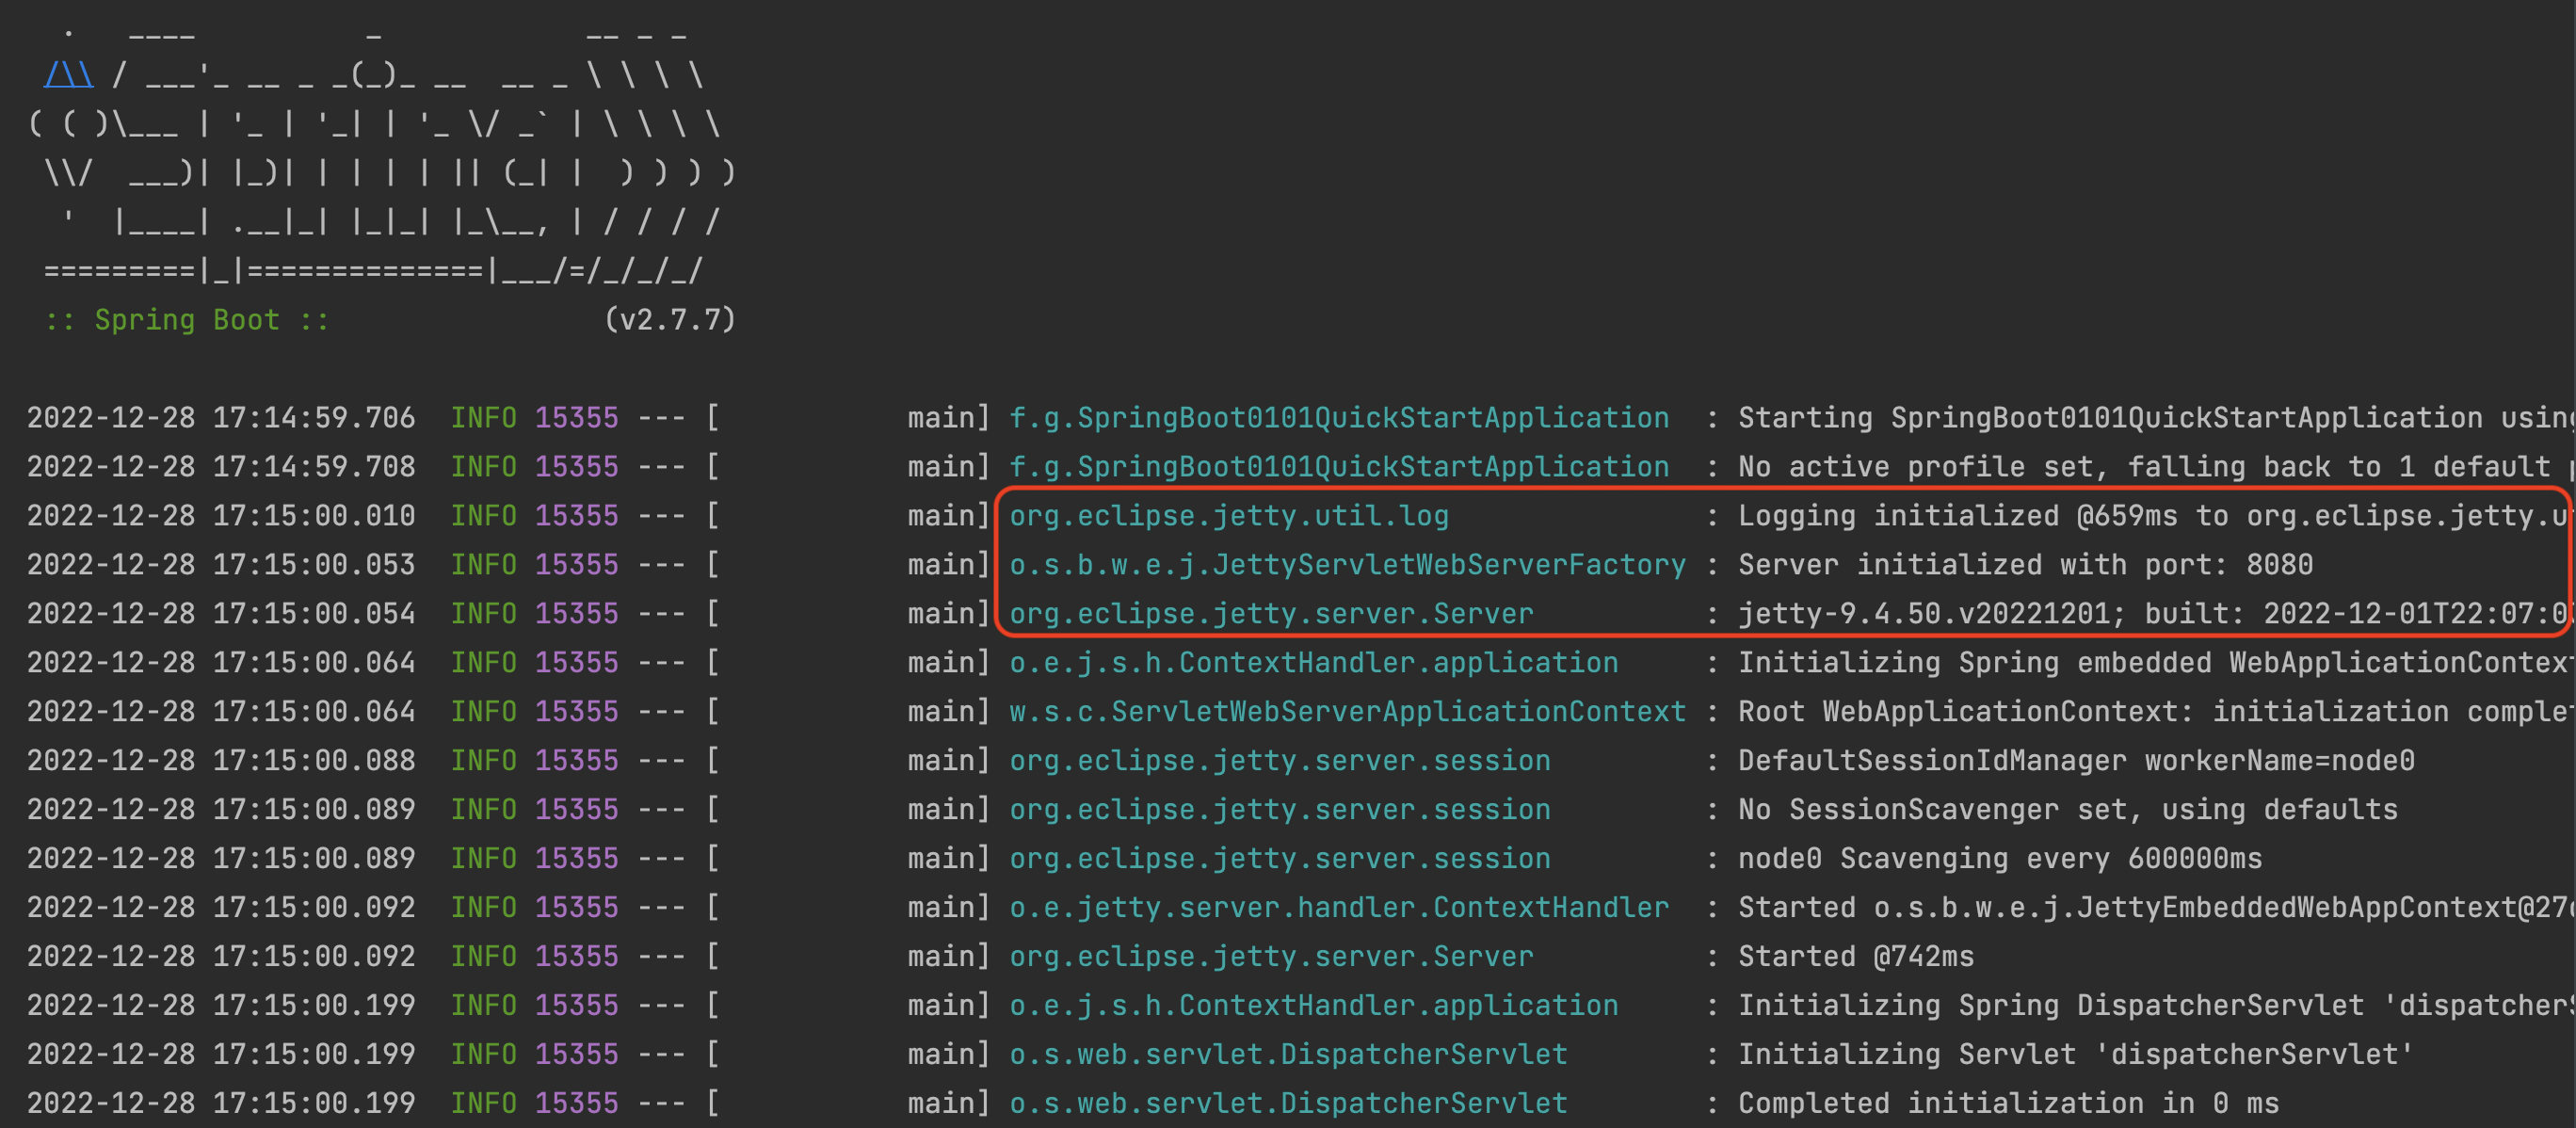
此时,我们更换的 jetty 服务器就生效并可以启动了:

image-20221228171535483

SpringBoot 的内置服务器

  • tomcat默认):apache出品,应用面广,负载了若干较重的组件
  • jetty: 更轻量级,负载性能远不及 tomcat;可扩展性更强(相较于 tomcat),谷歌应用引擎已经全面切换为 jetty
  • undertow:负载性能勉强超过 tomcat

小结

  1. 内嵌 tomcat 服务器是 SpringBoot 辅助功能之一
  2. 内嵌 tomcat 工作原理是将 tomcat 服务器作为对象运行,并将该对象交给 Spring 容器管理
  3. 变更内嵌服务器思想是去除现有服务器,添加全新的服务器

3 SpringBoot 的配置

基础配置

SpringBoot 工程中,所有的配置都统一在一个配置文件中。默认配置文件如下所示,其通过键值对配置对应属性:

1
src/main/resources/application.properties

SpringBoot 内置配置属性查询:点击跳转 SpringBoot 官方网站

修改默认端口号

1
2
# 修改服务器端口
server.port=8081

关闭/修改运行日志图标

1
2
3
4
5
# 关闭运行日志图标(banner)
spring.main.banner-mode=off

# 修改运行日志图标(banner)
spring.banner.image.location=logo.png

设置日志相关

以下日志记录级别是按照记录的信息量的递增顺序列出的:

off(关闭)、fatal(致命)、error(错误)、warn(警告)、info(信息,默认值)、debug(调试)、trace(跟踪)

1
2
3
4
5
6
# 设置日志显示级别
logging.level.root=info
logging.level.fr.gdai.controller=debug
logging.level.fr.gdai.service=debug
logging.level.fr.gdai.dao=info
logging.level.fr.gdai.damain=info

思考❓:

我们观察一下上面的日志级别设置,为了更加细粒度地控制日志的输出,使用 .properties 文件时经常需要写许多类似的内容。那么我们是否可以使这种配置更加的格式化,从而简化书写呢?SpringBoot 提供了多种属性配置的方式,详见下一节配置文件类型

小结

  1. SpringBoot导入对应的 starter 依赖后,才会提供对应配置属性
  2. 书写 SpringBoot 配置采用关键字+提示形式书写

配置文件类型

SpringBoot 提供了 3 种属性配置文件的格式:

  • application.properties:(传统格式/默认格式

    1
    2
    3
    4
    # 修改服务器端口
    server.port=8081
    # 修改访问服务的前缀
    server.servlet.context-path=/test
  • application.yml:(主流格式

    1
    2
    3
    4
    5
    # 修改服务器端口及访问服务的前缀
    server:
    port: 8082
    servlet:
    context-path: /test
  • application.yaml

    1
    2
    3
    4
    5
    # 修改服务器端口及访问服务的前缀
    server:
    port: 8082
    servlet:
    context-path: /test

思考❓:

如果三个配置文件都存在 resource 文件目录下,那么谁会生效?

我们不妨试验一下,观察控制台打印的日志信息中关于服务器端口的信息

image-20221228183337252

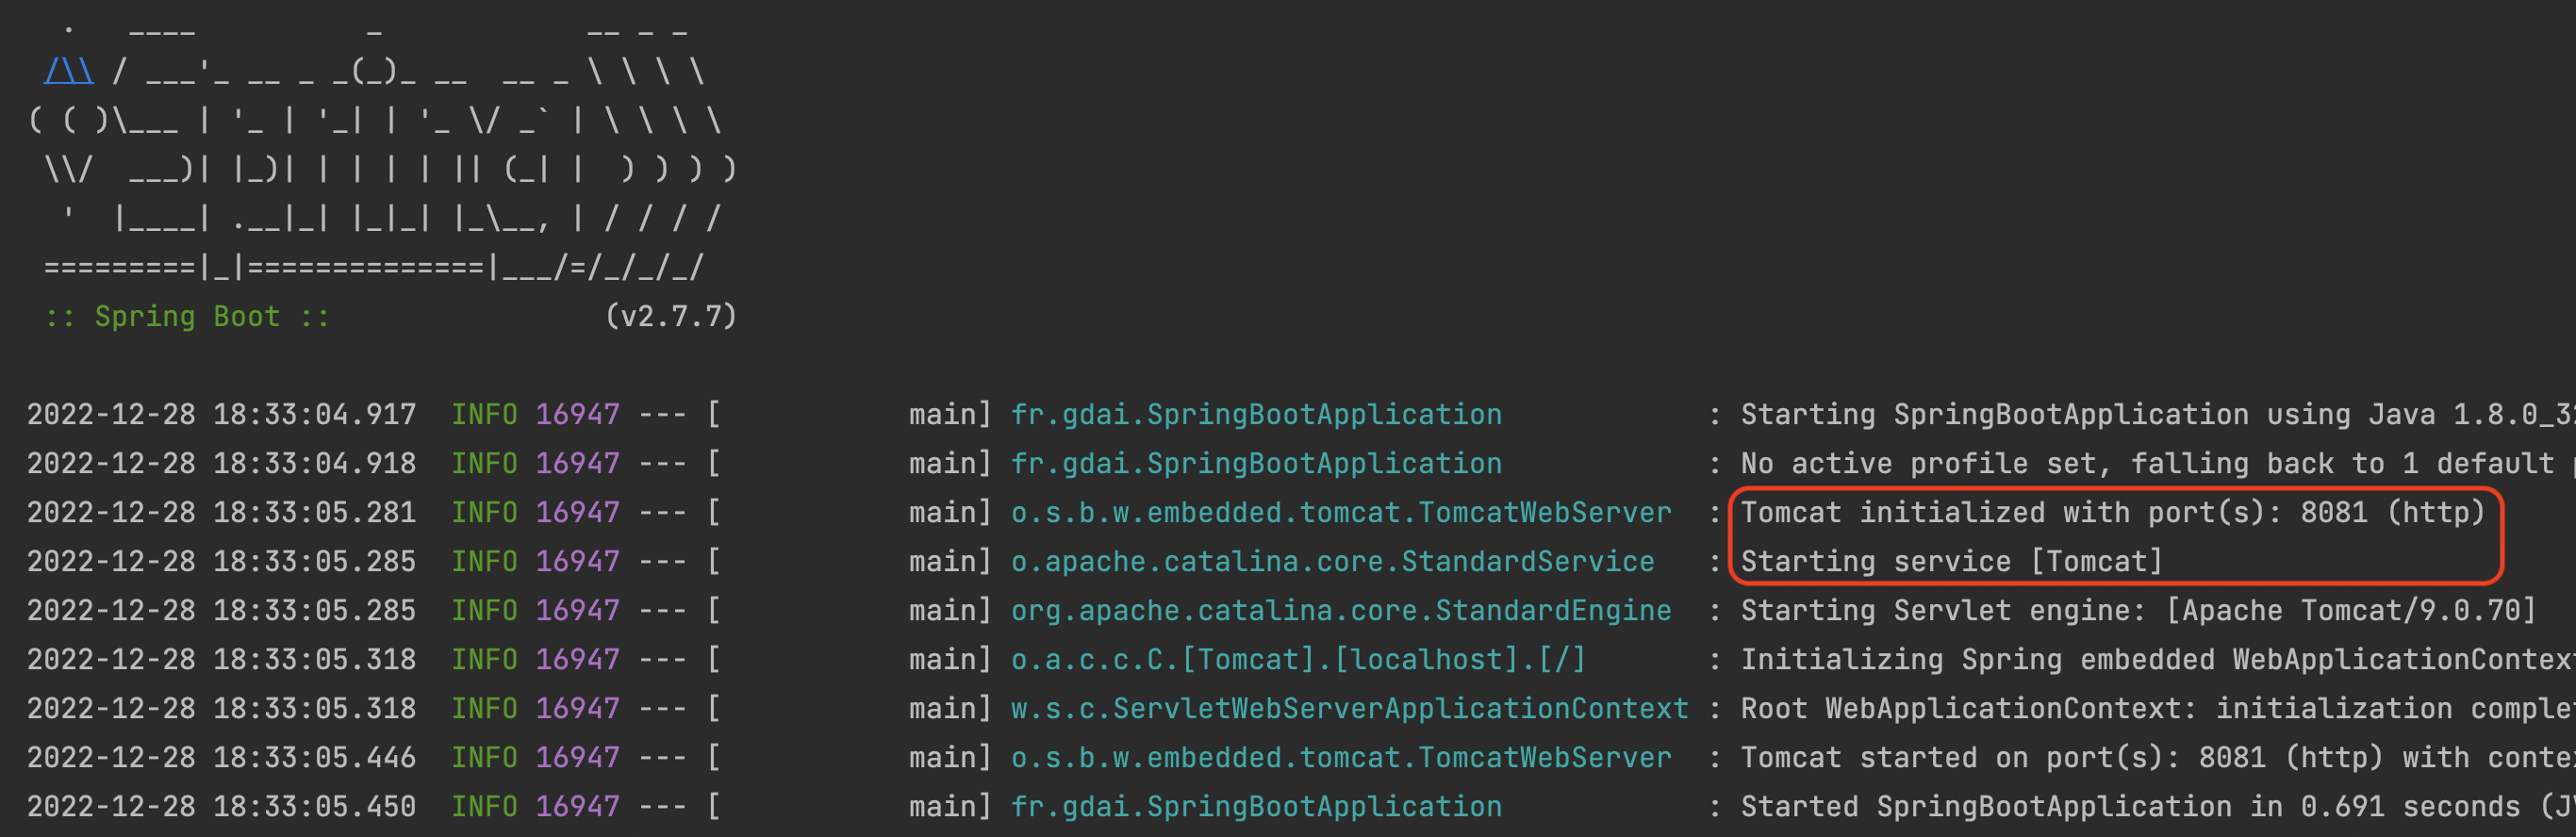
我们发现,服务器端口为 8081。同理继续试验,最后得出结论。SpringBoot 配置文件加载顺序:

1
application.properties > application.yml > application.yaml

注意 ⚠️:

  • 不同配置文件中相同配置按照加载优先级相互覆盖高优先级配置内容会覆盖低优先级配置内容)
  • 但是不同配置文件中不同配置会全部保留

YAML 语法

YAML

YAML(YAML Ain’t Markup Language),是一种数据序列化格式,而不是像 XML 那样的标记语言

【优点】

  • 容易阅读
  • 容易与脚本语言交互
  • 以数据为核心,重数据轻格式

【YAML 文件扩展名】

  • .yml主流
  • .yaml

YAML 基本语法

  • key: value属性名与属性值之间使用冒号+空格作为分隔,且属性名不能重复
  • 大小写敏感
  • 属性层级关系使用多行描述
  • 使用缩进表示层级关系,同层级左侧对齐,只允许使用空格(不允许使用 Tab 键);缩进的空格数目不重要,只要相同层级的元素左侧对齐即可
  • # 表示注释

YAML 数据类型

  • 字面值的表示方式
1
2
3
4
5
6
7
8
booleanType: true                       # TRUE, true, Ture, FALSE, false, False 均可
floatType: 0.0001 # 支持科学计数法
intType: 1000 # 支持二进制、八进制、十六进制
nullType: ~ # ~ 表示null
stringType: Hello # 字符串类型可以直接书写
stringType2: "Hello!" # 可以使用双引号包裹特殊字符
dateType: 2022-12-31 # 日期必须使用 yyyy-MM-dd 的格式
dateTimeType: 2022-12-31T23:59:59+01:00 # 日期与时间之间使用T连接, 最后使用+代表时区
  • 对象的表示方式
1
2
3
4
5
6
student:
name: gdai
education:
school: ENSEEIHT
department: SN
parcour: Logiciel
  • 数组表示方式:在属性名书写位置的下方使用 - 作为数据开始符号。每行书写一个数据,- 与数据间空格分隔
1
2
3
4
5
6
7
8
9
10
11
12
13
14
15
16
17
18
19
20
21
22
23
24
25
26
27
28
29
courses:
- "Systèmes répartis"
- "Calcul Parallèle"
- "Web Semantique"

# 数组书写的缩略格式
courseList: ["Systèmes répartis" , "Calcul Parallèle" , "Web Semantique"]

#
student:
name: gdai
education:
school: ENSEEIHT
department: SN
parcour: Logiciel
subject:
- "Systèmes répartis"
- "Calcul Parallèle"
- "Web Semantique"

students:
- name: Tom
department: SN
- name: Enzo
department: SN
- name: Arthur
department: SN

studentList: [{name: Tom , department: SN} , {name: Enzo , department: SN} , {name: Arthur, department: SN}]
  • .yaml 文件中的变量引用:在上面的例子中,我们注意到 student 数组中的 department 属性都应该一致,所以我们考虑使用变量引用。如下所述:
1
2
3
4
5
6
7
8
9
departmentName: "Sciences du Numérique"

students:
- name: Tom
department: ${departmentName}
- name: Enzo
department: ${departmentName}
- name: Arthur
department: ${departmentName}

思考❓:

现在我们已经知道了 YAML 具有严格的数据格式要求,并且已经可以正确的书写 YAML 文件了,那这些文件书写后其实是在定义一些数据。这些数据时给谁用的呢?

大部分是 SpringBoot 框架内部使用,但是如果我们想配置一些数据自己使用,能不能用呢?答案是可以的,那如何读取 YAML 文件中的数据呢?

读取 YMAL 中的数据

读取单一数据

Spring 框架中一样,使用 @Value 读取单个数据,属性名引用方式:${一级属性名.二级属性名...}

1
2
3
4
5
6
7
8
9
10
11
12
13
14
15
16
17
18
19
20
21
22
23
24
package fr.gdai.controller;

@RestController
@RequestMapping("/books")
public class BookController {

@Value("${student.name}")
private String textFromYaml;

@Value("${courses[1]}")
private String courseFromYaml;

@Value("${students[1].department}")
private String depFromYaml;

@GetMapping
public String printDemo() {
String s = "从yaml文件中读取到:" + textFromYaml
+ "\t" + depFromYaml
+ "\t" + courseFromYaml;
System.out.println(s);
return s;
}
}

我们通过发送 GET 请求访问到该方法

1
http://localhost:8081/test/books

结果输出:

1
从yaml文件中读取到:gdai	Sciences du Numérique	Calcul Parallèle
小结
  1. 使用 @Value 配合 SpEL 读取单个数据;

  2. 如果数据存在多层级,依次书写层级名称即可;

  3. 如果属性中出现特殊字符,可以使用双引号包裹起来作为字符解析

    1
    2
    text1: \t       # 读取是依旧按照 \t 读取, 不会解析为转义字符
    text2: "\t" # 使用""包裹的转义字符将会生效

读取全部数据

SpringBoot 提供了一个 Environment 对象来封装全部数据,并使用 @Autowired 注解使其装载所有数据。

1
2
3
4
5
6
7
8
9
10
11
12
13
14
15
16
17
18
package fr.gdai.controller;

@RestController
@RequestMapping("/books")
public class BookController {

@Autowired
private Environment env;

@GetMapping
public String printDemo() {
String s = "从yaml文件中读取到:" + env.getProperty("student.name")
+ "\t" + env.getProperty("students[1].department")
+ "\t" + env.getProperty("courses[1]");
System.out.println(s);
return s;
}
}

我们通过发送 GET 请求访问到该方法

1
http://localhost:8081/test/books

结果输出:

1
从yaml文件中读取到:gdai	Sciences du Numérique	Calcul Parallèle

思考❓:

我们想结构性地获取数据(例如,我们定义了数据库的连接设置),但是并不想获取全部数据(因为这样冗余数据过多)。我们应该怎么做呢?

读取引用类型属性数据

之前我们提出了一个问题:我们想结构性地获取数据(例如,我们定义了数据库的连接设置),我们应该怎么做呢?

例如我们在配置文件中定义:

1
2
3
4
5
6
7
8
9
# 创建类,用于封装下面的数据
# 由spring帮我们去加载这些数据到对象中,所以我们需要告诉spring使用这段信息
# 使用的时候从spring中直接获取信息

dataSource:
driver: com.mysql.jdbc.Driver
url: jdbc:mysql://localhost:3306/database
username: root
password: root
  1. 自定义对象用来封装指定数据。需要注意的是:

    • 封装对象的属性名需要与 yaml 数据的属性名相同;
    • 使用 @Component 将其放入 Spring 容器
    • 使用 @ConfigurationProperties(prefix="") 指定加载的数据
    1
    2
    3
    4
    5
    6
    7
    8
    9
    10
    11
    12
    13
    14
    15
    16
    package fr.gdai.config;

    /**
    * 1. 定义数据模型用来封装yaml文件中对应的数据
    * 2. 使用 @Component 将其放入spring容器
    * 3. 使用 @ConfigurationProperties 指定加载的数据
    */
    @Component
    @ConfigurationProperties(prefix = "datasource")
    public class MyDataSource {
    private String driver;
    private String url;
    private String username;
    private String password;
    // 省略 getter, setter, constructor
    }
  2. Controller 中装载该封装类:

    1
    2
    3
    4
    5
    6
    7
    8
    9
    10
    11
    12
    13
    14
    15
    16
    package fr.gdai.controller;

    @RestController
    @RequestMapping("/books")
    public class BookController {

    @Autowired
    private MyDataSource myDataSource;

    @GetMapping
    public String printDemo() {
    String s = myDataSource.toString();
    System.out.println(s);
    return s;
    }
    }
  3. 我们通过发送 GET 请求访问到该方法

    1
    http://localhost:8081/test/books

    结果输出:

    1
    MyDataSource{driver='com.mysql.jdbc.Driver', url='jdbc:mysql://localhost:3306/database', username='root', password='root'}
小结
  1. 使用 @ConfigurationProperties(prefix="") 注解绑定配置信息到封装类中
  2. 封装类需要定义为 Spring 管理的 Bean@Component),否则无法进行属性注入

4 SpringBoot 的技术整合