知识回顾:Appli Web课程笔记 - MVC
在 Spring 中我们重点介绍了数据访问层 dao 与业务逻辑层 service 通过 Spring 框架的实现。SpringMVC 是 Spring 的一个子项目,是表述层 Controller 的一整套完备解决方案。
在如上的设计中:
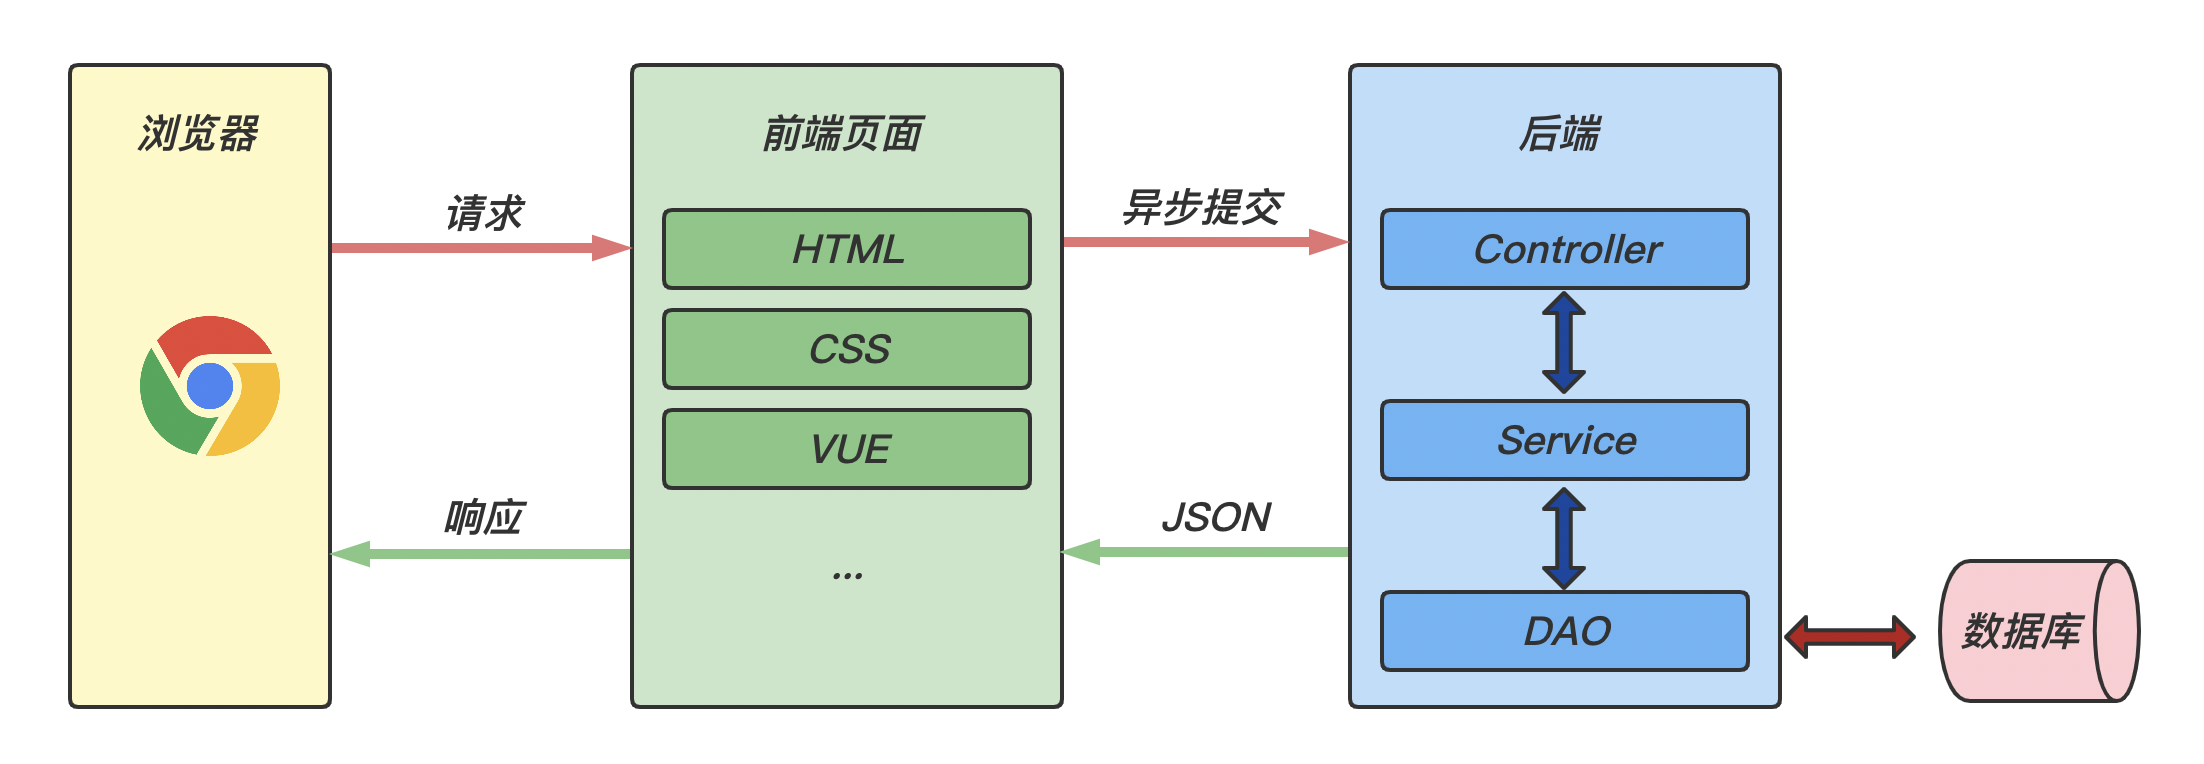
controller 负责请求和数据的接收,接收后将其转发给 service 进行业务处理service 根据需要会调用 dao 对数据进行增删改查dao 把数据处理完后,将结果交给 service,service再交给 controllercontroller 根据需求将 Model和 View 组合起来生成页面,转发给前端浏览器
这样做的好处就是 controller 可以处理多个请求,并对请求进行分发,执行不同的业务操作。
随着互联网的发展,上面的模式因为是同步调用,性能慢慢的跟不需求,所以异步调用
因为是异步调用,所以后端不需要返回 View 视图,将其去除
前端如果通过异步调用的方式进行交互,后端就需要将返回的数据转换成 JSON
Spring 家族原生产品,与 IOC 容器无缝对接
基于原生 Servlet DispatcherServlet 来进行请求的统一管理 将 servlet 封装为 DispatcherServlet 。
代码清新简洁;内部组件化程度高
性能高,适合大型互联网项目需求。
maven 项目.xml 配置文件SpringMVC 的配置文件默认的位置和名称:
位置:${project_path}/src/main/webapp/WEB-INF/ 目录下
名称:<servlet-name>-servlet.xml,在本例子中即为 SpringMVC-servlet.xml
1 2 3 4 <context:component-scan base-package ="fr.gdai.springmvc.controller" />
1 2 3 4 5 6 package fr.gdai.springmvc.config;@Configuration @ComponentScan("fr.gdai.springmvc.controller") public class SpringMvcConfig {}
tomcat 服务器加载配置我们之前说过,SpringMVC 的本质是 servlet,通过将 servlet 封装成 DispatcherServlet,从而对浏览器的请求统一管理
web.xml 配置文件我们需要在 web.xml 中配置 DispatcherServlet。如下
1 2 3 4 5 6 7 8 9 10 11 12 13 14 15 16 17 <servlet > <servlet-name > SpringMVC</servlet-name > <servlet-class > org.springframework.web.servlet.DispatcherServlet</servlet-class > </servlet > <servlet-mapping > <servlet-name > SpringMVC</servlet-name > <url-pattern > /</url-pattern > </servlet-mapping >
在配置 SpringMVC 的前端控制器 DispatcherServlet 时,<url-pattern> 中 / 与 /* 的区别:
1 2 3 4 5 6 7 8 9 10 11 12 13 14 15 16 17 18 19 20 21 22 23 24 25 26 27 package fr.gdai.springmvc.config;public class DispatcherServletUtil extends AbstractDispatcherServletInitializer { @Override protected WebApplicationContext createServletApplicationContext () { AnnotationConfigWebApplicationContext webCtx = new AnnotationConfigWebApplicationContext (); webCtx.register(SpringMvcConfig.class); return webCtx; } @Override protected String[] getServletMappings() { return new String []{"/" }; } @Override protected WebApplicationContext createRootApplicationContext () { return null ; } }
根据以上的配置,我们给出一种更加简洁的配置方式。其实际上是继承 AbstractDispatcherServletInitializer 的子类 AbstractAnnotationConfigDispatcherServletInitializer :
1 2 3 4 5 6 7 8 9 10 11 12 13 14 15 16 17 18 19 20 package fr.gdai.springmvc.config;public class DispatcherServletUtil extends AbstractAnnotationConfigDispatcherServletInitializer { @Override protected Class<?>[] getRootConfigClasses() { return new Class [0 ]; } @Override protected Class<?>[] getServletConfigClasses() { return new Class []{SpringMvcConfig.class}; } @Override protected String[] getServletMappings() { return new String []{"/" }; } }
controller 及测试我们继续编写 controller 包下的代码以完成测试:
1 2 3 4 5 6 7 8 9 10 11 12 13 14 15 16 17 18 19 20 21 22 23 24 package fr.gdai.springmvc.controller;@Controller public class UserController { @RequestMapping("/save") @ResponseBody public String save () { System.out.println("user saved!" ); return "{'module':'springmvc:save()'}" ; } @RequestMapping("/delect") @ResponseBody public String delect () { System.out.println("user delected!" ); return "{'module':'springmvc:delect()'}" ; } }
我们可以启动 tomcat 服务器来测试这个save() 方法;也可以在 maven 中设置 tomcat 的插件:
在 maven 的配置文 pom.xml 中设置 tomcat 的插件
1 2 3 4 5 6 7 8 9 10 11 12 13 <build > <plugins > <plugin > <groupId > org.apache.tomcat.maven</groupId > <artifactId > tomcat7-maven-plugin</artifactId > <version > 2.1</version > <configuration > <port > 8081</port > <path > /springmvc</path > </configuration > </plugin > </plugins > </build >
然后在 IDEA 中新建一个 Run/Debug Configuration
1 2 Name : xxx Run : tomcat7:run
启动服务器。在浏览器中输入
1 http://localhost:8081/springmvc/save
可以观察到页面显示 {'module':'springmvc:save'} 且控制台输出 user saved!
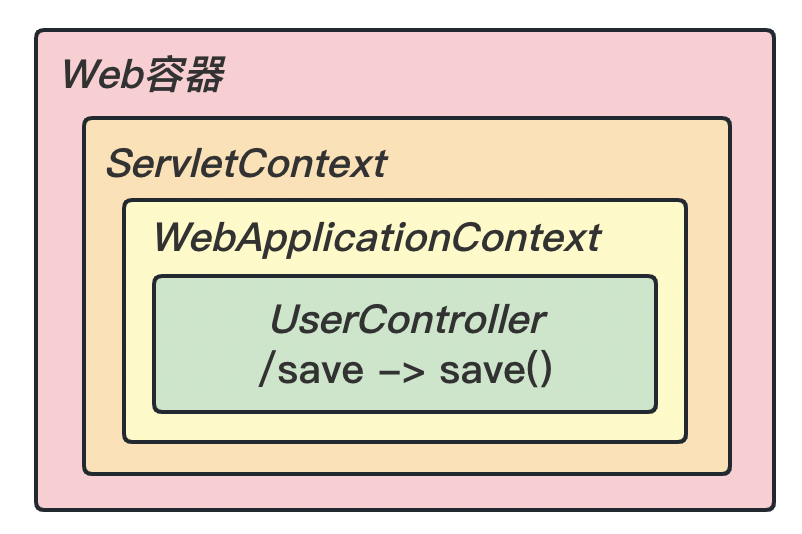
服务器启动,执行 DispatcherServletUtil 类,初始化 web 容器
执行createServletApplicationContext()方法,创建了 webApplicationContext 对象
加载 SpringMvcConfig.class
执行 @ComponentScan 加载对应的 Bean
加载 UserController,每个 @RequestMapping("/xxx") 的名称对应一个具体的方法 SpringMVC 统一管理,并不是由每个 Bean 单独管理。
执行 getServletMappings() 方法,定义所有的请求都通过 SpringMVC
发送请求 http://localhost:8081/springmvc/save
web 容器发现所有请求都经过 SpringMVC,将请求交给 SpringMVC` 处理
解析请求路径 /save
由 /save 匹配执行对应的方法 save()
执行 save()
检测到有 @ResponseBody 直接将 save() 方法的返回值作为响应体返回给请求方
在一个完整的项目中,我们考虑如下的项目结构:
1 2 3 4 5 6 7 8 9 10 11 12 13 14 15 16 17 18 19 |-- fr.gdai |-- config |-- SpringConfig.java |-- JDBCDataSource.java |-- MyBatisConfig.java |-- SpringMvcConfig.java |-- DispatcherServletUtil.java |-- domain |-- User.java |-- Book.java |-- dao |-- UserDao.java |-- BookDao.java |-- service |-- UserService.java |-- BookService.java |-- controller |-- UserController.java |-- BookController.java
我们可以很容易的发现,在我们的项目中有几种不同种类的 Bean:
Spring 维护的 Bean 对象:
业务 Bean:service 等
功能 Bean:JDBCDataSource 等
SpringMVC 维护的 Bean 对象:
我们在包扫描 @ComponentScan() 时需要区分不同的作用域:
SpringConfig.java
1 2 3 4 5 6 7 8 9 @Configuration @ComponentScan({"fr.gdai.springmvc.dao", "fr.gdai.springmvc.service"}) @ComponentScan(value = "fr.gdai.springmvc", excludeFilters = @ComponentScan.Filter( type = FilterType.ANNOTATION, classes = Controller.class)) public class SpringConfig {}
SpringMvcConfig.java
1 2 3 4 @Configuration @ComponentScan("fr.gdai.springmvc.controller") public class SpringMvcConfig {}
在之前的 SpringMVC 中 DispatcherServlet 的设置中,我们定义了需要 SpringMVC 处理的请求路径:
1 2 3 4 5 @Override protected String[] getServletMappings() { return new String []{"/" }; }
那么在这个路径下的所有请求都会被 SpringMVC 所拦截。当用户想访问一个静态资源,如 html 页面、图片等,该请求也会被 SpringMVC 拦截,并尝试将其处理,而此时就会出现问题。
例如,我们使用 GET 方式请求静态资源 index.html
1 http://localhost:8081/pages/index.html
SpringMVC 会拦截该请求,并匹配 DispatcherServlet 所管理的 Controller 中是否有满足 /pages/index.html 的 GET 请求的处理。从而与我们的要求不符,出现错误。此时就需要 SpringMVC “放行”该请求,使其交给 tomcat 服务器直接提供该静态资源。
SpringMVC 框架提供了一个 WebMvcConfigurationSupport 的类来解决该问题,我们需要创建一个类来继承它,通过重写 addResourceHandlers() 方法来实现:
1 2 3 4 5 6 7 8 9 10 11 12 package fr.gdai.springmvc.config;@Configuration public class SpringMvcSupport extends WebMvcConfigurationSupport { @Override protected void addResourceHandlers (ResourceHandlerRegistry registry) { registry.addResourceHandler("/pages/**" ).addResourceLocations("/pages/" ); registry.addResourceHandler("/css/**" ).addResourceLocations("/css/" ); registry.addResourceHandler("/js/**" ).addResourceLocations("/js/" ); registry.addResourceHandler("/images/**" ).addResourceLocations("/images/" ); } }
然后将这个 @Configuration 添加到 SpringMvcConfig.java 的扫描范围内
1 2 3 4 5 6 7 package fr.gdai.springmvc.config;@Configuration @ComponentScan({"fr.gdai.springmvc.controller", "fr.gdai.springmvc.config"}) @EnableWebMvc public class SpringMvcConfig {}
我们考虑如下的项目结构:
1 2 3 4 5 |-- fr.gdai |-- ... |-- controller |-- UserController.java |-- BookController.java
UserController.java
1 2 3 4 5 6 7 8 9 10 11 12 13 @Controller public class UserController { @Autowired private UserServiceImpl userService; @RequestMapping("/save") @ResponseBody public String userSave () { System.out.println("user saved!" ); return "{'module':'springmvc:userSave()'}" ; } }
BookController.java
1 2 3 4 5 6 7 8 9 10 11 12 13 @Controller public class BookController { @Autowired private BookServiceImpl bookService; @RequestMapping("/save") @ResponseBody public String bookSave () { System.out.println("book saved!" ); return "{'module':'springmvc:bookSave()'}" ; } }
在两个 @Controller 中,我们设置了两个相同的请求路径映射 @RequestMapping("/save")。这种情况是无法成功初始化 servlet 的,错误信息:
1 Initialization of bean failed; nested exception is java.lang.IllegalStateException: Cannot map handler 'userController' to URL path [/save]: There is already handler of type [class fr.gdai.springmvc.controller.BookController] mapped.
我们可以完善请求路径映射来解决这个问题:
1 2 3 4 5 6 7 8 9 10 @Controller public class UserController { @RequestMapping("/user/save") @ResponseBody public String userSave () { System.out.println("user saved!" ); return "{'module':'springmvc:userSave()'}" ; } }
1 2 3 4 5 6 7 8 9 10 @Controller public class BookController { @RequestMapping("/book/save") @ResponseBody public String bookSave () { System.out.println("book saved!" ); return "{'module':'springmvc:bookSave()'}" ; } }
或者使用请求路径的前缀:
1 2 3 4 5 6 7 8 9 10 11 @Controller @RequestMapping("/user") public class UserController { @RequestMapping("/save") @ResponseBody public String userSave () { System.out.println("user saved!" ); return "{'module':'springmvc:userSave()'}" ; } }
名称:@RequestMapping(value = "PATH/PREFIX")
即可用于 Controller的 方法的注解
也可用于 Controller 类的注解 前缀
Get 请求我们知道,使用 Get 请求的参数 param1 和 param2 会在 url 中体现出来。如下所示
1 http://localhost:8081/xxx/xxx?param1=value1¶m2=value2
所以普通基本类型 param1 和 param2 都可以按照如下形式,被服务器端的方法接收:
1 2 3 @RequestMapping("/xxx/xxx") @ResponseBody public void xxx (Type param1, Type param2) { }
Post 请求对于 Post 请求,我们需要注意:与 servlet 的 doGet() 和 doPost() 方法不同,SpringMVC 的不区分这两种方法 代码是没有区别的
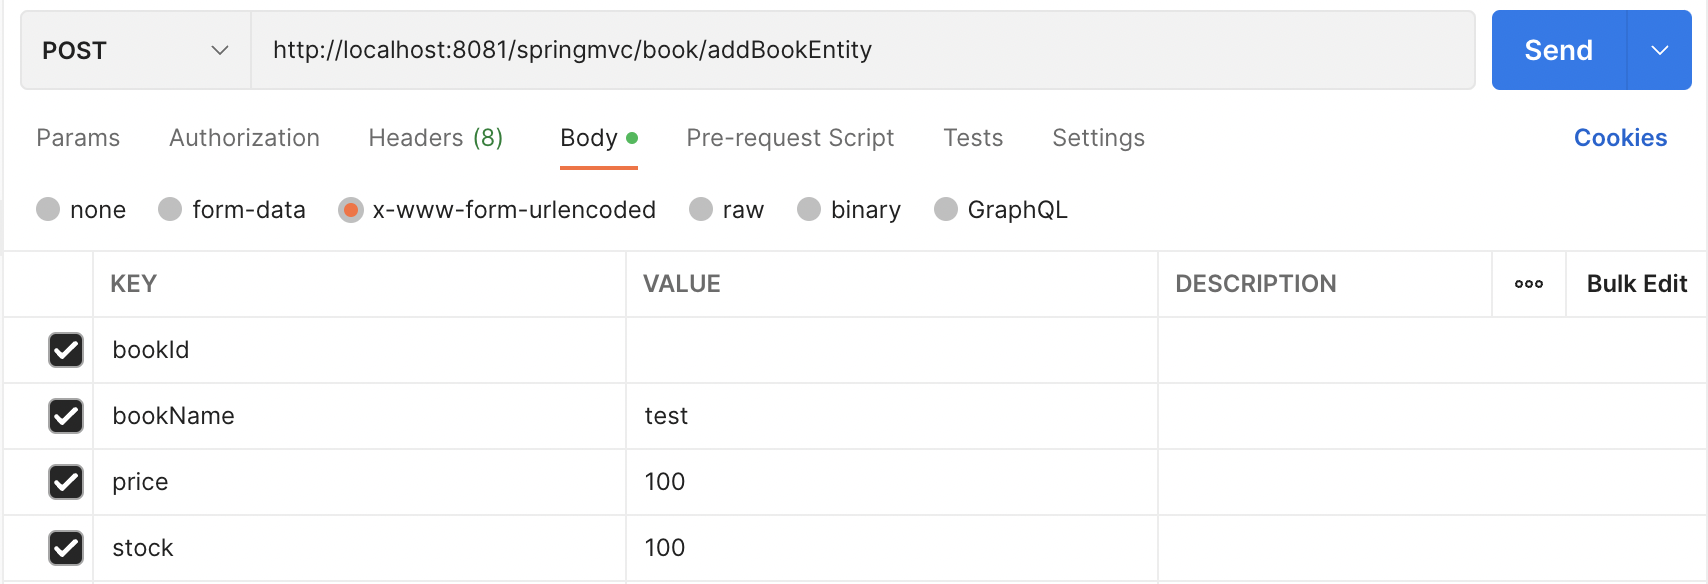
在 Post 请求中,所有的请求参数都在请求体 RequestBody url 中。在 PostMan 中可以通过如下方式模拟发送 Post 请求:
服务器端的方法依然是
1 2 3 @RequestMapping("/xxx/xxx") @ResponseBody public void xxx (Type param1, Type param2) { }
p.s.:根据网友反馈,Tomcat ver.8 以上的版本中,Get 请求不存在中文乱码问题,Post 请求中的中文乱码。
对于 Get 请求的中文乱码问题 Get 请求参数是通过 url 传递的,所以我们需要设置 tomcat 服务器的 urlEncoding 属性为 utf-8。在 Maven 集成的 tomcat 插件中,我们需要在 pom.xml 文件中关于 tomcat 的设置中添加如下内容:
1 2 3 <configuration > <uriEncoding > utf-8</uriEncoding > </configuration >
对于 Post 请求的中文乱码问题 servlet 中的 Filter 过滤器中设置编码类型。在 SpringMVC 中,我们依然可以在 DispatcherServlet 的配置中通过设置 Filter 的方法
1 2 3 4 5 6 7 8 9 @Override protected Filter[] getServletFilters() { CharacterEncodingFilter filter = new CharacterEncodingFilter (); filter.setEncoding("utf-8" ); return new Filter []{filter}; }
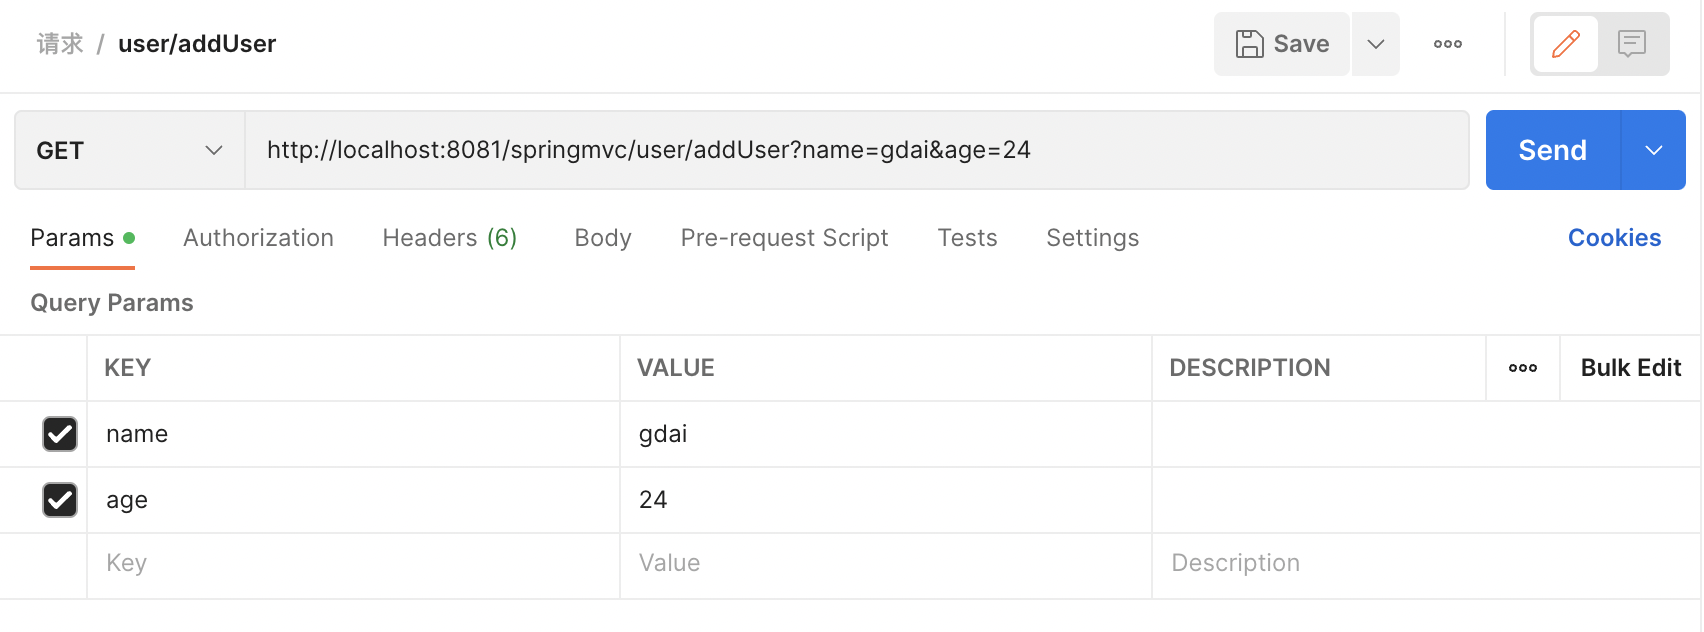
url 地址传递参数,url 地址参数名与形参变量名相同,定义形参即可接收参数。
1 2 3 4 5 6 7 @RequestMapping("/addUser") @ResponseBody public String addUser (String name, int age) { System.out.println("普通参数传递 : addUser ---> name = " + name); System.out.println("普通参数传递 : addUser ---> age = " + age); return "{'module':'springmvc:addUser()'}" ; }
1 2 普通参数传递 : addUser ---> name = gdai 普通参数传递 : addUser ---> age = 24
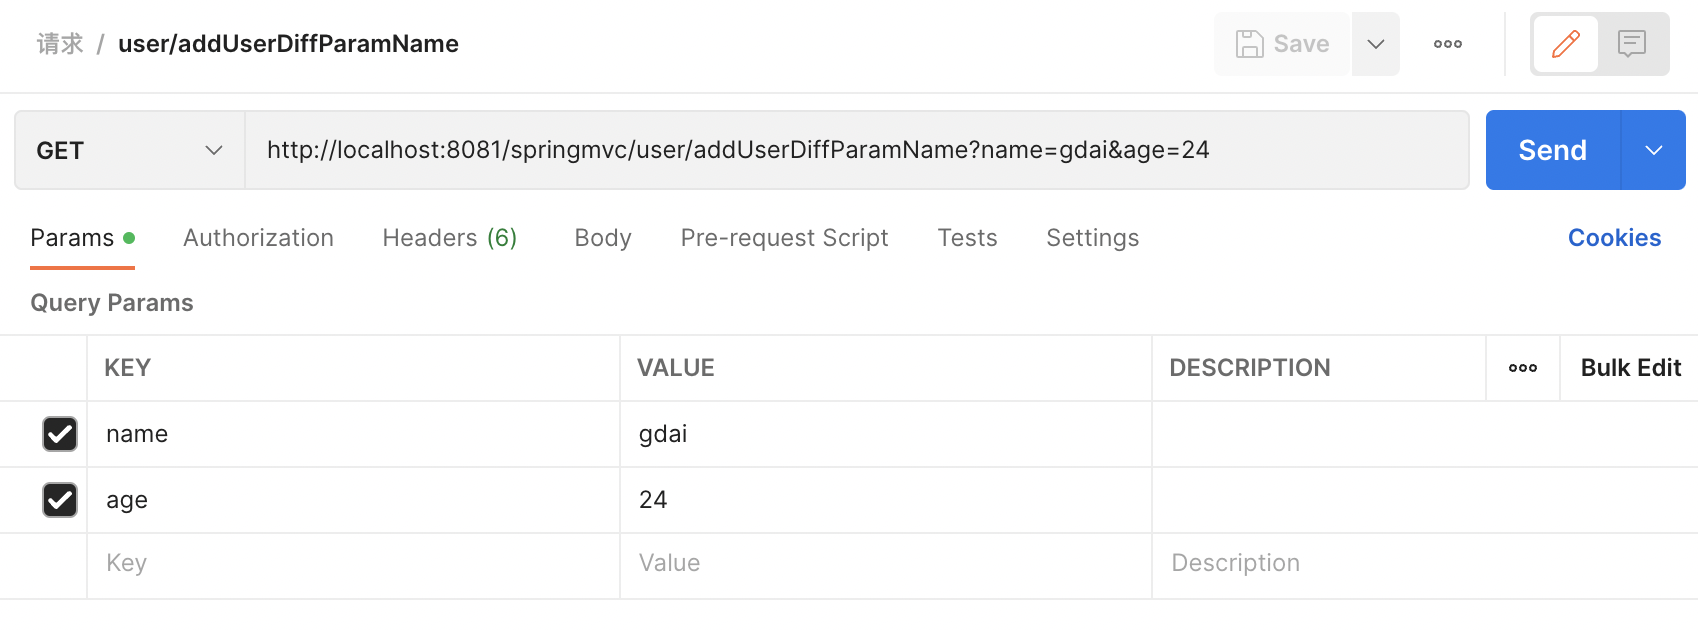
url 地址传递参数。若 url 地址参数名与形参变量名不相同 @RequestParam() 注解定义形参即可接收参数。
1 2 3 4 5 6 7 8 @RequestMapping("/addUserDiffParamName") @ResponseBody public String addUserDiffParamName (@RequestParam("name") String userName, @RequestParam("age") int userAge) { System.out.println("普通参数(不同参数名)传递 : addUser ---> name = " + userName); System.out.println("普通参数(不同参数名)传递 : addUser ---> age = " + userAge); return "{'module':'springmvc:addUser()'}" ; }
1 2 普通参数(不同参数名)传递 : addUser ---> name = gdai 普通参数(不同参数名)传递 : addUser ---> age = 24
@RequestParam 作为形参注解 绑定请求参数与方法内形参间的关系
其中,required 参数:是否为必传参数
defaultValue 参数:参数默认值
在日常编程中,不同的系统中的日期类型数据也不尽相同:
1998-01-311998/01/3131/01/1998,等
在 SpringMVC 中,默认的日期格式为 yyyy/MM/dd,可以自动的将字符串 yyyy/MM/dd 转化成 Date 类型的数据。如下所示
1 2 3 4 5 6 7 @RequestMapping("/dateParam") @ResponseBody public String dateParam (Date date) { System.out.println("日期类型集合参数传递 ---> " + date); return "{'module':'springmvc:dateParam()'}" ; } }
1 日期类型集合参数传递 ---> Sat Jan 31 00:00:00 CET 1998
我们也可以更改为其他的格式,则需要在 Date 形参前使用 @DateTimeFormat(pattern="") 注解指定日期格式。如下所示:
1 2 3 4 5 6 @RequestMapping("/dateParam") @ResponseBody public String dateParam (@DateTimeFormat(pattern="yyyy-MM-dd HH:mm:ss") Date date) { System.out.println("日期类型集合参数传递 ---> " + date); return "{'module':'springmvc:dateParam()'}" ; }
1 日期类型集合参数传递 ---> Sat Jan 31 01:59:59 CET 1998
更多情况下,我们使用实体类的参数作为形参传入方法中。在 SpringMVC 框架中,可以自动地将请求内容中的类的属性创建成一个实体类。如下所示:
1 2 3 4 5 6 @RequestMapping("/addBookEntity") @ResponseBody public String addBookEntity (Book book) { System.out.println("实体类型参数传递 ---> " + book); return "{'module':'springmvc:addBookEntity()'}" ; }
1 实体类型参数传递 ---> Book{bookId=null, bookName='test', price=100, stock=100}
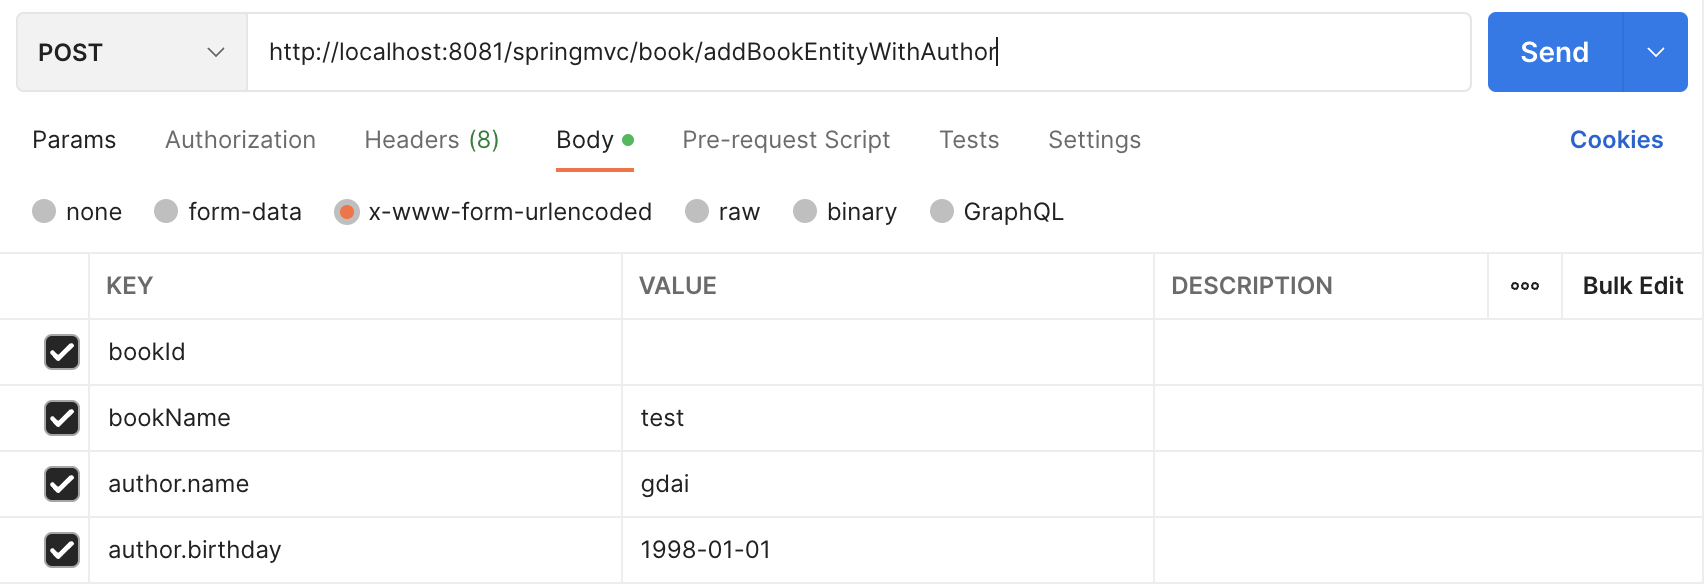
如果在实体类中引用了其他类,在请求参数中可以使用 Xxx.xxx 对这个引用类进行创建并赋值,如下
1 实体类型参数传递 ---> Book{bookId=null, bookName='test', author=Person{name='gdai', birthday='1998-01-01'}}
对于数组类型的接收,我们可以使用相同的参数名
1 2 3 4 5 6 @RequestMapping("/arrayParam") @ResponseBody public String arrayParam (String[] args) { System.out.println("数组类型参数传递 ---> " + Arrays.toString(args)); return "{'module':'springmvc:arrayParam()'}" ; }
1 数组类型参数传递 ---> [val1, val2, val3]
在集合类型(Set、List、Map 等类型)中,不能直接像数组类型那样直接使用相同的参数名来实现。因为我们如果不使用 @RequestParam 指定参数,SpringMVC 会将 List 视为一个没有实现类的接口,从而报错 Failed to instantiate [java.util.List]: Specified class is an interface。
所以在使用集合类型参数时,我们需要使用 @RequestParam 指定参数
1 2 3 4 5 6 @RequestMapping("/listParam") @ResponseBody public String listParam (@RequestParam List<String> args) { System.out.println("集合类型参数传递 ---> " + args); return "{'module':'springmvc:listParam()'}" ; }
1 集合类型参数传递 ---> [val1, val2, val3]
JSON 集合类型参数JSON 是一种轻量级的数据交换格式 JSON 遵循一定的语法词法结构来格式化数据,在数据的接收段也应该有对应的解释器来将这种格式化的数据转化成程序内的属性。所以
(1)我们首先需要在 Maven 中导入一个反序列化 JSON 的工具 jackson-databind
1 2 3 4 5 6 <dependency > <groupId > com.fasterxml.jackson.core</groupId > <artifactId > jackson-databind</artifactId > <version > 2.12.2</version > </dependency >
(2)在 SpringMVC 中开启自动地将 JSON 转化成 Java 的类属性:在 SpringMVCConfig.java 中添加 @EnableWebMvc 注解
注意 @EnableWebMvc 的功能有许多,将在后面的内容中介绍。
1 2 3 4 5 6 7 package fr.gdai.springmvc.config;@Configuration @ComponentScan("fr.gdai.springmvc.controller") @EnableWebMvc public class SpringMvcConfig {}
(3)在后端相关代码的形参前添加 @RequestBody 注解
1 2 3 4 5 6 @RequestMapping("/listParamForJson") @ResponseBody public String listParamForJson (@RequestBody List<String> args) { System.out.println("JSON类型参数传递 ---> " + args); return "{'module':'listParamForJson()'}" ; }
(4)在 PostMan 中使用 JSON 格式传输请求数据:POST -> Body -> raw -> JSON
(5)测试结果
1 JSON类型参数传递 ---> [test1, test2, test3]
JSON 实体类型参数对于 JSON 的实体类型参数,后端的相关代码与表单的形式类似:
1 2 3 4 5 6 @RequestMapping("/entityParamForJson") @ResponseBody public String entityParamForJson (@RequestBody Book book) { System.out.println("JSON实体类型参数传递 ---> " + book); return "{'module':'springmvc:entityParamForJson()'}" ; }
1 JSON实体类型参数传递 ---> Book{bookId=null, bookName='testForJSON', price=200, stock=200}
相同的,如果在实体类中引用了其他类,也可以在 JSON 格式中使用嵌套的形式赋值:
1 JSON实体类型参数传递 ---> Book{bookId=null, bookName='test', author=Person{name='gdai', birthday='1998-01-01'}}
JSON 实体集合类型参数对于 JSON 的实体集合类型参数(List<Book> books),后端的相关代码与表单的形式类似:
1 2 3 4 5 6 @RequestMapping("/entityListParamForJson") @ResponseBody public String entityListParamForJson (@RequestBody List<Book> books) { System.out.println("JSON实体类型集合参数传递 ---> " + books); return "{'module':'springmvc:entityListParamForJson()'}" ; }
1 2 3 4 JSON实体类型集合参数传递 ---> [Book{bookId=null, bookName='test01', price=100, stock=100}, Book{bookId=null, bookName='test02', price=200, stock=200}, Book{bookId=null, bookName='test03', price=300, stock=300}]
所谓“响应”,就是将用户的请求经过处理后的结构反馈给用户。响应大题分为两种类型:响应页面 响应数据
我们在之前的请求部分中使用了 @ResponseBody 来将函数返回的内容作为响应体给用户浏览器。当我们想响应某个页面时,我们不需要使用该注解,而是将响应页面的相对 webapp 的地址作为字符串返回
文件系统结构
1 2 3 4 5 6 7 8 9 10 |-- ... |-- java |-- fr.gdai |-- ... |-- controller |-- UserController.java |-- BookController.java |-- webapp |-- WEB-INF |-- index.jsp
1 2 3 4 5 6 7 8 9 10 @Controller @RequestMapping("/book") public class BookController { @RequestMapping("/jumpToIndex") public String jumpToIndex () { System.out.println("跳转到index" ); return "/index.jsp" ; } }
此时我们在浏览器中输入
1 http://localhost:8081/springmvc/book/jumpToIndex
即可跳转到 index.jsp 页面
对于响应数据 @ResponseBody 注解。下面以字符串为例,其他基本数据类型同理:
1 2 3 4 5 6 7 8 9 10 11 @Controller @RequestMapping("/book") public class BookController { @RequestMapping("/toText") @ResponseBody public String toText () { System.out.println("返回纯文本信息" ); return "response text" ; } }
此时我们在浏览器中输入
1 http://localhost:8081/springmvc/book/toText
即可得到响应的数据:
1 2 3 4 5 6 7 8 9 10 11 @Controller @RequestMapping("/book") public class BookController { @RequestMapping("/toArray") @ResponseBody public int [] toText() { System.out.println("返回数组信息" ); return new int []{1 ,2 ,3 }; } }
此时我们在浏览器中输入
1 http://localhost:8081/springmvc/book/toArray
即可得到响应的数据:
如果我们想响应一个实体类对象,只需要返回该实体类对象,并将其作为响应体 @ResponseBody 即可。SpringMVC 框架与 jackson-databind 可以自动将实体类对象的属性数据转化为 JSON 格式
1 2 3 4 5 6 7 8 9 10 11 @Controller @RequestMapping("/book") public class BookController { @RequestMapping("/toEntity") @ResponseBody public Book toEntity () { System.out.println("返回实体类信息" ); return new Book (null , "responseJSON" , 100 , 100 ); } }
此时我们在 PostMan 的 Get 请求中输入
1 http://localhost:8081/springmvc/book/toEntity
即可得到响应的数据:
1 2 3 4 5 6 { "bookId" : null , "bookName" : "responseJSON" , "price" : 100 , "stock" : 100 }
该例子我们结合了 MySQL、MyBatis、Spring 和 SpringMVC 框架对数据库进行查询,并响应查询结果
1 2 3 4 5 6 7 8 9 10 11 12 13 14 15 @Controller @RequestMapping("/book") public class BookController { @Autowired private BookServiceImpl bookService; @RequestMapping("/toEntityList") @ResponseBody public List<Book> showAllBook () { List<Book> books = bookService.showAllBooks(); System.out.println("返回实体集合信息" ); return books; } }
此时我们在 PostMan 的 Get 请求中输入
1 http://localhost:8081/springmvc/book/toEntityList
即可得到响应的数据:
1 2 3 4 5 6 7 8 9 10 11 12 13 14 [ { "bookId" : 1 , "bookName" : "L_etranger" , "price" : 100 , "stock" : 100 } , { "bookId" : 2 , "bookName" : "Nausea" , "price" : 100 , "stock" : 200 } ]
通过前面的学习,我们可以看到:在响应请求时,响应数据分为很多类型:基本数据类型、数组、JSON 等,前端人员在拿到这些信息时需要对于这些信息的类型再做处理,显然这样又增加了前后端的耦合度。此时我们希望通过封装响应体中的响应数据
我们创建一个结果类 Result,其中声明若干属性:(该类的属性并不是固定的,根据需要增减)
<T> data:用来存放请求处理后的结果 Integer code:用来描述操作的种类 String msg:用来存放返回到前端的消息
1 2 3 4 5 6 7 8 9 package fr.gdai.springmvc.controller;public class Result <T> { private Integer code; private T data; private String msg; }
1 2 3 4 5 6 7 8 9 10 11 12 13 package fr.gdai.springmvc.controller;public class ResultCode { public static final Integer INSERT_SUCC = 20011 ; public static final Integer DELETE_SUCC = 20021 ; public static final Integer UPDATE_SUCC = 20031 ; public static final Integer SELECT_SUCC = 20041 ; public static final Integer INSERT_ERR = 20010 ; public static final Integer DELETE_ERR = 20020 ; public static final Integer UPDATE_ERR = 20030 ; public static final Integer SELECT_ERR = 20040 ; }
最后,将我们所有的响应数据都通过 Result 类反馈给前端浏览器。我们以一个“结合了 MySQL、 MyBatis、Spring 和 SpringMVC 框架对数据库进行查询,并响应查询结果”的例子作为演示:
1 2 3 4 5 6 7 8 9 10 11 12 13 14 15 16 17 18 19 20 21 22 23 24 25 @Controller @RequestMapping("/book") public class BookController { @Autowired private BookServiceImpl bookService; @RequestMapping("/toEntityList") @ResponseBody public Result showAllBook () { Integer code; String message; List<Book> books = bookService.showAllBooks(); if (books == null ){ code = ResultCode.SELECT_ERR; message = "查询结果为空,请重试" ; } else { code = ResultCode.SELECT_SUCC; message = "查询成功" ; } System.out.println("返回实体集合信息" ); return new Result (code, books, message); } }
此时我们在 PostMan 的 Get 请求中输入
1 http://localhost:8081/springmvc/book/toEntityList
即可得到响应的数据:
1 2 3 4 5 6 7 8 9 10 11 12 13 14 15 16 17 18 { "code" : 20041 , "data" : [ { "bookId" : 1 , "bookName" : "L_etranger" , "price" : 100 , "stock" : 100 } , { "bookId" : 2 , "bookName" : "Nausea" , "price" : 100 , "stock" : 200 } ] , "msg" : "查询成功" }
RESTREST 简介REST (Representation State Transfer),表现形式状态转换。通俗来讲就是:资源
Resource:资源,即数据(前面说过网络的核心)。比如 newsfeed,friends等;
Representational:某种表现形式,比如用 JSON,XML,JPEG等;
State Transfer:状态变化。通过HTTP动词实现。
传统风格的资源描述形式:
1 2 http://localhost:8081/user/getById?id=1 http://localhost:8081/user/saveUser
REST 风格的资源描述形式(RESTful
1 2 http://localhost:8081/user/1 http://localhost:8081/user
优点:
隐藏资源的访问行为 书写简化
我们通过 REST 风格来描述资源,使得无法通过地址得知对资源是何种操作,那么我们又该如何确定对于资源的操作
一般来说,几乎所有的主流网络协议都有两个部分,一个是协议头 协议体 HTTP 的动词
下面是 HTTP 的动词 GET、PUT、DELETE 和 POST。
方法
描述
幂等
GET用于查询操作,对应于数据库的 select 操作
✔︎
PUT用于所有的信息更新,对应于数据库的 update操作
✔︎︎
DELETE用于更新操作,对应于数据库的 delete 操作
✔︎︎
POST用于新增操作,对应于数据库的 insert 操作
✘
HEAD用于返回一个资源对象的“元数据”,或是用于探测 API 是否健康
✔︎
PATCH用于局部信息的更新,对应于数据库的 update 操作
✘
OPTIONS获取 API 的相关的信息。
✔︎
注意
描述模块的名称通常使用复数,也就是使用复数的形式表示此类资源,而非单个资源。例如 users、books 等
RESTful 风格的改写我们按照之前介绍的传统风格的资源描述形式重新写一个 Controller:
1 2 3 4 5 6 7 8 9 10 11 12 13 14 15 16 17 18 19 20 21 22 23 24 25 26 27 28 29 30 31 32 33 package fr.gdai.springmvc.controller;@Controller public class TestController { @RequestMapping("/test/select") @ResponseBody public String select (int id) { System.out.println("test:select id=" + id); return "{'module':'test_select()'}" ; } @RequestMapping("/test/update") @ResponseBody public String update (@RequestBody User user) { System.out.println("test:update " + user); return "{'module':'test_update()'}" ; } @RequestMapping("/test/delete") @ResponseBody public String delete (int id) { System.out.println("test:delete id=" + id); return "{'module':'test_delete()'}" ; } @RequestMapping("/test/insert") @ResponseBody public String insert (@RequestBody User user) { System.out.println("test:insert " + user); return "{'module':'test_insert()'}" ; } }
现在我们就开始着手在我们已经掌握的传统风格的基础上,将其改写成 REST 风格:
关于 select(int id) 方法的改写
首先我们将 @RequestMapping() 内的 value 值 "/users";
然后需要指定 @RequestMapping() 内的 method 值
对于请求体内传递的参数 @RequestBody 来指定相关的参数
对于非请求体内传递的参数 select() 方法中的参数 id,与之前不同的是,参数的传递使用的是路径的方式,即
所以,我们需要在方法的形参前使用 @PathVariable 注解 请求路径中使用 {id} 与接收数据的形参
1 2 3 4 5 6 @RequestMapping(value="/tests", method=RequestMethod.POST) @ResponseBody public String select (int id) { System.out.println("test:select id=" + id); return "{'module':'test_select()'}" ; }
将其余方法都按照上述步骤更改为其对应的请求行为:
1 2 3 4 5 6 7 8 9 10 11 12 13 14 15 16 17 18 19 20 21 22 23 24 25 26 27 28 29 30 31 32 33 package fr.gdai.springmvc.controller;@Controller public class TestController { @RequestMapping(value = "/tests/{id}", method = RequestMethod.GET) @ResponseBody public String select (@PathVariable int id) { System.out.println("test:select id=" + id); return "{'module':'test_select()'}" ; } @RequestMapping(value = "/tests", method = RequestMethod.PUT) @ResponseBody public String update (@RequestBody User user) { System.out.println("test:update " + user); return "{'module':'test_update()'}" ; } @RequestMapping(value = "/tests/{id}", method = RequestMethod.DELETE) @ResponseBody public String delete (@PathVariable int id) { System.out.println("test:delete id=" + id); return "{'module':'test_delete()'}" ; } @RequestMapping(value = "/tests", method = RequestMethod.POST) @ResponseBody public String insert (@RequestBody User user) { System.out.println("test:insert " + user); return "{'module':'test_insert()'}" ; } }
@RequestBody、@RequestParam 与 @PathVariable
@RequestBody 用于接收请求体内的数据 JSON 数据;@RequestParam 用于接收 url 地址传参 表单传参 @PathVariable 用于接收路径参数 使用 {参数名称} 描述路径参数
后期开发中,发送请求参数超过一个 JSON 格式为主,@RequestBody 应用较广;
如果发送非 JSON 格式数据 @RequestParam 接收请求参数;
采用 RESTful 进行开发,当发送请求参数较少 @PathVariable 接收请求路径参数,常用于传递 id 值。当发送请求参数超过一个 JSON 格式为主。
RESTful 风格我们之前已经成功的将传统风格的请求方式改写成了 RESTful 风格,如下所示。
1 2 3 4 5 6 7 8 9 10 11 12 13 14 15 16 17 18 19 20 21 22 23 24 25 26 27 28 29 30 31 32 33 package fr.gdai.springmvc.controller;@Controller public class TestController { @RequestMapping(value = "/tests/{id}", method = RequestMethod.GET) @ResponseBody public String select (@PathVariable int id) { System.out.println("test:select id=" + id); return "{'module':'test_select()'}" ; } @RequestMapping(value = "/tests", method = RequestMethod.PUT) @ResponseBody public String update (@RequestBody User user) { System.out.println("test:update " + user); return "{'module':'test_update()'}" ; } @RequestMapping(value = "/tests/{id}", method = RequestMethod.DELETE) @ResponseBody public String delete (@PathVariable int id) { System.out.println("test:delete id=" + id); return "{'module':'test_delete()'}" ; } @RequestMapping(value = "/tests", method = RequestMethod.POST) @ResponseBody public String insert (@RequestBody User user) { System.out.println("test:insert " + user); return "{'module':'test_insert()'}" ; } }
但是我们发现,
对于每个方法,都需要分别配置 @RequestMapping 的属性,且 value 的前缀都是 /tests,甚是麻烦。所以我们可以将其简化,在整个 Controller 类前,使用 @RequestMapping("/tests") 简化。
对于每个方法,都使用了响应体 @ResponseBody 来反馈用户浏览器,所以我们也将其置于整个 Controller 类前。
1 2 3 4 5 6 7 8 9 10 11 12 13 14 15 16 17 18 19 package fr.gdai.springmvc.controller;@Controller @RequestMapping("/tests") @ResponseBody public class TestController { @RequestMapping(value = "/{id}", method = RequestMethod.GET) public String select (@PathVariable int id) {...} @RequestMapping(method = RequestMethod.PUT) public String update (@RequestBody User user) {...} @RequestMapping(value = "/{id}", method = RequestMethod.DELETE) public String delete (@PathVariable int id) {...} @RequestMapping(method = RequestMethod.POST) public String insert (@RequestBody User user) {...} }
可也以使用 @RestController 注解进一步简化 @Controller + @ResponseBody
至此,我们的业务代码已经简化到只剩 @RequestMapping(..., method) 注解了。我们任然可以将 @RequestMapping(..., method) 简化成 @MethodMapping,即 @GetMapping、@PutMapping、 @DeleteMapping 和 @PostMapping 等
1 2 3 4 5 6 7 8 9 10 11 12 13 14 15 16 17 18 package fr.gdai.springmvc.controller;@RestController @RequestMapping("/tests") public class TestController { @GetMapping("/{id}") public String select (@PathVariable int id) {...} @PutMapping public String update (@RequestBody User user) {...} @DeleteMapping("/{id}") public String delete (@PathVariable int id) {...} @PostMapping public String insert (@RequestBody User user) {...} }
TODO
SSM 整合在本章节,我们不以实际的项目代码作为展示,只是将配置过程显示出来。首先我们先给出一个项目的基本文件体系:
1 2 3 4 5 6 7 8 9 10 11 12 13 14 15 16 17 18 19 20 21 22 23 24 25 26 27 28 29 30 31 32 33 |-- pom.xml >-- target v-- src >-- test v-- main v-- java v-- fr.gdai.PORJECT_NAME v-- config |-- SpringConfig.java |-- SpringJdbcConfig.java |-- SpringMvcConfig.java |-- SpringMvcSupport.java |-- ServletConfig.java |-- MyBatisConfig.java |-- DataSourceConfig.java >-- domain >-- dao (接口, 关联MyBatis的Mapping文件) v-- service |-- XxxService.java >-- implement >-- controller >-- interceptor v-- resources |-- jdbc.properties v-- fr/gdai/springmvc/dao |-- XxxDao.xml (MyBatis的Mapping文件) v-- webapp >-- WEB-INF >-- pages >-- images >-- css >-- js |-- index.jsp
Maven 构建项目我们使用 Maven 构建项目,在 pom.xml 文件中将打包方式更改为 war:
1 <packaging > war</packaging >
添加依赖坐标:
1 2 3 4 5 6 7 8 9 10 11 12 13 14 15 16 17 18 19 20 21 22 23 24 25 26 27 28 29 30 31 32 33 34 35 36 37 38 39 40 41 42 43 44 45 46 47 48 49 50 51 52 53 54 55 56 57 58 59 60 61 62 63 64 65 66 67 68 69 70 71 <dependencies > <dependency > <groupId > org.springframework</groupId > <artifactId > spring-webmvc</artifactId > <version > 4.3.5.RELEASE</version > </dependency > <dependency > <groupId > javax.servlet</groupId > <artifactId > javax.servlet-api</artifactId > <version > 3.1.0</version > <scope > provided</scope > </dependency > <dependency > <groupId > com.fasterxml.jackson.core</groupId > <artifactId > jackson-databind</artifactId > <version > 2.12.2</version > </dependency > <dependency > <groupId > org.mybatis</groupId > <artifactId > mybatis</artifactId > <version > 3.5.7</version > </dependency > <dependency > <groupId > org.mybatis</groupId > <artifactId > mybatis-spring</artifactId > <version > 1.3.1</version > </dependency > <dependency > <groupId > com.mchange</groupId > <artifactId > c3p0</artifactId > <version > 0.9.5.2</version > </dependency > <dependency > <groupId > org.springframework</groupId > <artifactId > spring-jdbc</artifactId > <version > 4.3.5.RELEASE</version > </dependency > <dependency > <groupId > junit</groupId > <artifactId > junit</artifactId > <version > 4.12</version > <scope > test</scope > </dependency > <dependency > <groupId > org.springframework</groupId > <artifactId > spring-test</artifactId > <version > 4.3.5.RELEASE</version > </dependency > </dependencies >
我们既可以使用单独的 tomcat 服务器,也可以使用 Maven 整合的 tomcat 服务器插件,配置如下:
1 2 3 4 5 6 7 8 9 10 11 12 13 14 15 <build > <plugins > <plugin > <groupId > org.apache.tomcat.maven</groupId > <artifactId > tomcat7-maven-plugin</artifactId > <version > 2.1</version > <configuration > <port > 端口号</port > <path > /项目根目录路径</path > <uriEncoding > utf-8</uriEncoding > </configuration > </plugin > </plugins > </build >
MyBatis 与数据库连接因为本章节不考虑实际项目的数据,所以在此我们不提供数据库建表语句。但是我在下方给出一个数据库快速建表的在线工具,作者:程序员鱼皮
关于 MyBatis 的相关知识,参考以下链接:
下面我们开始设置数据库的连接:
jdbc.properties我们使用 .properties 文件来配置 JDBC 连接信息:
${PROJECT_ROOT}/src/main/resources/jdbc.properties
1 2 3 4 jdbc.driver =com.mysql.jdbc.Driver jdbc.url =jdbc:mysql://localhost:3306/数据库名 jdbc.username =root jdbc.password =root
DataSourceConfig.javafr.gdai.PROJECT_NAME.config.DataSourceConfig.java
1 2 3 4 5 6 7 8 9 10 11 12 13 14 15 16 17 18 19 20 21 22 23 24 25 26 27 package fr.gdai.ssm.config;@PropertySource("classpath:jdbc.properties") public class DataSourceConfig { @Value("${jdbc.driver}") private String driver; @Value("${jdbc.url}") private String url; @Value("${jdbc.username}") private String userName; @Value("${jdbc.password}") private String password; @Bean public DataSource getDataSource () throws PropertyVetoException { ComboPooledDataSource dataSource = new ComboPooledDataSource (); dataSource.setDriverClass(driver); dataSource.setJdbcUrl(url); dataSource.setUser(userName); dataSource.setPassword(password); return dataSource; } }
MyBatisConfig.javafr.gdai.PROJECT_NAME.config.MyBatisConfig.java
1 2 3 4 5 6 7 8 9 10 11 12 13 14 15 16 17 18 19 20 21 22 23 24 package fr.gdai.ssm.config;public class MyBatisConfig { @Bean public SqlSessionFactoryBean sqlSessionFactoryBean (DataSource dataSource) { SqlSessionFactoryBean sqlSessionFactoryBean = new SqlSessionFactoryBean (); sqlSessionFactoryBean.setTypeAliasesPackage("fr.gdai.springmvc.domain" ); sqlSessionFactoryBean.setDataSource(dataSource); return sqlSessionFactoryBean; } @Bean public MapperScannerConfigurer mapperScannerConfigurer () { MapperScannerConfigurer mapperScannerConfigurer = new MapperScannerConfigurer (); mapperScannerConfigurer.setBasePackage("fr.gdai.springmvc.dao" ); return mapperScannerConfigurer; } }
XxxDao.java``fr.gdai.PROJECT_NAME.dao.XxxDao.java`
1 2 3 4 package fr.gdai.springmvc.dao;@Repository public interface XxxDao {...}
XxxDao.xml
注意
要与 XxxDao.java 接口处于同一包下(即 XxxDao 接口的全类名和映射文件的命名空间 namespace 保持一致)
${PROJECT_ROOT}/src/main/resources/fr/gdai/PORJECT_NAME/dao/XxxDao.xml
1 2 3 4 5 6 7 8 9 10 <?xml version="1.0" encoding="UTF-8" ?> <!DOCTYPE mapper PUBLIC "-//mybatis.org//DTD Mapper 3.0//EN" "https://mybatis.org/dtd/mybatis-3-mapper.dtd" > <mapper namespace ="fr.gdai.PORJECT_NAME.dao.XxxDao" > <select id ="methodOfInterface" resultType ="TYPE" > selece * from xxx </select > ... </mapper >
Spring 与 SpringMVC 配置SpringConfig.java我们统一将所有的配置都放在 config 包下:
fr.gdai.PORJECT_NAME.config.SpringConfig.java
1 2 3 4 5 6 7 8 9 10 11 12 package fr.gdai.ssm.config;@Configuration @Import({DataSourceConfig.class, SpringJdbcConfig.class, MyBatisConfig.class}) @ComponentScan(value = "fr.gdai.ssm", excludeFilters = @ComponentScan.Filter( type = FilterType.ANNOTATION, classes = Controller.class)) public class SpringConfig {}
SpringJdbcConfig.javafr.gdai.PORJECT_NAME.config.SpringJdbcConfig.java
1 2 3 4 5 6 7 8 9 10 import org.springframework.jdbc.core.JdbcTemplate;public class SpringJdbcConfig { @Bean public static JdbcTemplate getJdbcTemplate (DataSource dataSource) { JdbcTemplate jdbcTemplate = new JdbcTemplate (); jdbcTemplate.setDataSource(dataSource); return jdbcTemplate; } }
SpringMvcConfig.javafr.gdai.PORJECT_NAME.config.SpringMvcConfig.java
1 2 3 4 5 6 7 8 package fr.gdai.ssm.config;@Configuration @ComponentScan({"fr.gdai.springmvc.controller", "fr.gdai.springmvc.config"}) @EnableWebMvc public class SpringMvcConfig {}
SpringMvcSupport.javafr.gdai.PORJECT_NAME.config.SpringMvcSupport.java
1 2 3 4 5 6 7 8 9 10 11 12 13 14 15 package fr.gdai.ssm.config;@Configuration public class SpringMvcSupport extends WebMvcConfigurationSupport { @Override protected void addResourceHandlers (ResourceHandlerRegistry registry) { registry.addResourceHandler("/pages/**" ).addResourceLocations("/pages/" ); registry.addResourceHandler("/css/**" ).addResourceLocations("/css/" ); registry.addResourceHandler("/js/**" ).addResourceLocations("/js/" ); registry.addResourceHandler("/images/**" ).addResourceLocations("/images/" ); } }
ServletConfig.javafr.gdai.PORJECT_NAME.config.ServletConfig.java
1 2 3 4 5 6 7 8 9 10 11 12 13 14 15 16 17 18 19 20 21 22 23 24 25 26 27 28 29 30 package fr.gdai.ssm.config;public class ServletConfig extends AbstractAnnotationConfigDispatcherServletInitializer { @Override protected Class<?>[] getRootConfigClasses() { return new Class []{SpringConfig.class}; } @Override protected Class<?>[] getServletConfigClasses() { return new Class []{SpringMvcConfig.class}; } @Override protected String[] getServletMappings() { return new String []{"/" }; } @Override protected Filter[] getServletFilters() { CharacterEncodingFilter filter = new CharacterEncodingFilter (); filter.setEncoding("utf-8" ); return new Filter []{filter}; } }

