写在前面:
本人在学习 Java 并发编程 学习到一种除了 synchronized 用得较多的一种锁 ReentrantLock,本文旨在学习研究 ReentrantLock 相关知识,如 AbstractQueuedSynchronizer(简称 AQS),Lock 接口等。但碍于学识浅薄,文章中难免会出现错误,恳请各位读者加以指正。
本文主要通过以下几个方面来系统的介绍 ReentrantLock:
AQS
ReentrantLock 继承自 AbstractQueuedSynchronizer(简称 AQS),所以我们从 AQS 开始讲起。
AQS (抽象的、基于队列的同步器)是**阻塞式锁和相关同步器工具**的框架,即其他的同步器工具都是它的子类,且基于 AQS 实现的锁是阻塞式的锁。
AQS 的特点有:
- 用
state属性(volatile int)来表示资源的状态,分为独占模式 (只有一个线程访问一个资源)和共享模式(可以有多个线程访问多个资源)。需要由AQS的子类来定义如何维护这个状态,控制如何获取锁与释放锁。getState:获得state状态setState:设置state状态compareAndState:使用CAS机制设置state状态(保证state变量的原子性)
- 提供了基于
FIFO的等待队列(JDK 层面),类似于ObjectMonitor中的_EntryList(c++ 底层); - 条件变量
Condition来实现wait \ notify机制,类似于ObjectMonitor中的_WaitSet,但是支持多个条件变量。
AQS 的子类主要实现(@override)如下方法:
boolean tryAcquire():获取锁,只尝试一次。如果获取锁成功,则返回true;反之false,并将当前线程阻塞(底层使用park()阻塞当前线程),加入到等待队列中。
1 | // 如果获取锁失败 |
tryRelease():释放锁,只尝试一次。如果释放锁成功,则返回true;反之false
1 | // 如果释放锁失败 |
tryAcquireShared():获取锁tryReleaseShared():释放锁isHeldExclusively()
自定义一个阻塞式的锁
【步骤】
- 首先我们要让我们自定义的
MyLock这个类实现java.util.concurrent.lock.Lock接口; - 然后在
MyLock中实现一个AQS同步器类。
【具体实现】
- 我们先写一个
MySync类继承自ADS
1 | // 我们希望实现这个同步器类MySync。 |
- 我们再实现
Lock接口:
1 | public class MyLock implements Lock { |
- 我们写一个测试方法来测试这个
MyLock是否符合预期
1 | public class test { |
输出:
1 | Time:1662389256121 t1 加锁 |
【结果分析】
我们可以看到,MyLock 类确实能实现锁的功能。而且在 t2 线程第二次调用 lock.lock() 时,因为不是可重入错,线程被阻塞了。
ReentrantLock
经过以上过程,我们应该已经对“如何实现一个锁”有了大致的思路。现在我们来分析与上述例子相似的 ReentrantLock。
给出 ReentrantLock 的 UML 类图:
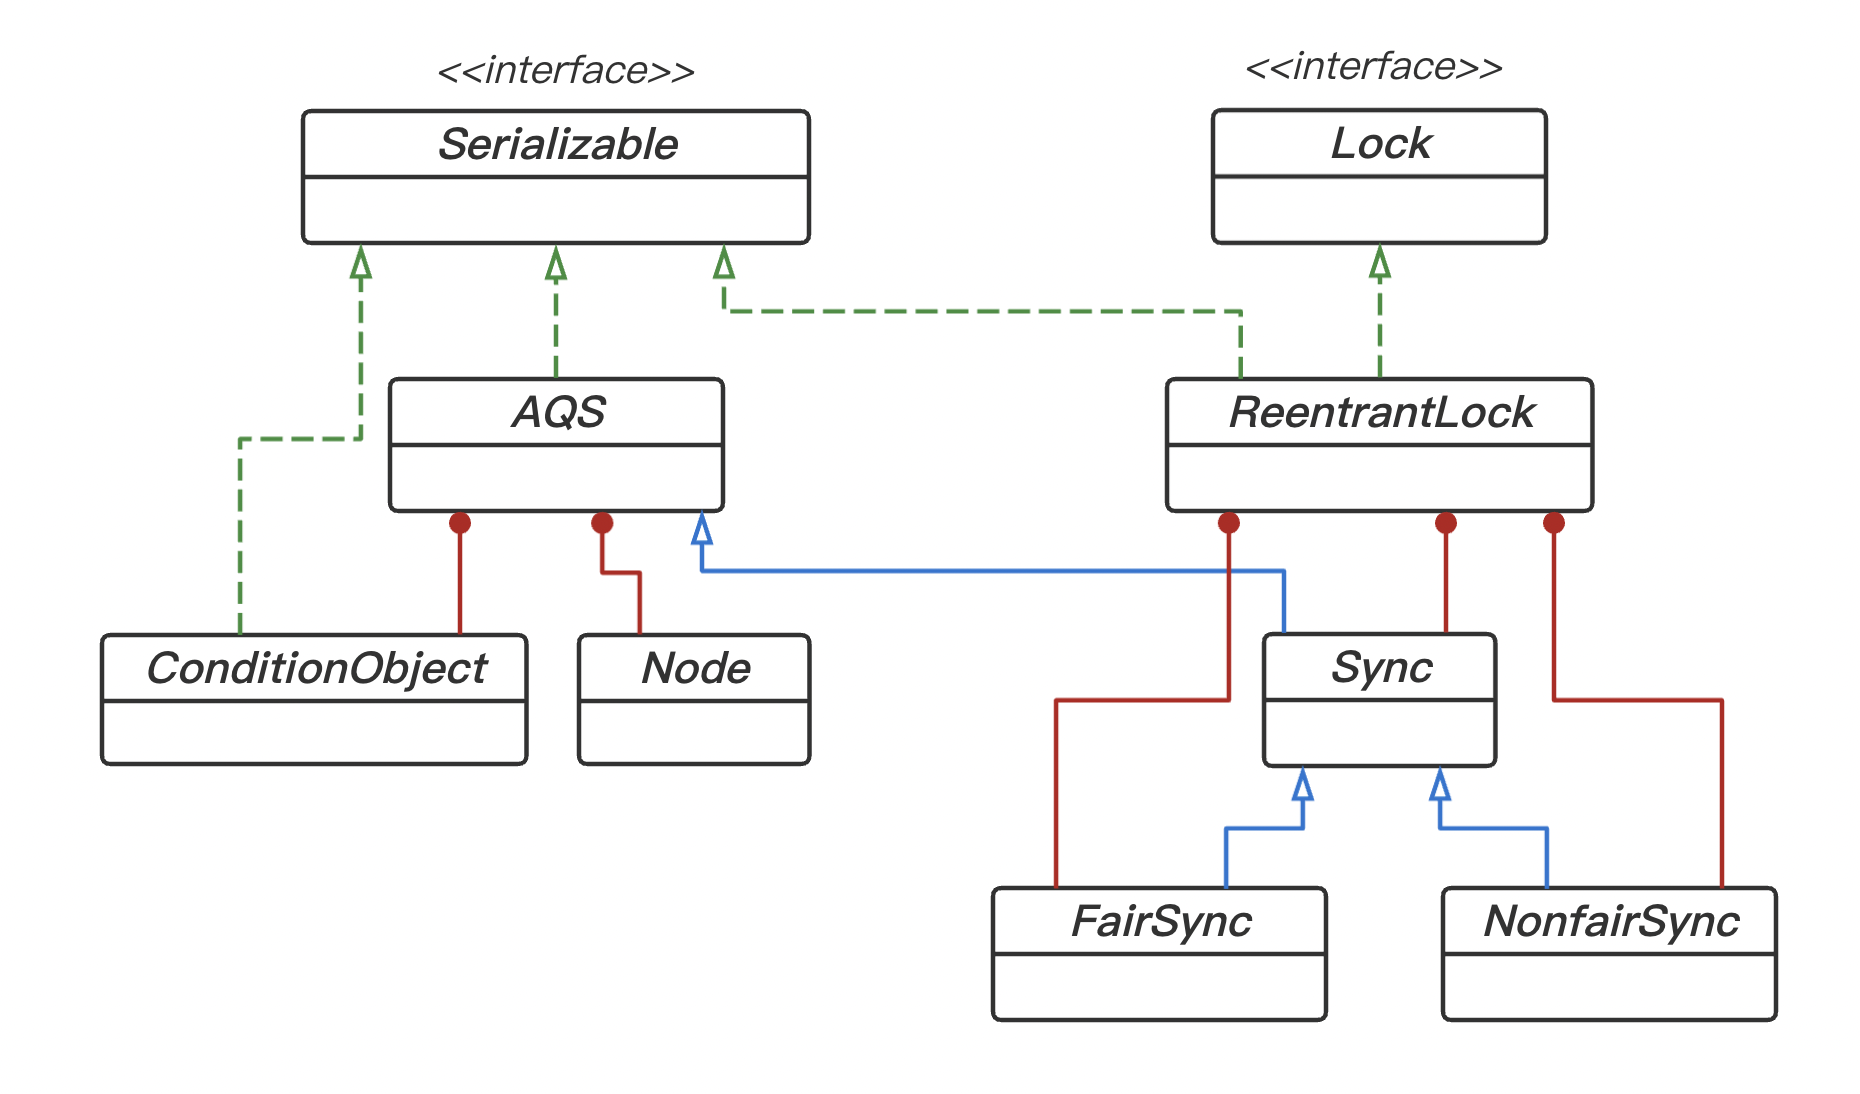
可以看出,对于 ReentrantLock 的 Sync 同步器有两种类型:FairSync 和 NonfairSync。所以 ReentrantLock 中也有公平锁与非公平锁(默认)的实现。
ReentrantLock 的非公平锁实现
ReentrantLock 构造器
从 ReentrantLock 的构造器开始:
1 | public ReentrantLock() { |
可以看出,ReentrantLock 默认是非公平锁(无参构造时)。NonfairSync 是间接继承自 AQS。
ReentrantLock 的加锁流程
1 | final void lock() { |
1 | public final void acquire(int arg) { |
1 | final boolean acquireQueued(final Node node, int arg) { |
1 | private final boolean parkAndCheckInterrupt() { |
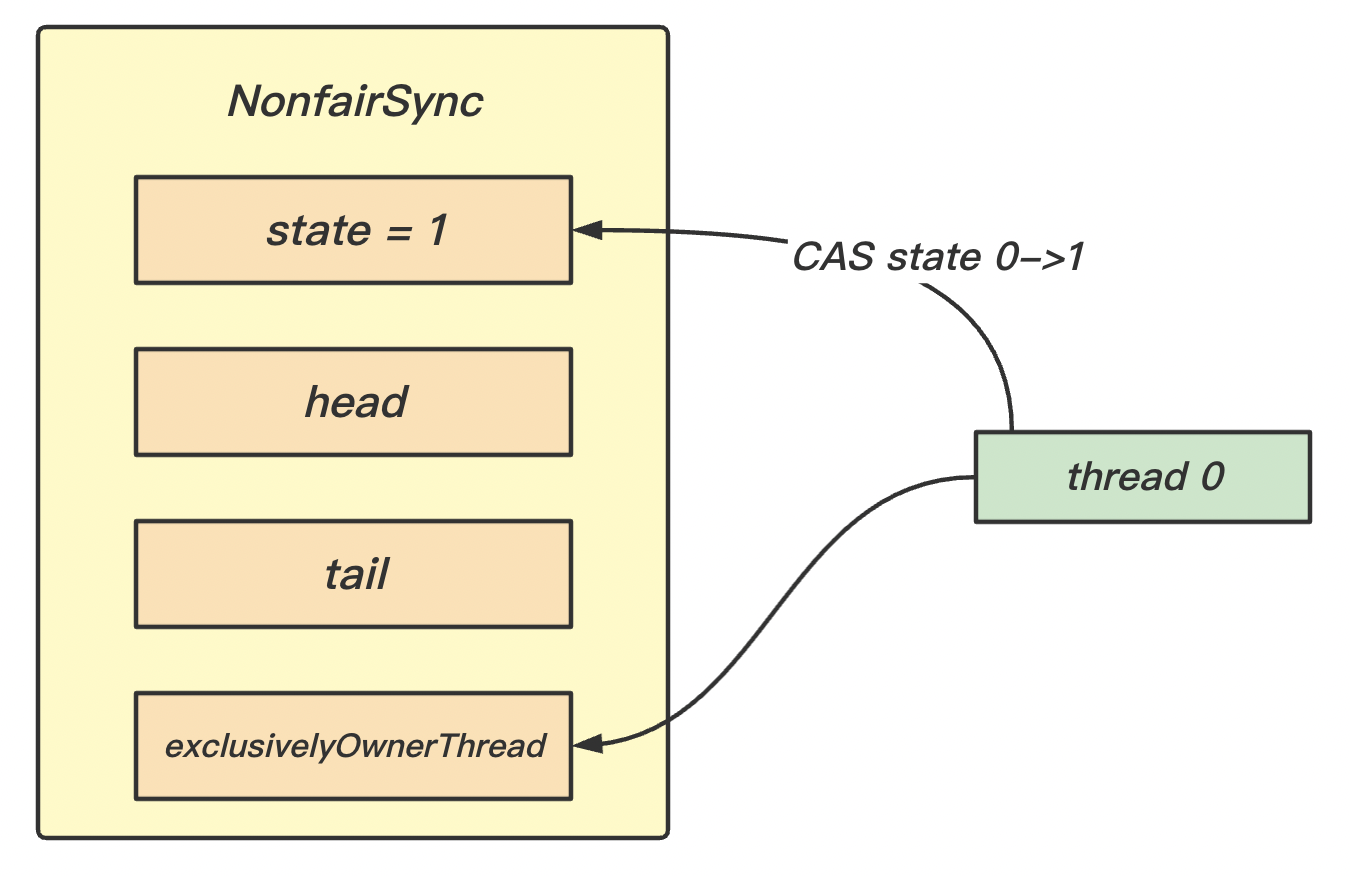
没有竞争时
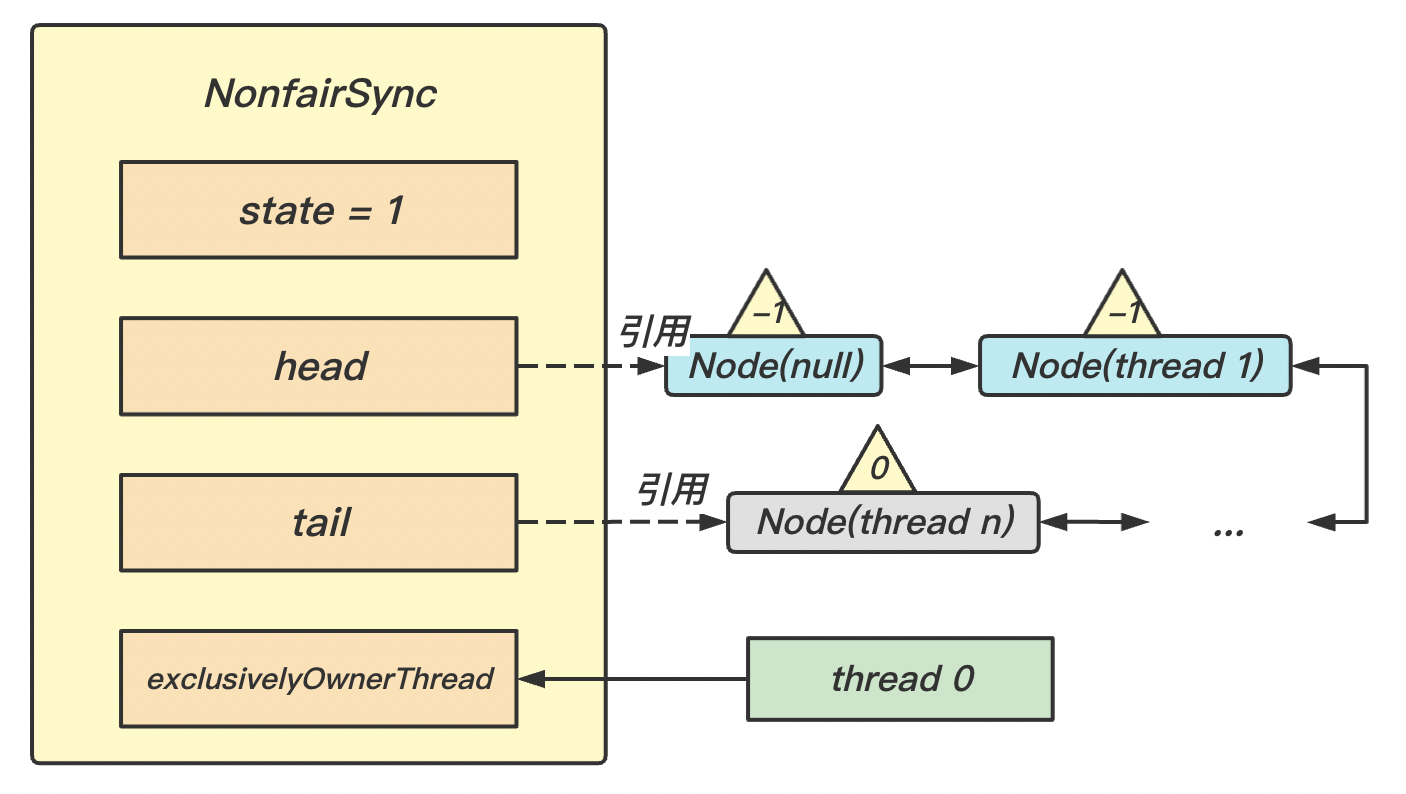
当只有一个线程 thread 0 想获得这个锁时,
- 用
CAS试图将state状态由 0 改为 1,成功; setExclusiveOwnerThread(Thread.currentThread()):将Owner改为当前线程。
第一个竞争出现时
在另一个线程 thread 1 来竞争这个锁时,
-
用
CAS试图将state状态由 0 改为 1,但是失败了,因为state已经是 1 了;进入acquire(): -
!tryAcquire():再次用CAS试图将state状态由 0 改为 1,但是失败了,返回true -
acquireQueued(addWaiter(Node.EXCLUSIVE), arg):尝试将thread 1成装成Node,存入队列-
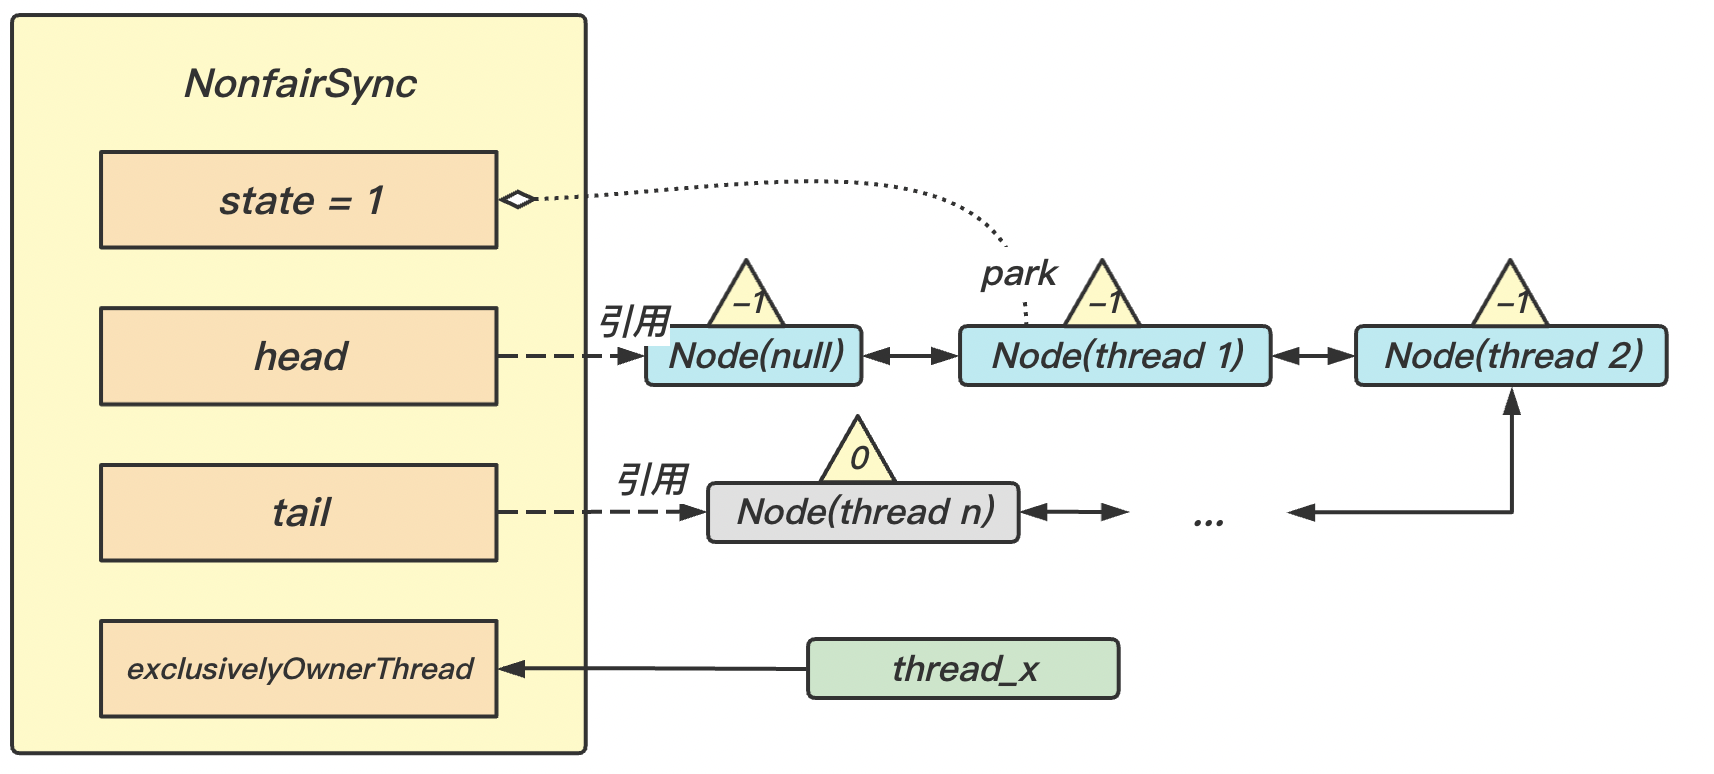
图中黄色三角形表示该
Node的waitStatus状态,其中 0 默认正常状态,-1 则说明当前节点有义务唤醒后继节点 -
Node的创建是懒惰的 -
启动第一个
Node为null,我们称之为 Dummy(哑元),用来占位,并不关联线程。一般被Head引用。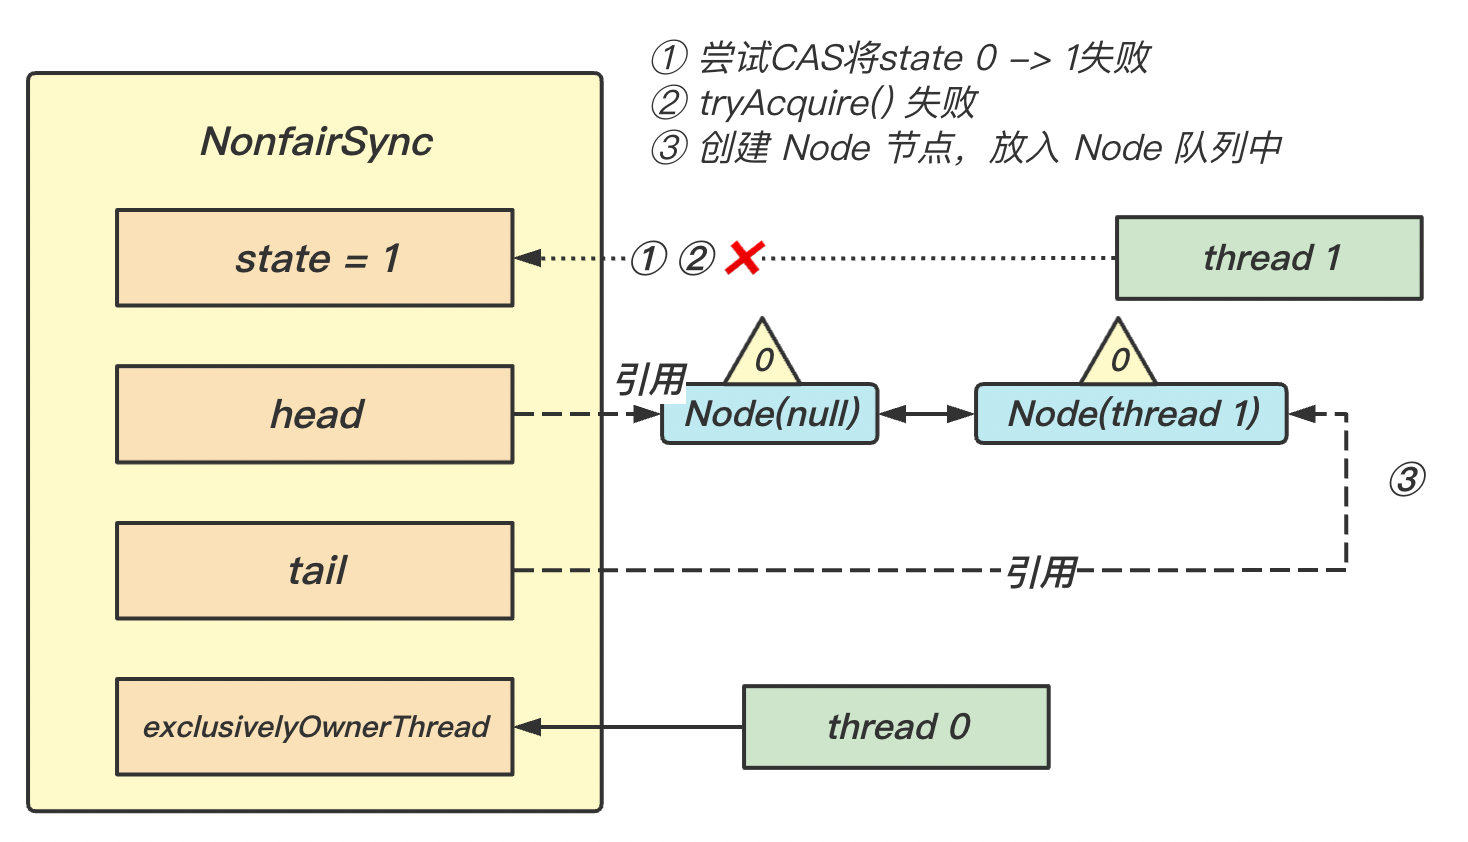
-
-
当线程进入
acquireQueued()方法内:-
acquireQueued()会一直在一个for(;;)的死循环内不断尝试获得锁,失败之后会park()阻塞当前线程; -
如果
node(当前线程)的前驱节点是Head,则再次尝试CAS获得锁;但是此时thread 1失败; -
进入
shouldParkAfterFailedAcquire()方法:如果node的前驱节点的waitStatus状态是-1(表示有责任唤醒后继节点),则结束该方法,返回true;如果waitStatus状态是>0,则将该节点的前驱节点waitStatus状态改为-1,返回false -
进入
parkAndCheckInterrupt():将node(当前线程)阻塞park()。图中用灰色表示。
-
-
经过多个线程经历上述过程竞争失败后,变成如图所示的样子:
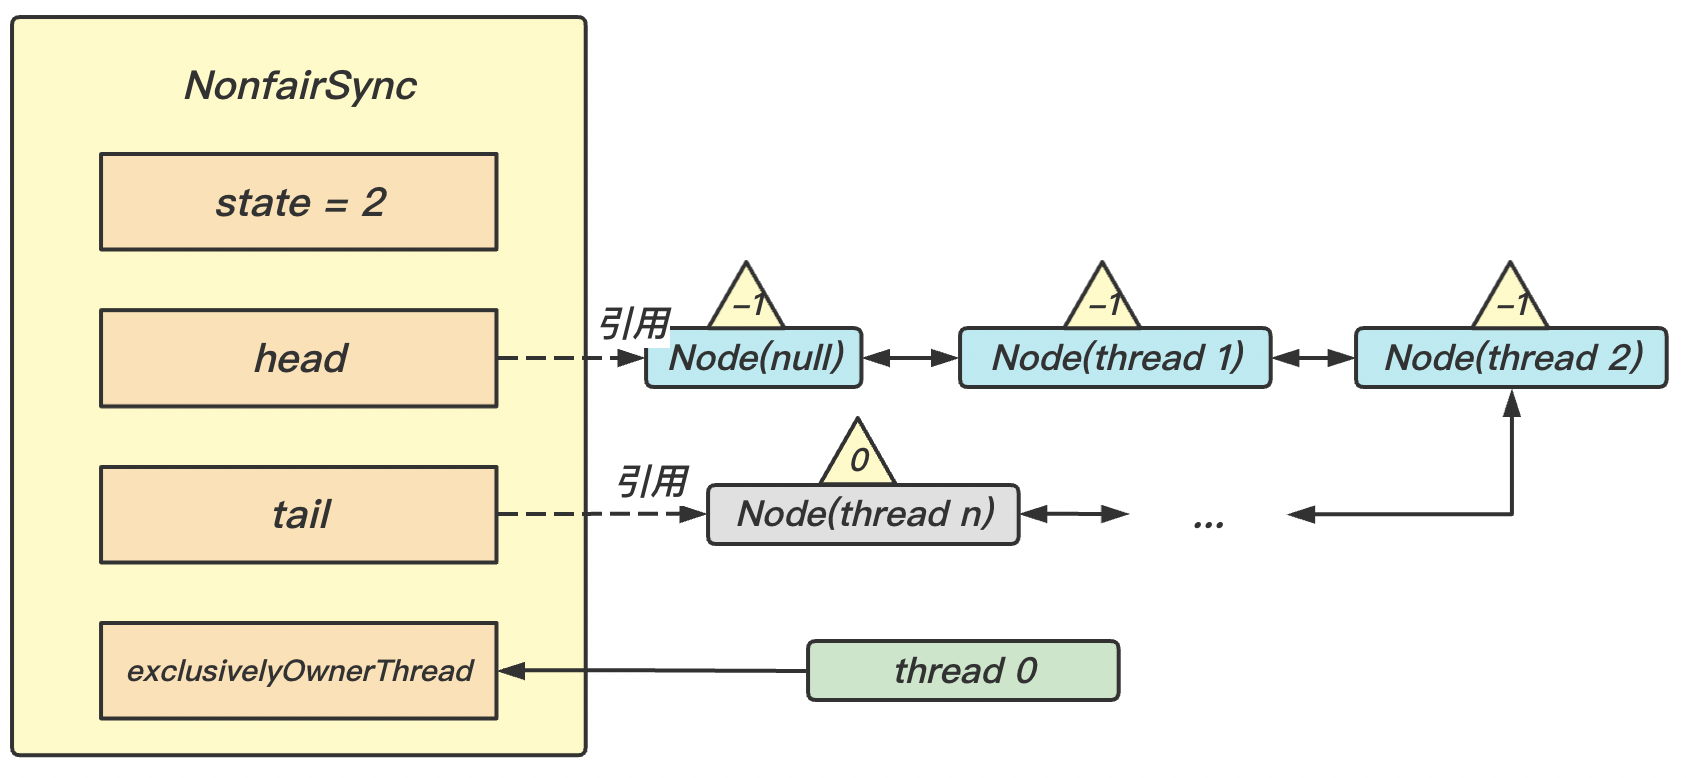
锁重入时
1 | static final class NonfairSync extends Sync { |
- 检查
state状态,如果state > 0时,说明锁已经被别的线程拥有; - 检查
Owner是否是当前线程,如果是则说明这个锁是当前线程的可重入锁 ,state++
ReentrantLock 的解锁流程
1 | public void unlock() { |
1 | public final boolean release(int arg) { |
1 | protected final boolean tryRelease(int releases) { |
没有锁重入时
-
thread 0释放锁,进入tryRelease()方法:-
将
Owner置为null -
将
state置为0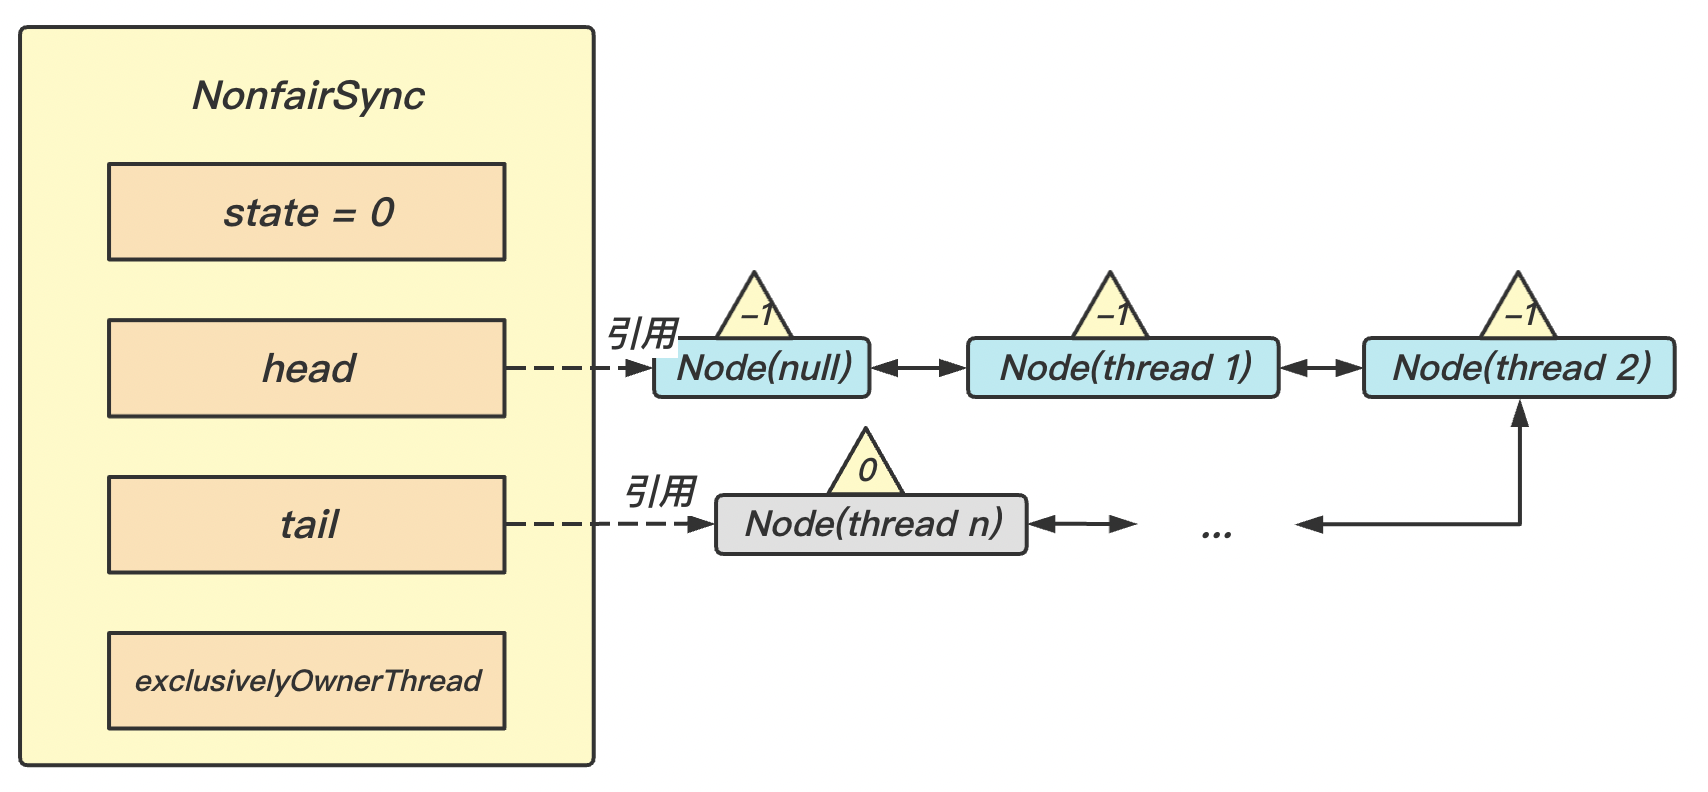
-
-
现在就可尝试
CAS将state由 0 改为 1,所以进入if (tryRelease(arg)) {}代码块:-
此时存在
Head节点(即head的引用不为空)且Head的waitStatus != 0,所以唤醒Head的后继节点 ,unpark(thread 1) -
此时
thread 1被唤醒,恢复执行。因为thread 1在被park()前在acquireQueued()的for(;;)死循环内不断尝试获得锁,所以唤醒之后继续在死循环内尝试获得锁; -
此时
thread 1节点的前驱节点是Head,且可以成功地尝试获得锁,那么我们可以将thread 1节点从等待队列中移除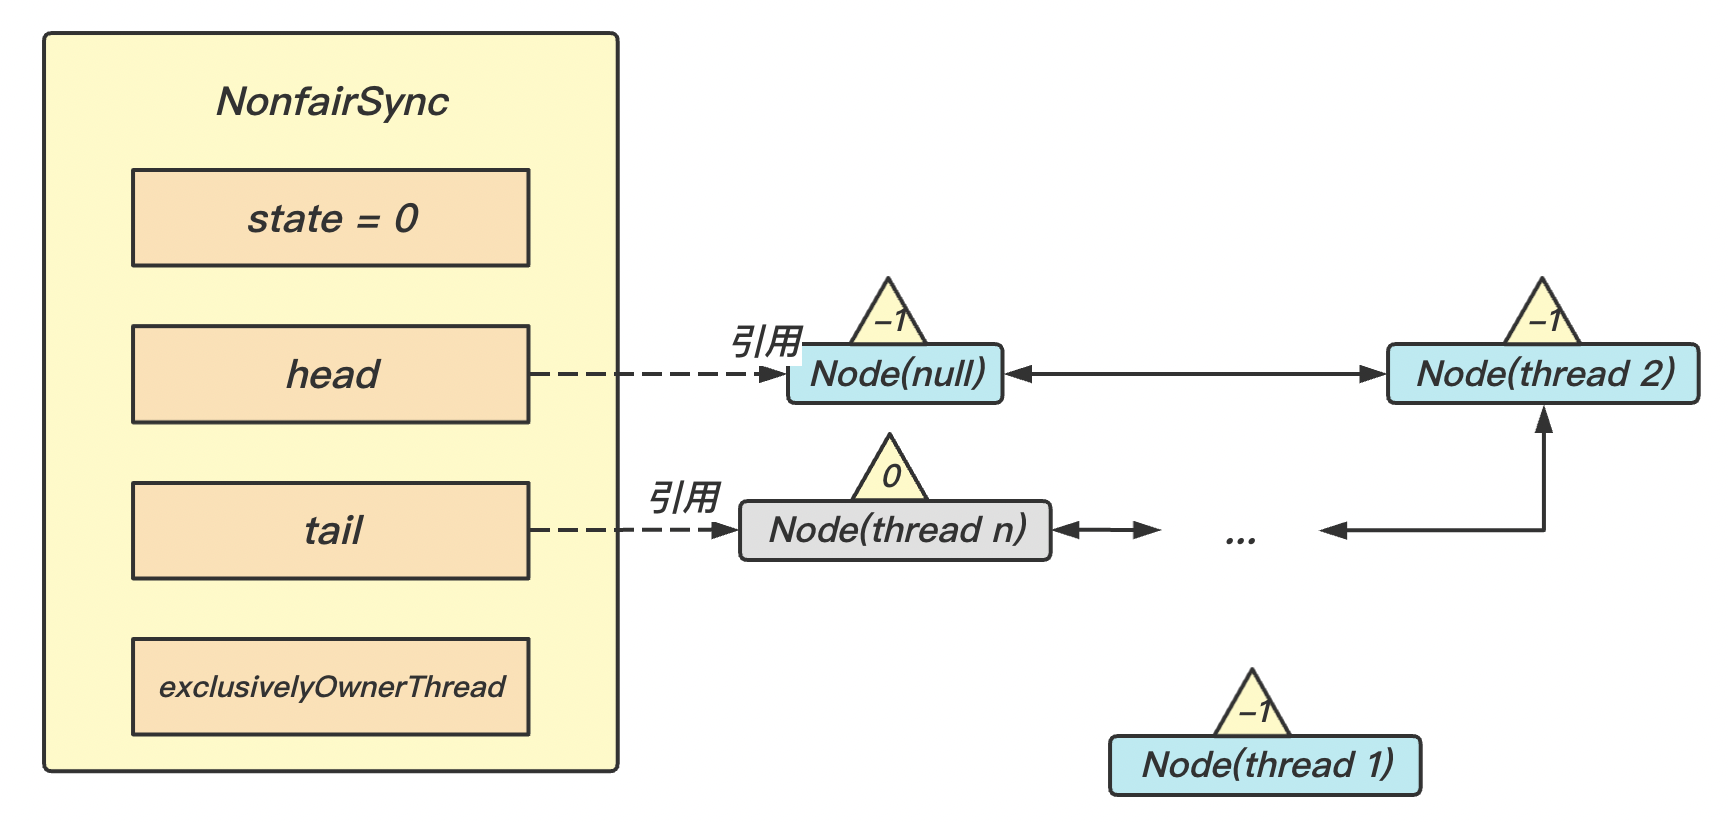
-
发生不公平现象
【注意 ⚠️】
我们考虑这样一个问题:如果在 thread 0 线程刚释放完锁,state = 0 的时候,有一个线程 thread_x 想要获取锁。那么 thread_x 就与等待队列中本来应该被唤醒的 thread 1 产生了竞争。如下图。
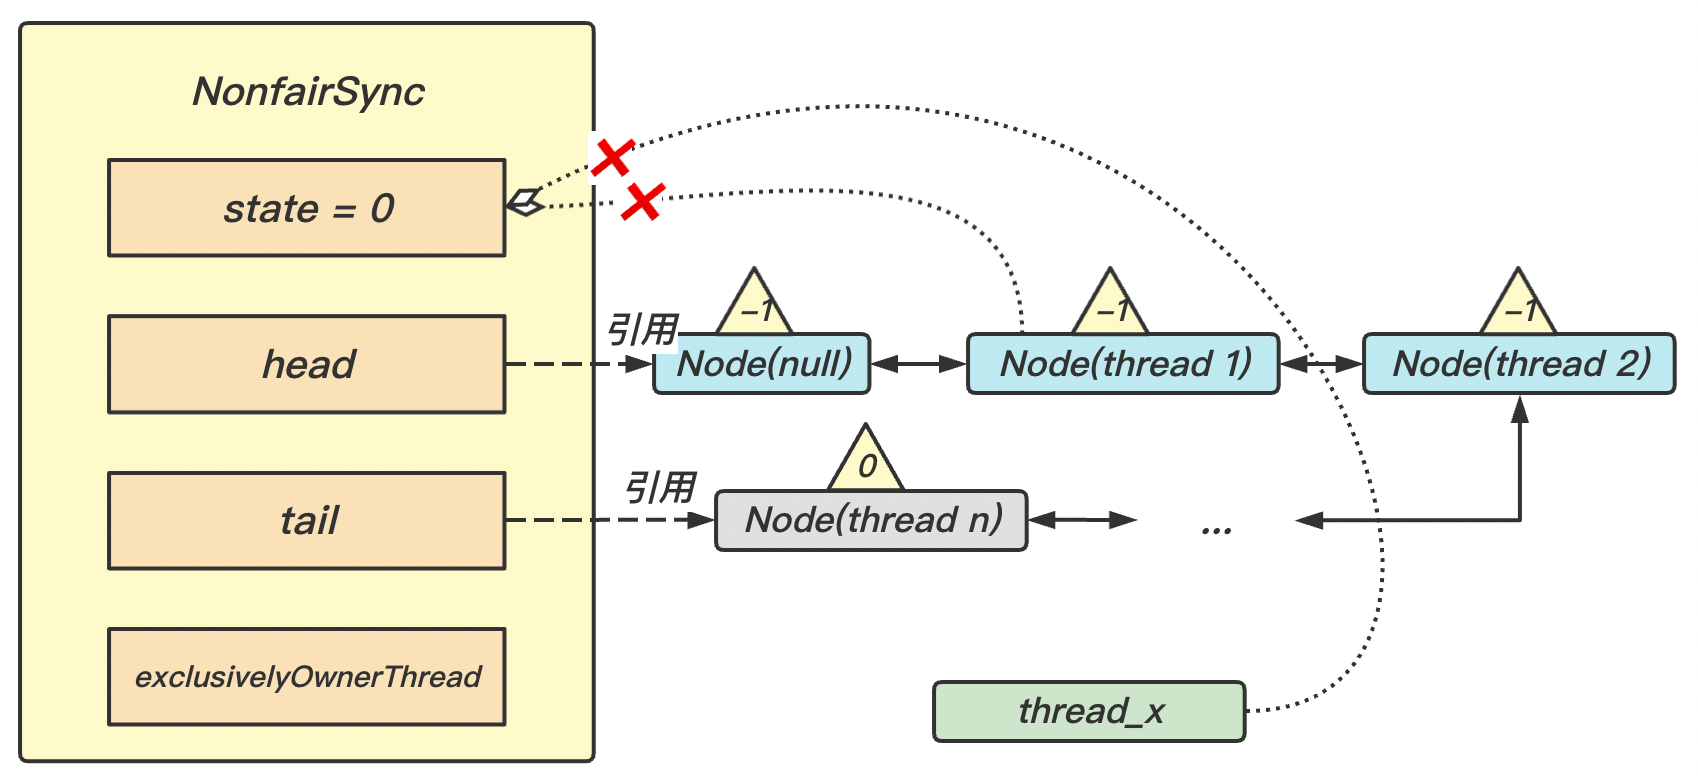
如果 thread_x 得到了锁,那么 thread 1 就会被再次 park 。对于等待队列中的线程节点来说就是【不公平的】,因为 thread_x 插队了。
锁重入时
- 检查
state状态,如果state > 0时,说明锁已经被别的线程拥有; - 检查
Owner是否是当前线程,如果是则说明这个锁是当前线程的可重入锁,解锁时state--; - 当
state = 0时才释放这个锁。
ReentrantLock 可打断原理
不可打断模式(默认)
我们之前说过,线程在没办法立即获得锁时,就会在 acquireQueued() 方法中的死循环中不断尝试获取锁。尝试不成功就会被 park 阻塞。但是我们知道,一个线程被 park() 之后会被 interrupte() 方法打断阻塞状态,但是打断标记会被清除,以至于可以继续在死循环里运行,直到再次被 park。
从下面源码中可以看出,我们引入了一个 interrupted 作为记录是否被打断过的标记。在不可打断模式下,只有在该被打断过的线程得到锁后,才会响应打断 selfInterrupt() 。
1 | public final void acquire(int arg) { |
1 | final boolean acquireQueued(final Node node, int arg) { |
1 | private final boolean parkAndCheckInterrupt() { |
可打断模式
我们可以从如下源码中看出,可打断模式中 doAcquireInterruptibly() 整体与不可打断模式相同,但是在处理打断的过程中:可打断模式会直接抛出一个异常 InterruptedException(),进而打断线程。
1 | public final void acquireInterruptibly(int arg) throws InterruptedException { |
1 | private void doAcquireInterruptibly(int arg) throws InterruptedException { |
ReentrantLock 公平锁原理
不公平锁
我们在前面讨论过不公平发生的情况。我们知道,ReentrantLock 默认是不公平锁:
如果在
thread 0线程刚释放完锁,state = 0的时候,有一个线程thread_x想要获取锁。那么thread_x就与等待队列中本来应该被唤醒的thread 1产生了竞争。如果thread_x得到了锁,那么thread 1就会被再次park。对于等待队列中的线程节点来说就是【不公平的】,因为thread_x插队了。
公平锁
那么 ReentrantLock 如何实现平平锁呢?
通过下面源码我们可以看出:公平锁模式下,线程执行 tryAcquire() 尝试获取锁时,需要判断 hasQueuedPredecessors() 即检查等待队列是否为空、检查 Head 节点有无后继节点,且该后继节点关联的线程是不是当前线程。若满足则说明 AQS 等待队列里有优先级更高的线程,当前线程不会争抢锁。
1 | static final class FairSync extends Sync { |
1 | public final boolean hasQueuedPredecessors() { |
ReentrantLock 条件变量实现原理
每个条件变量对应着一个等待队列,它的实现类是 ConditionObject。它维护一个单链表,作为存放那些不满足条件而被阻塞的线程。
对于 ConditionObject,其主要有两个方法:await() 和 singal()
注意 ⚠️
这里我们之所以说
ConditionObject维护一个单链表,是因为其中的Node只有后继节点,不能找到前驱节点。但是它是可以变成双链表的,因为Node中有可以找到前驱节点的指针。
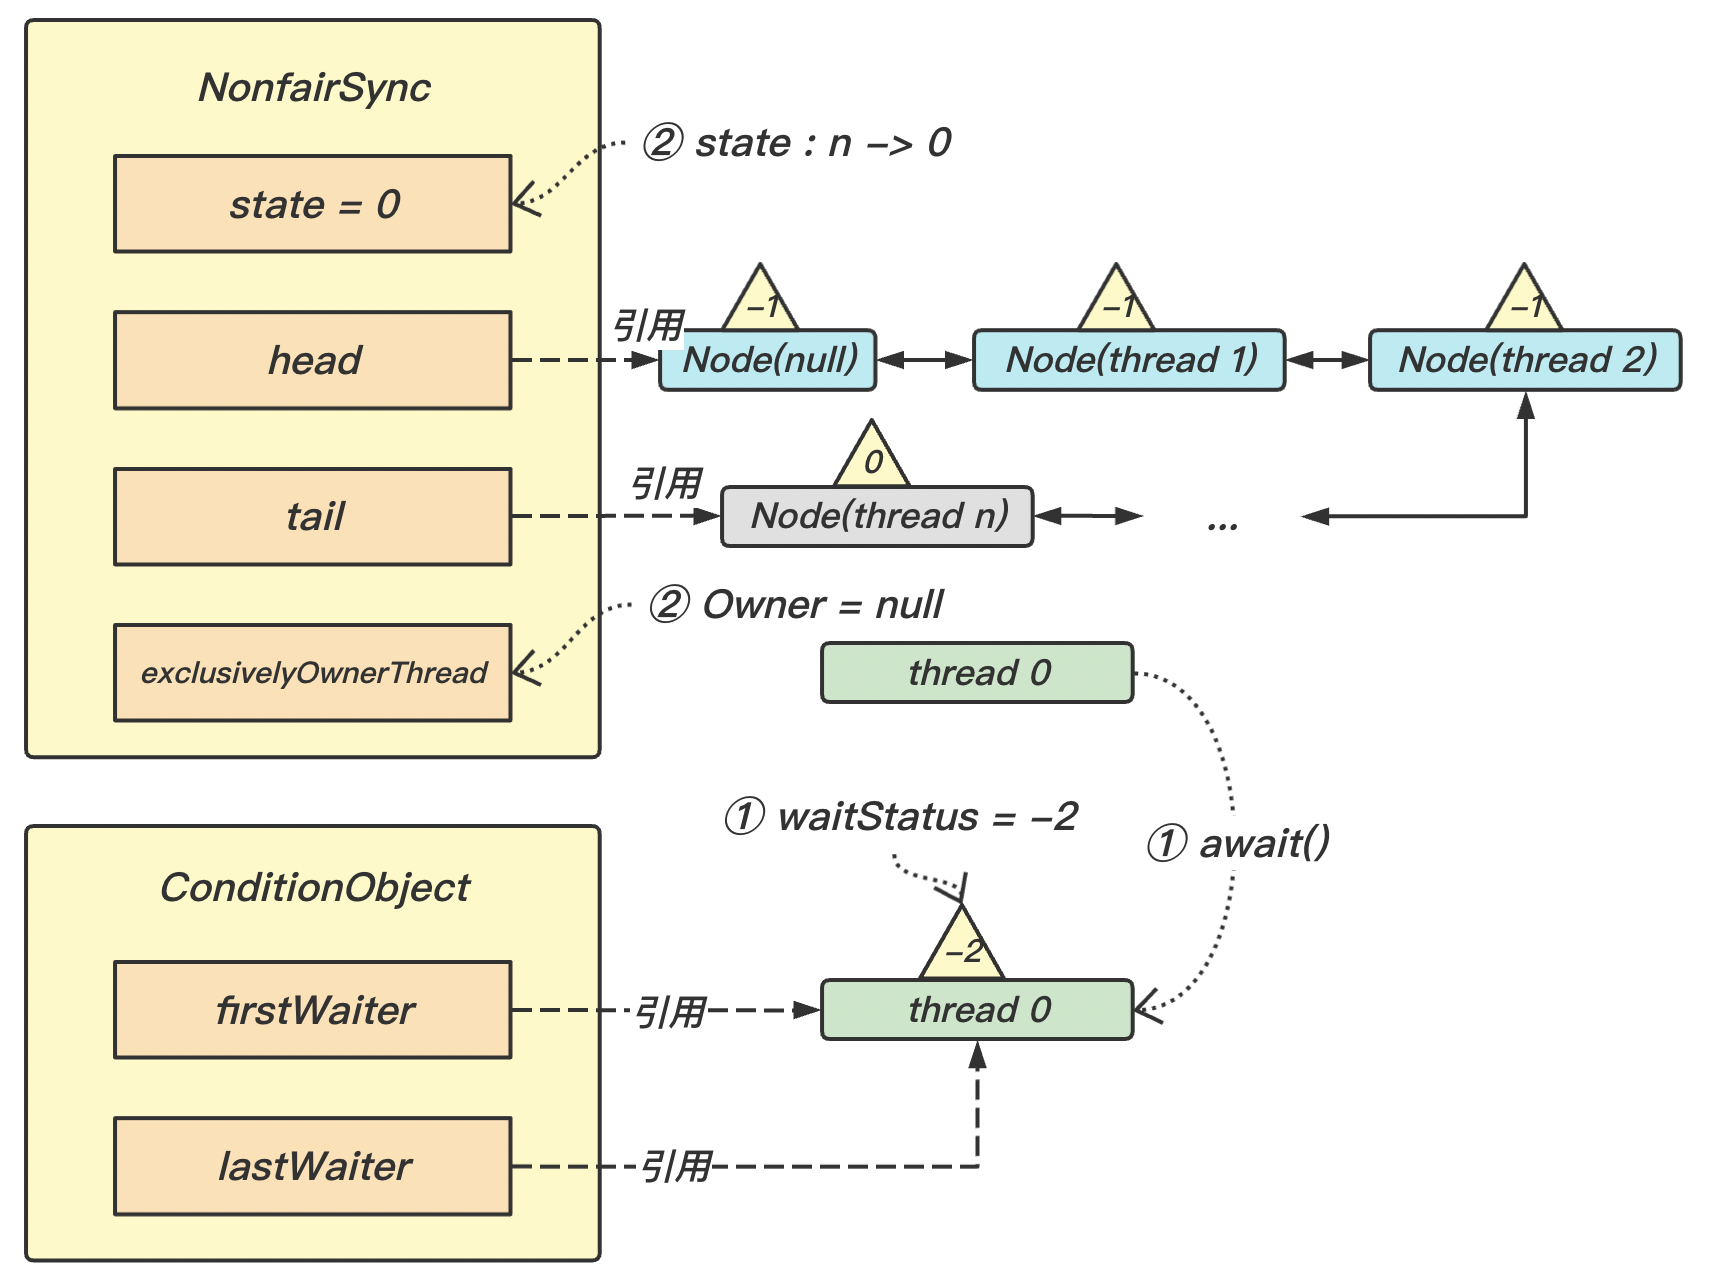
await() 流程
1 | public final void await() throws InterruptedException { |
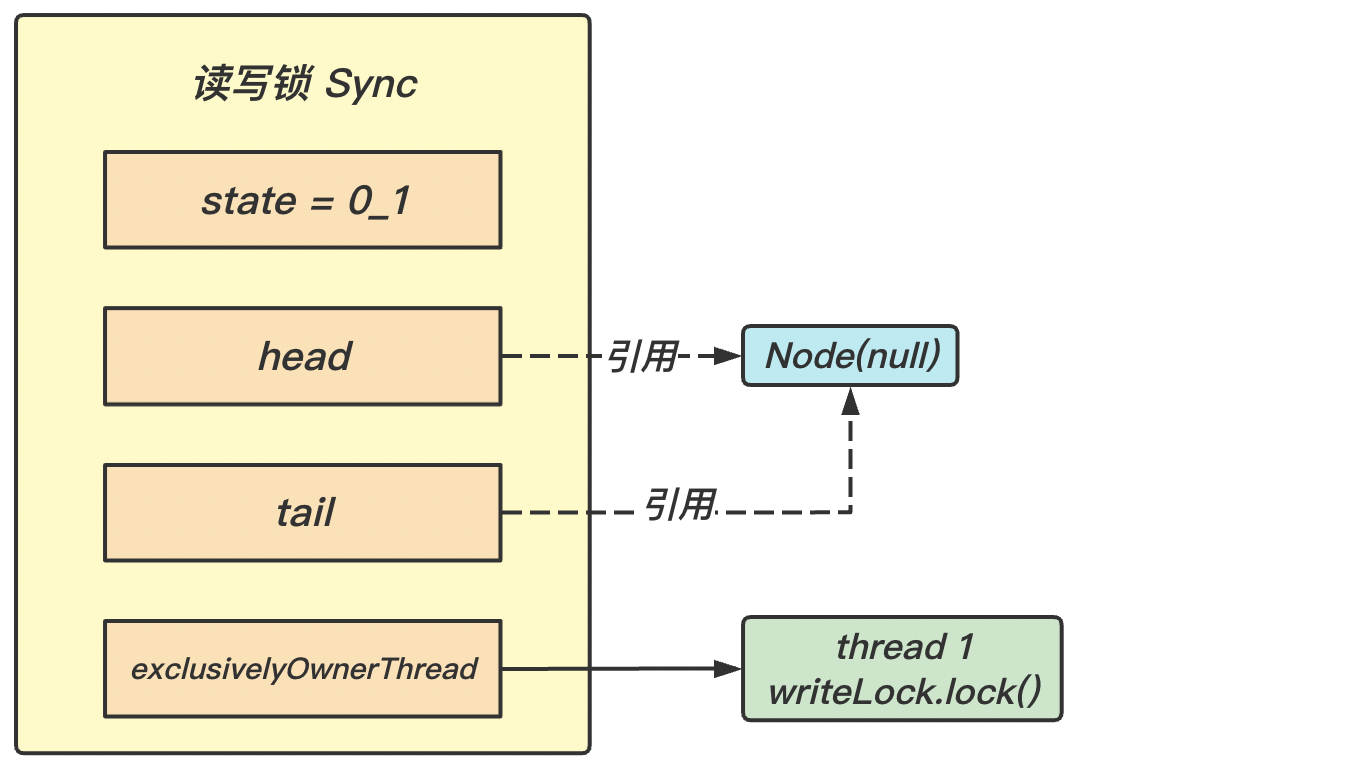
开始时 thread 0 持有锁,
- 此时调用
await()方法,会将当前线程封装成Node加入到ConditionObject的等待队列尾部,设置其waitStatus = -2 (Node.CONDITION); - 进入
AQS的fullyRelease()流程,把node对应线程上的锁全部释放,并将其park阻塞等待; unparkAQS队列中Head的后继节点,竞争锁。
signal() 流程
1 | public final void signal() { |
1 | private void doSignal(Node first) { |
由上述源码我们可以看出,
-
当当前线程调用
single()方法时,会将ConditionObject的等待队列中队首节点firstdoSignal()
-
断开
first节点,并将其转移至同步器的等待队列末尾,并唤醒等待队列中Head的后继节点,更新waitStatus;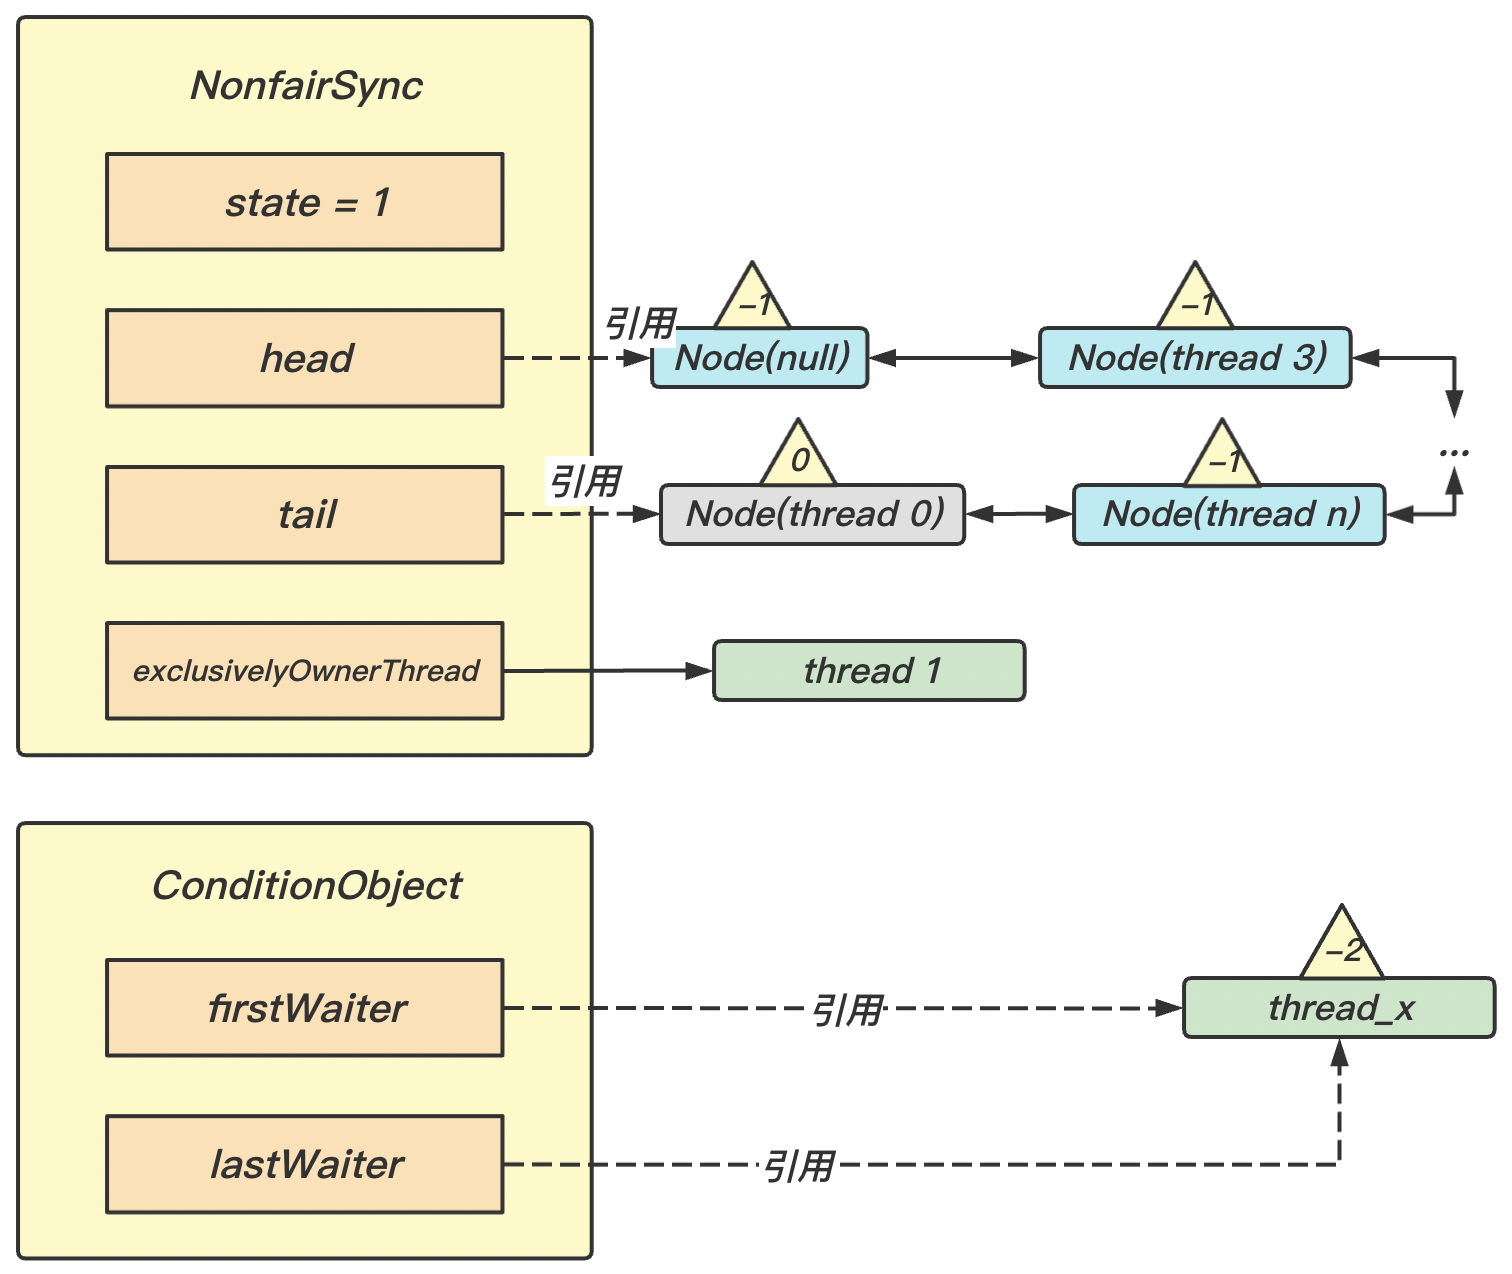
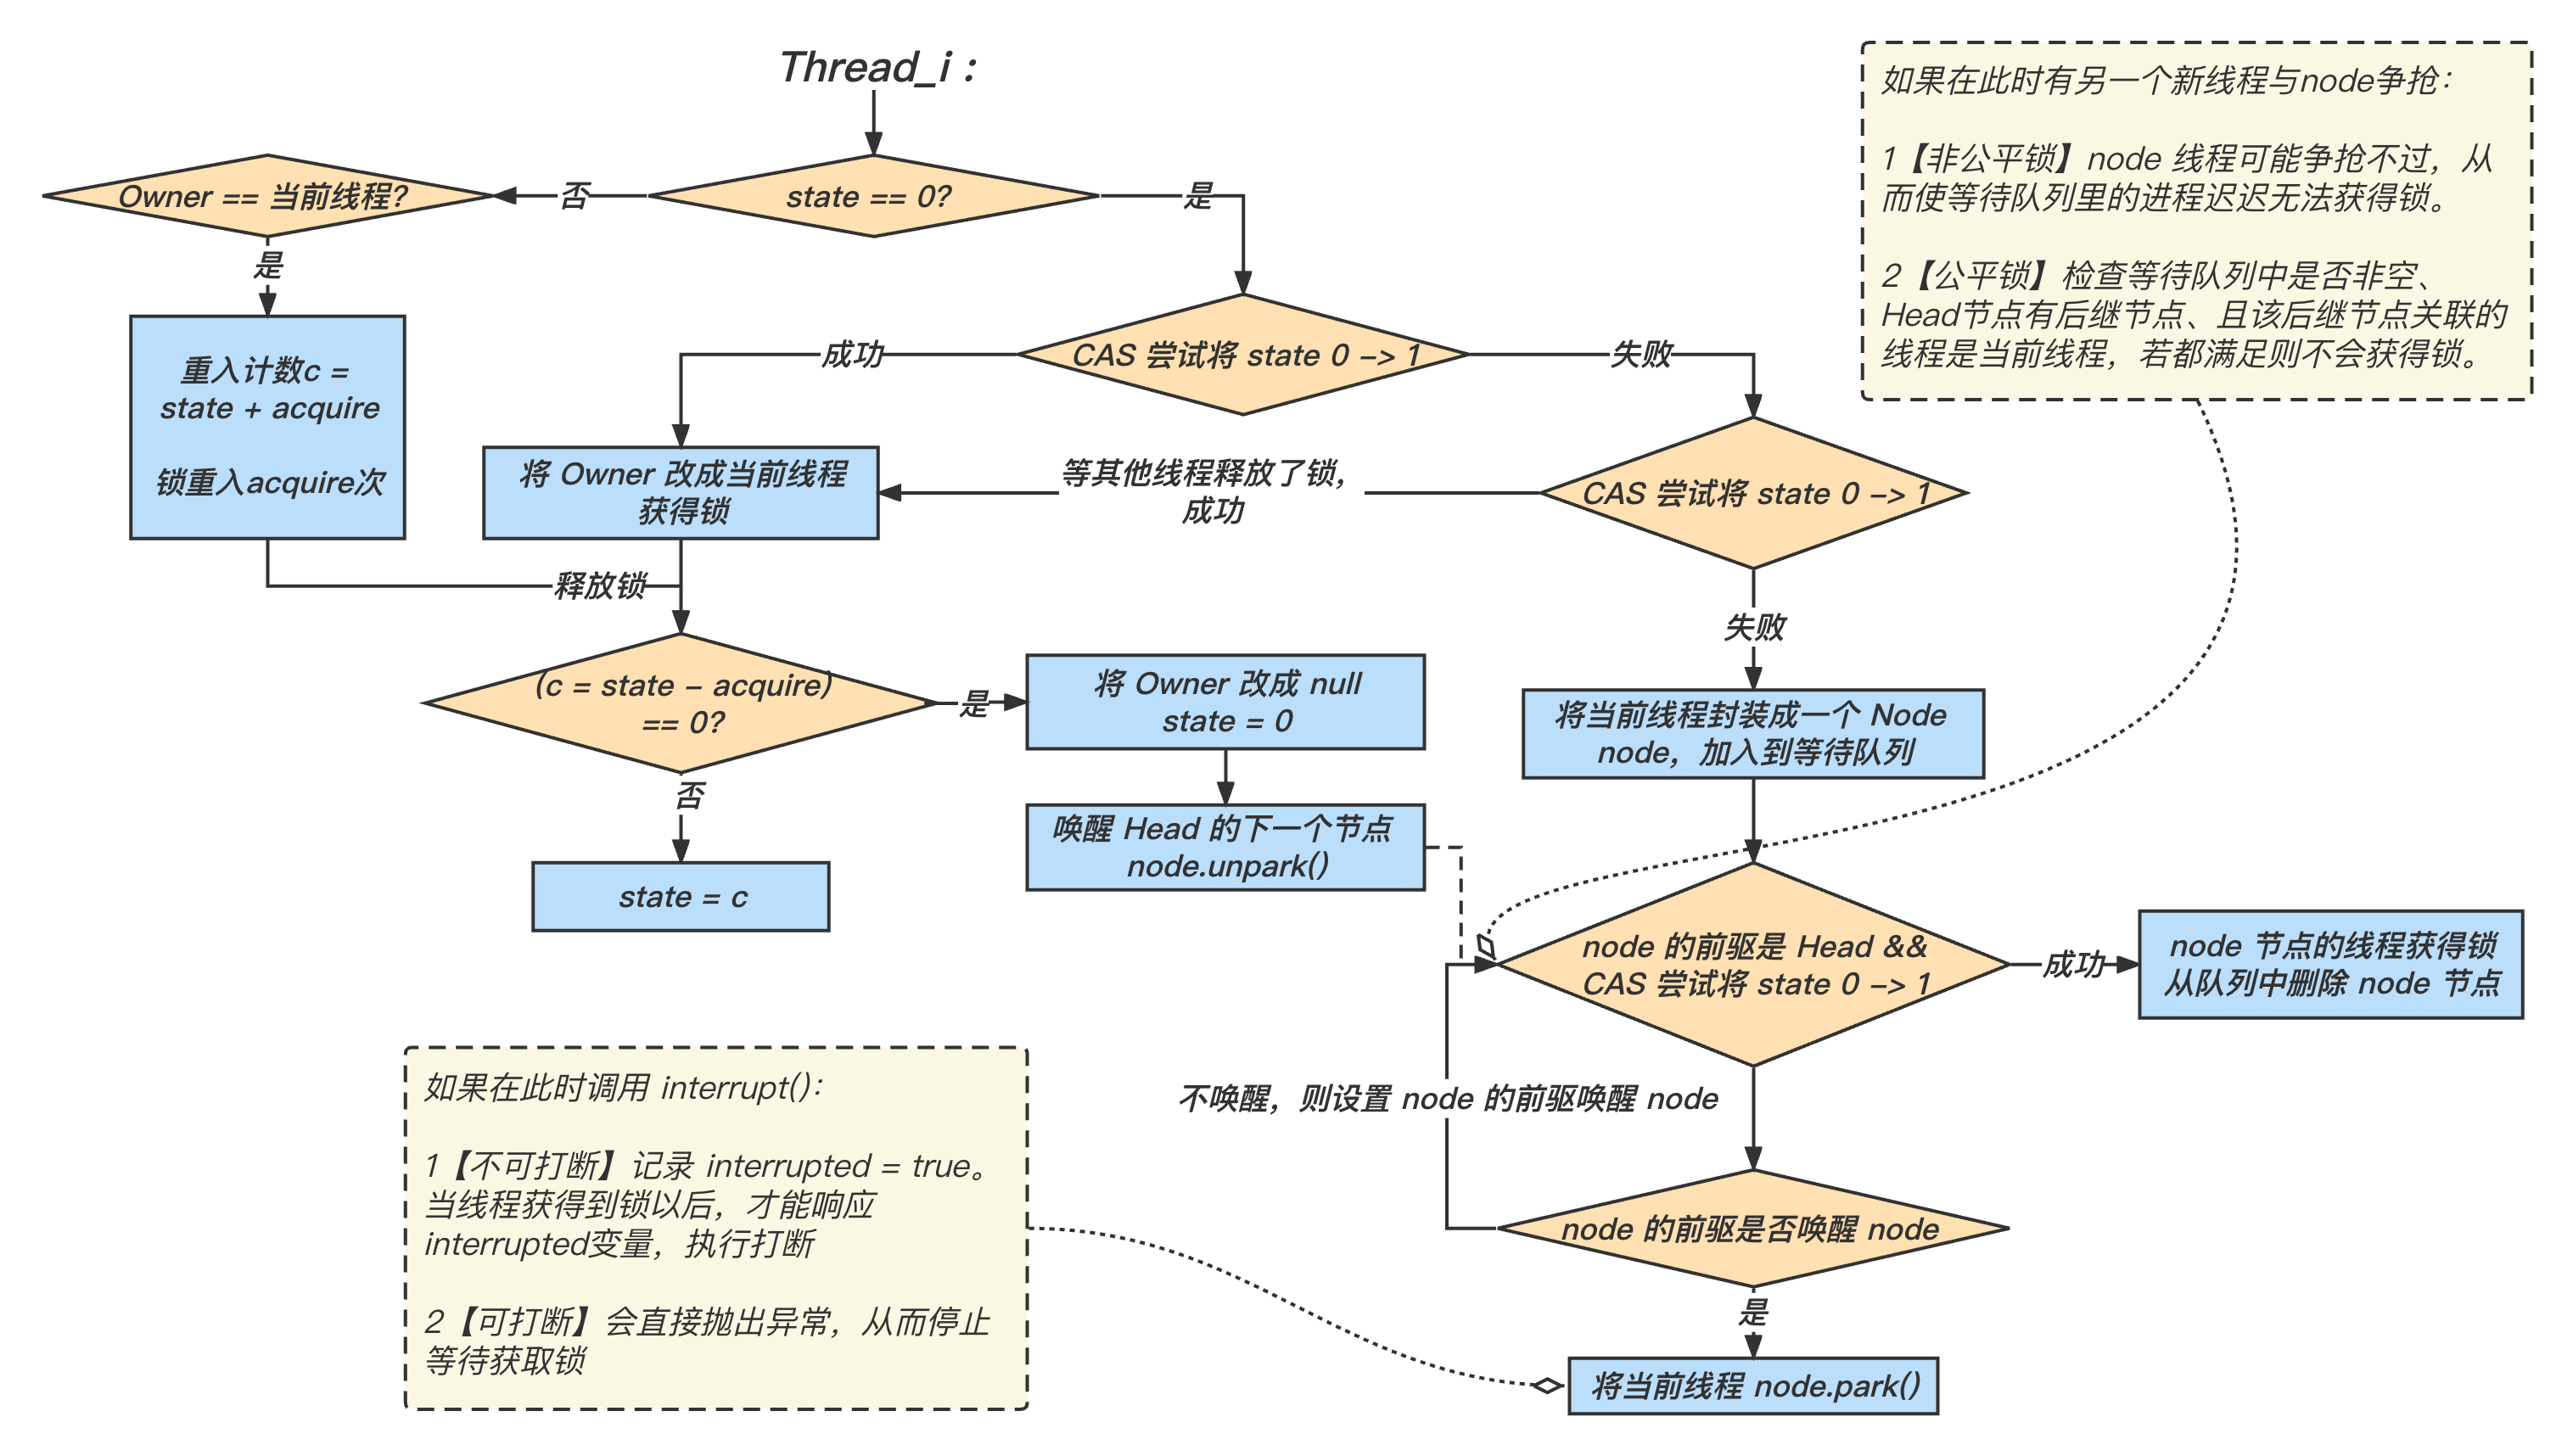
ReentrantLock 原理流程图
ReentrantReadWriteLock 读写锁
ReentrantReadWriteLock,顾名思义,就是可重入的读写锁。我们先来介绍什么是读写锁。
我们知道,在并发地访问同一个临界区资源(如并发地读写同一个数据时),
读 - 读操作并不影响数据的安全性,读 - 写操作和写 - 写操作 需要互斥地进行。
相应的,我们就需要两种锁来保证读写数据的安全性:读锁和写锁。而在 ReentrantLock 中提供了一种读写锁 ReentrantReadWriteLock 的具体实现。其使用的示例如下,
1 | class DataOperator { |
ReentrantReadWriteLock 原理
ReentrantReadWriteLock 用的是同一个 Sync 同步器(以下以非公平同步器 NonFairSync 为例),所以他们的等待队列、state 状态等都是同一个。不同点是:写锁对应着 state 状态的低 16 bits;读锁对应着 state 状态的高 16 bits。即
1 | |-----------------------------------------------------| |
上锁流程
下面我们从源码角度试图分析 ReentrantReadWriteLock 中上锁的原理:
1 | public class ReentrantReadWriteLock implements ReadWriteLock, java.io.Serializable { |
【写锁】部分源代码
1 | public static class WriteLock implements Lock, java.io.Serializable { |
1 | public final void acquire(int arg) { |
1 | protected final boolean tryAcquire(int acquires) { |
【读锁部分】源代码:
1 | public static class ReadLock implements Lock, java.io.Serializable { |
1 | public final void acquireShared(int arg) { |
1 | public class ReentrantReadWriteLock{ |
1 | private void doAcquireShared(int arg) { |
由以上的源码我们可知,
- 请求读锁的线程封装成
Node节点时,其状态是Node.SHARED(共享状态)- 请求写锁的线程封装成
Node节点时,其状态是Node.EXCLUSIVE(独占状态)
下面我们以两个线程 thread_1 和 thread_2 举例:
(一)thread_1 写锁 , thread_2 读锁
thread_1线程想获得【写锁】,流程与ReentrantLock大致无异:
- 如果
state == 0,说明此时既没有【读锁】也没有【写锁】,则可以加锁(在“公平规则”下,还需要判断等待队列里是否有其他线程); - 如果
state的高 16 bits不为 0,即state = n_0,则说明已经有线程获得了【读锁】。再检查Owner是否是当前线程,如果是,则可以加写锁,如果不是,则说明其他线程获得了读锁,读-写互斥,所以无法加锁; - 如果
state的低 16 bits不为 0,即state = 0_n,则说明已经有线程获得了【写锁】,无法加锁。
thread_1线程成功后加锁后,thread_2线程想获得【读锁】。流程如下
-
在
tryAcquireShared()中,方法返回一个整数int,返回-1时表示获取读锁失败;返回1表示成功。 -
如果
state的低 16 bits不为 0,即state = 0_n,则说明已经有线程获得了【写锁】。再检查Owner是否是当前线程,如果是,则可以加读锁,如果不是,则无法加锁,返回-1。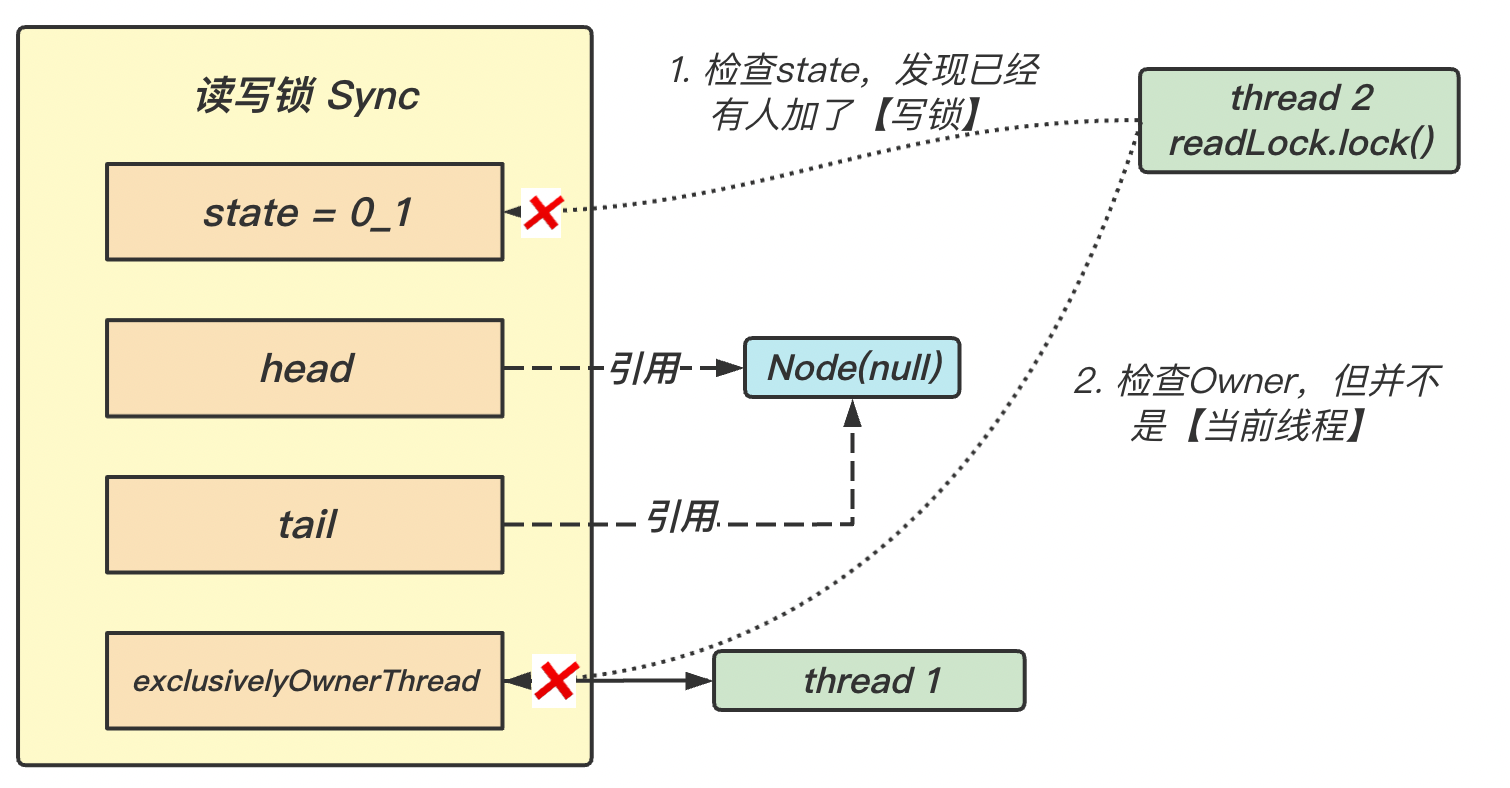
-
如果
tryAcquireShared()返回-1,即尝试加读锁失败,则进入doAcquireShared():- 将当前线程成装为
Node.SHARED,并加入同步器的等待队列中;会自旋尝试获得锁; - 更新等待队列中节点的
waitStatus值,-1为有义务唤醒后继节点; - 将当前节点
park。
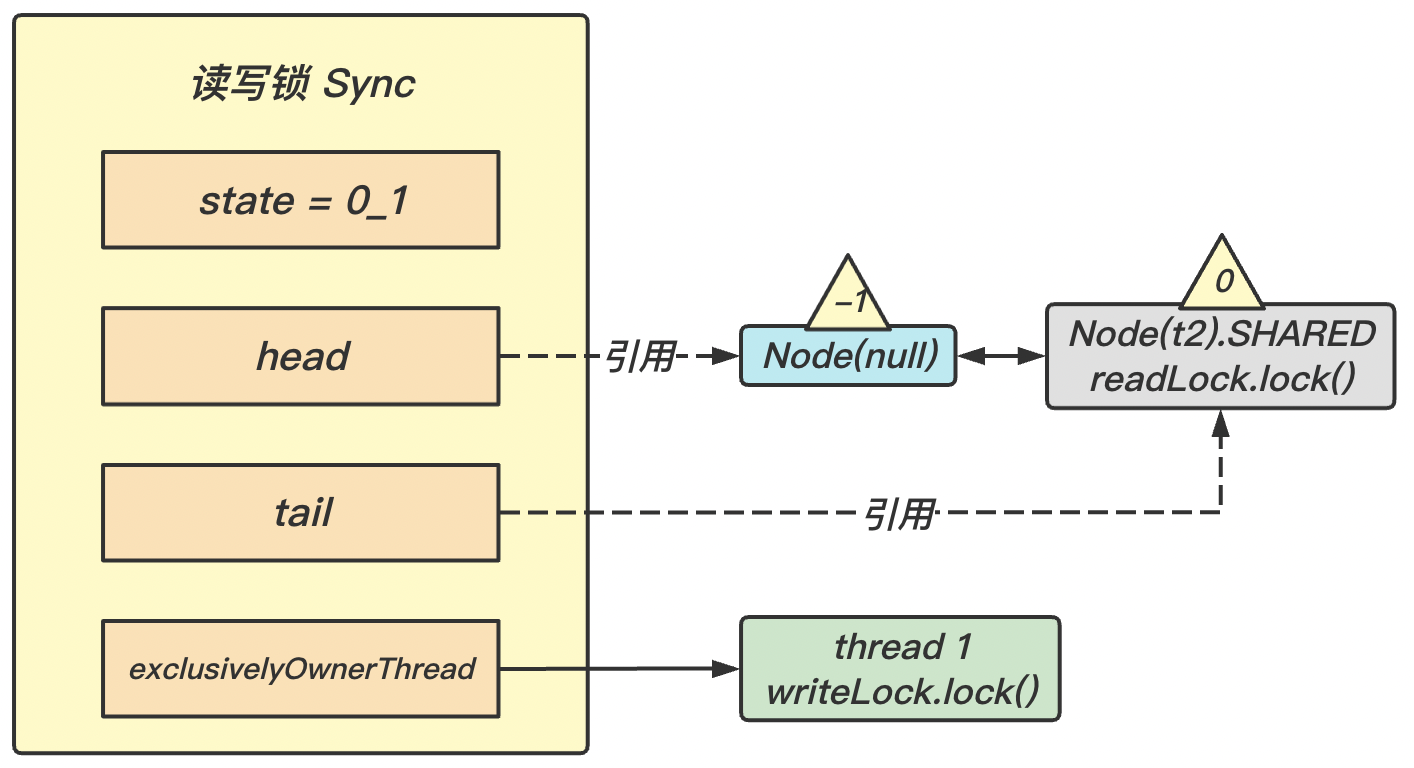
- 将当前线程成装为
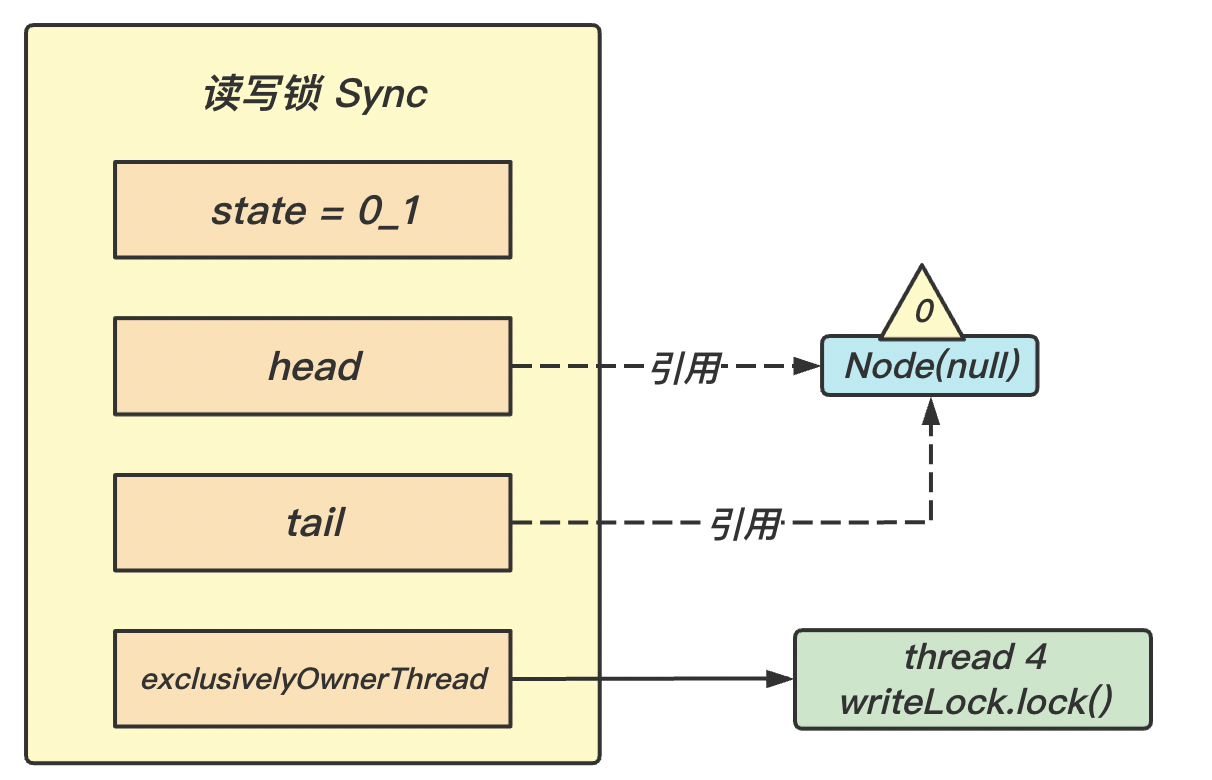
(二)thread_3 读锁 , thread_4 写锁
此时又有 thread_3 想获取读锁 , thread_4 想获取写锁,因为 thread_1 并没有释放锁,所以它们都被 park 在等待队列。如下图,
解锁流程
【写锁】解锁的部分源码如下:
1 | public final boolean release(int arg) { |
1 | protected final boolean tryRelease(int releases) { |
【读锁】解锁的部分源码如下:
1 | public static class ReadLock implements Lock, java.io.Serializable { |
1 | public final boolean releaseShared(int arg) { |
1 | protected final boolean tryReleaseShared(int unused) { |
1 | private void doReleaseShared() { |
(一)thread_1 释放写锁
-
thread_1尝试释放写锁tryRelease(),将state的低16 bits减 1。若减为 0,则将Owner置为空;若不为 0,则说明存在**写锁重入**;更新state;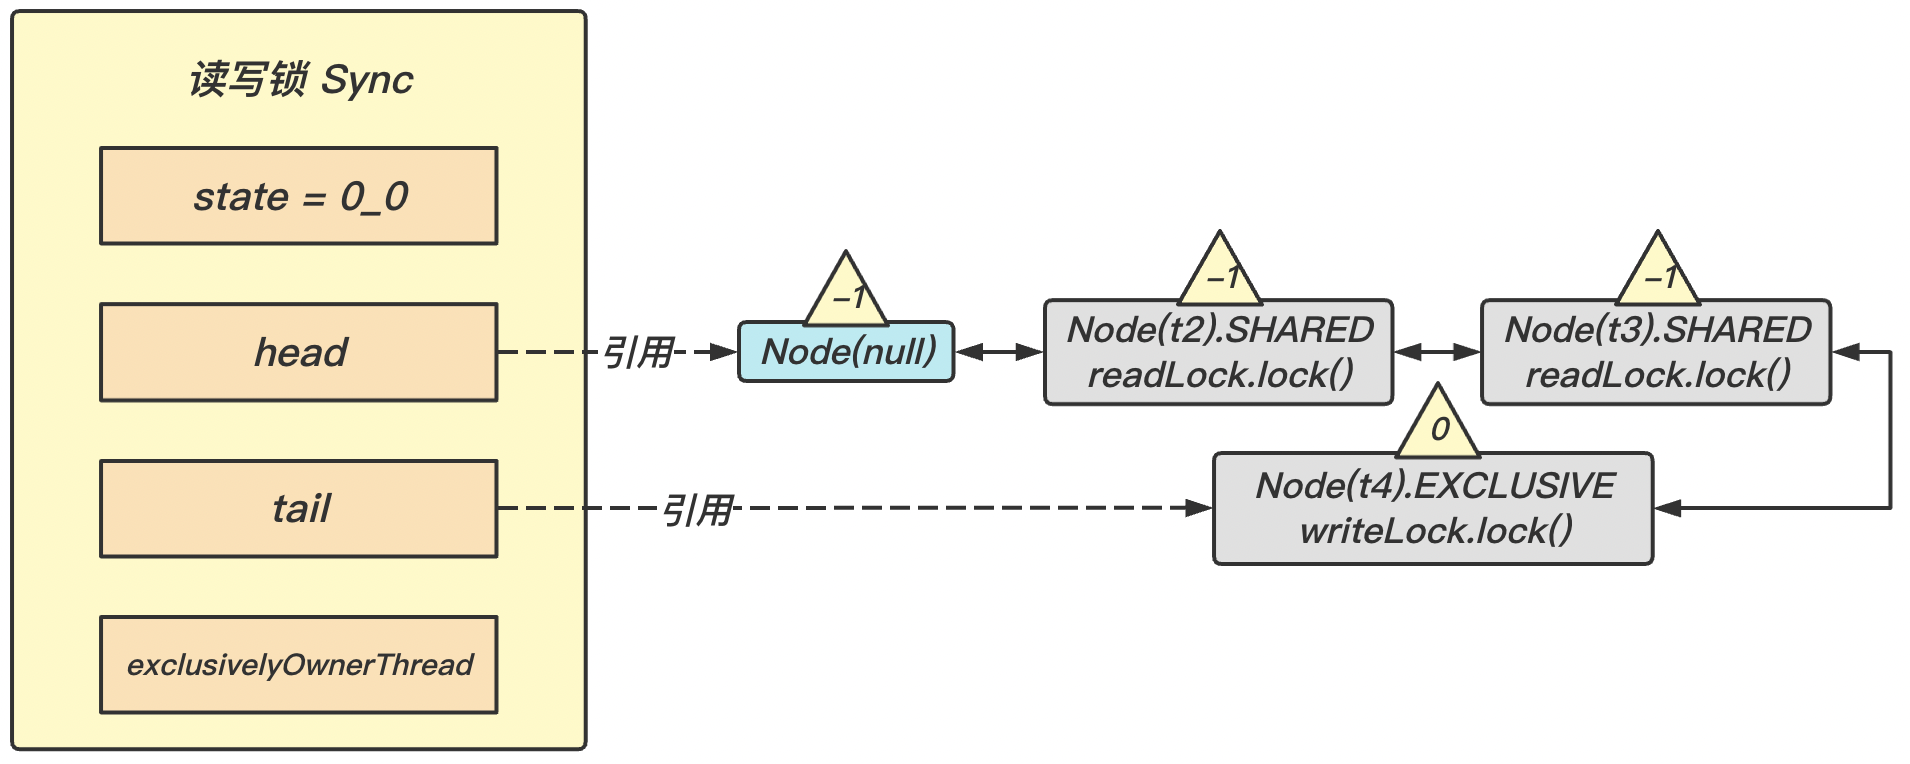
-
接下来开始唤醒等待队列中的线程,即让
thread_2恢复运行。此时thread_2从doAcquireShared()的for(;;){}循环中parkAndCheckInterrupt()处继续运行:-
再执行一轮
for(;;){}循环,当执行到tryAcquireShared()时,state的高16 bits加 1;如下图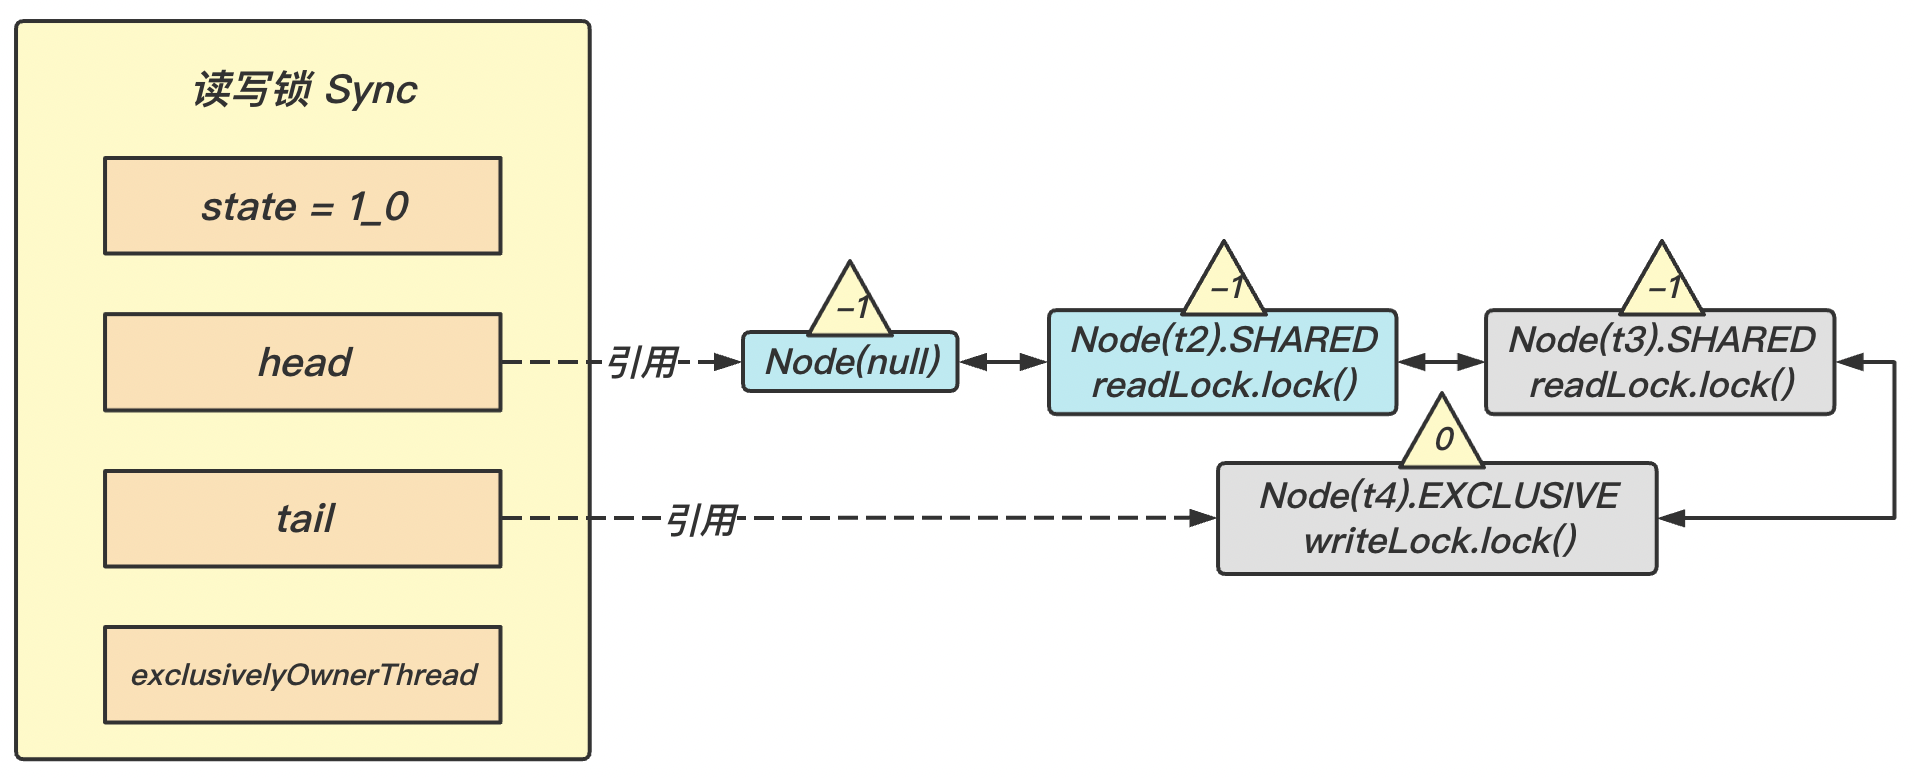
-
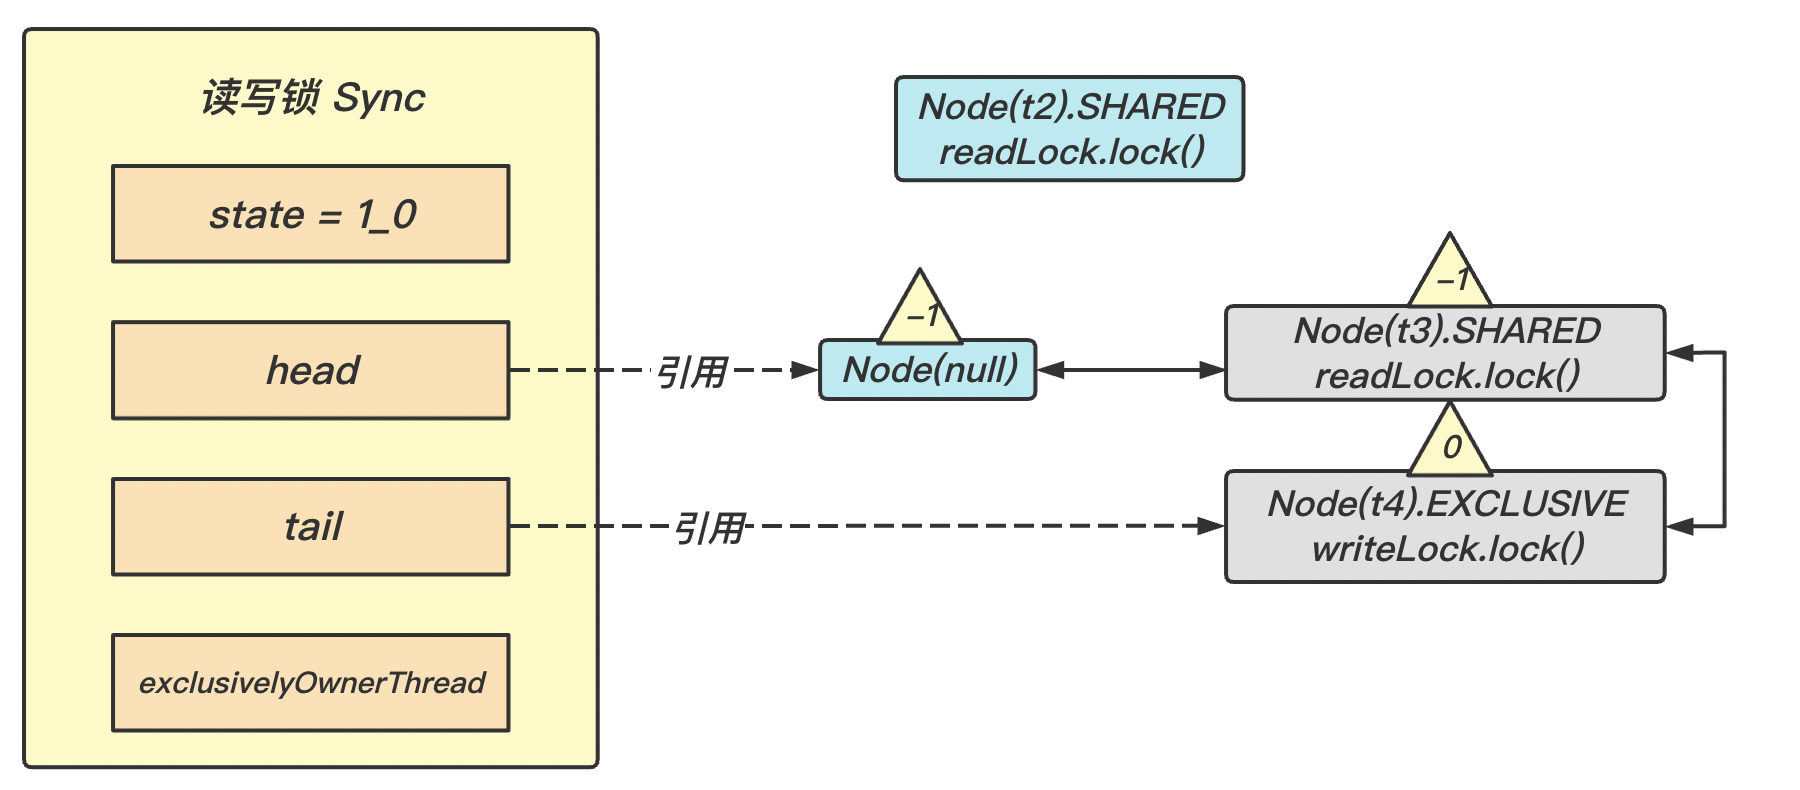
thread_2继续运行,调用setHeadAndPropagate(node, 1),将thread_2的节点(node)从队列里移出,更新waitStatus状态;如下图
-
【⚠️ 此时唤醒并没有结束】检查
Node(null)的后继节点的属性,如果是Node.SHARED,会继续唤醒其后继节点,直到不为SHARED;被唤醒的线程仍然从park的地方开始运行(步骤2),如此一来就会连续唤醒多个相连的Node.SHARED;如下图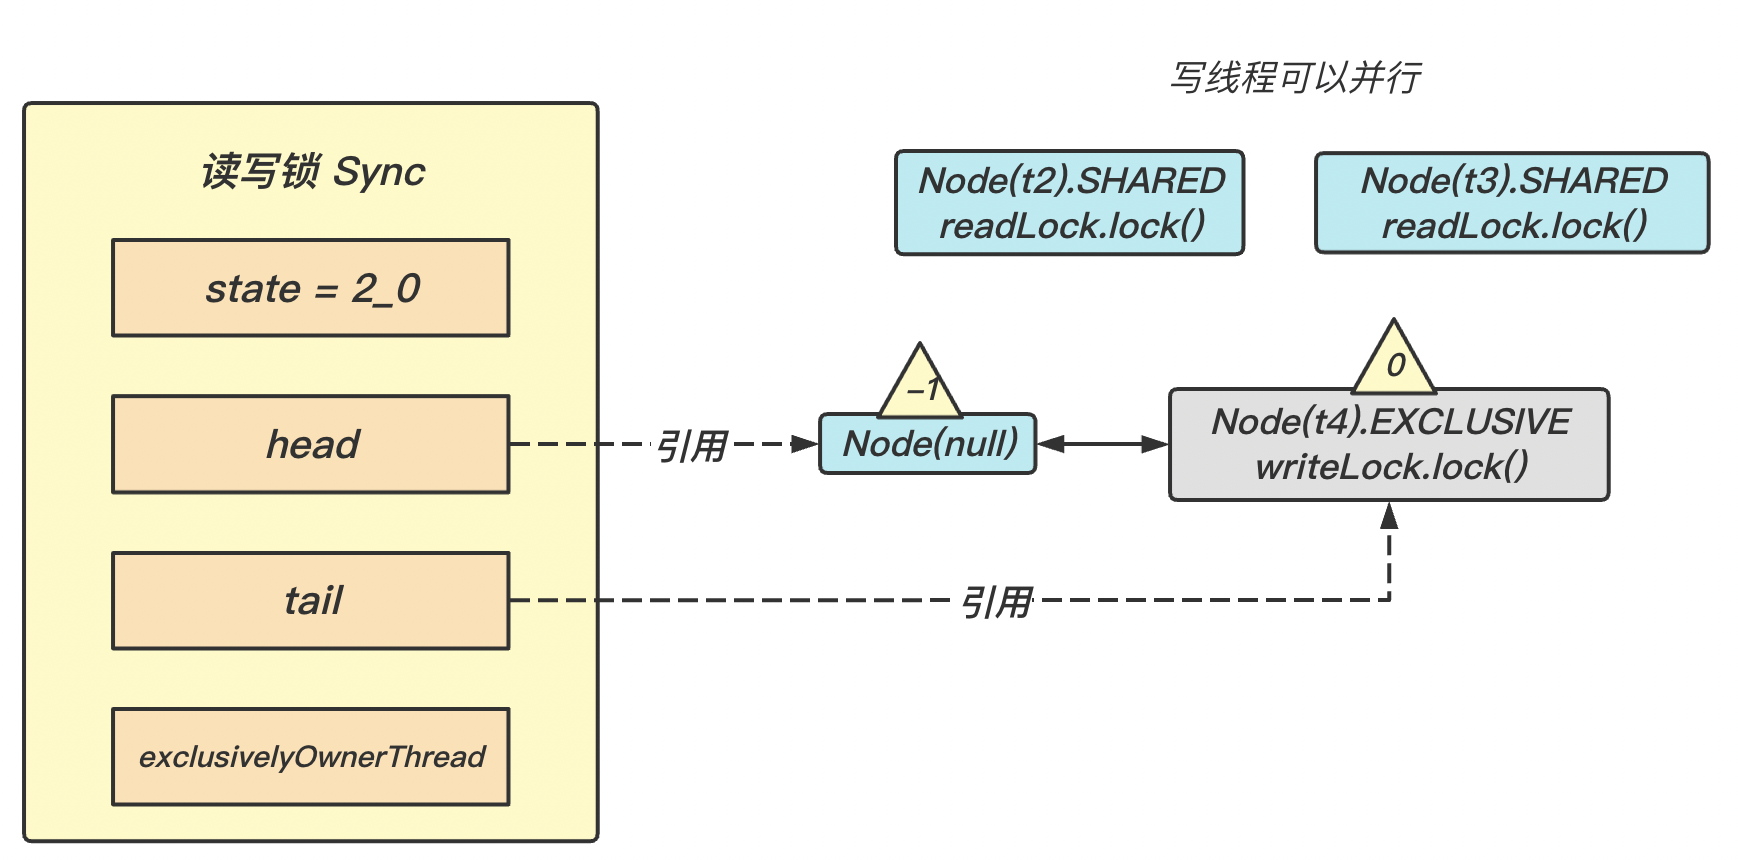
-
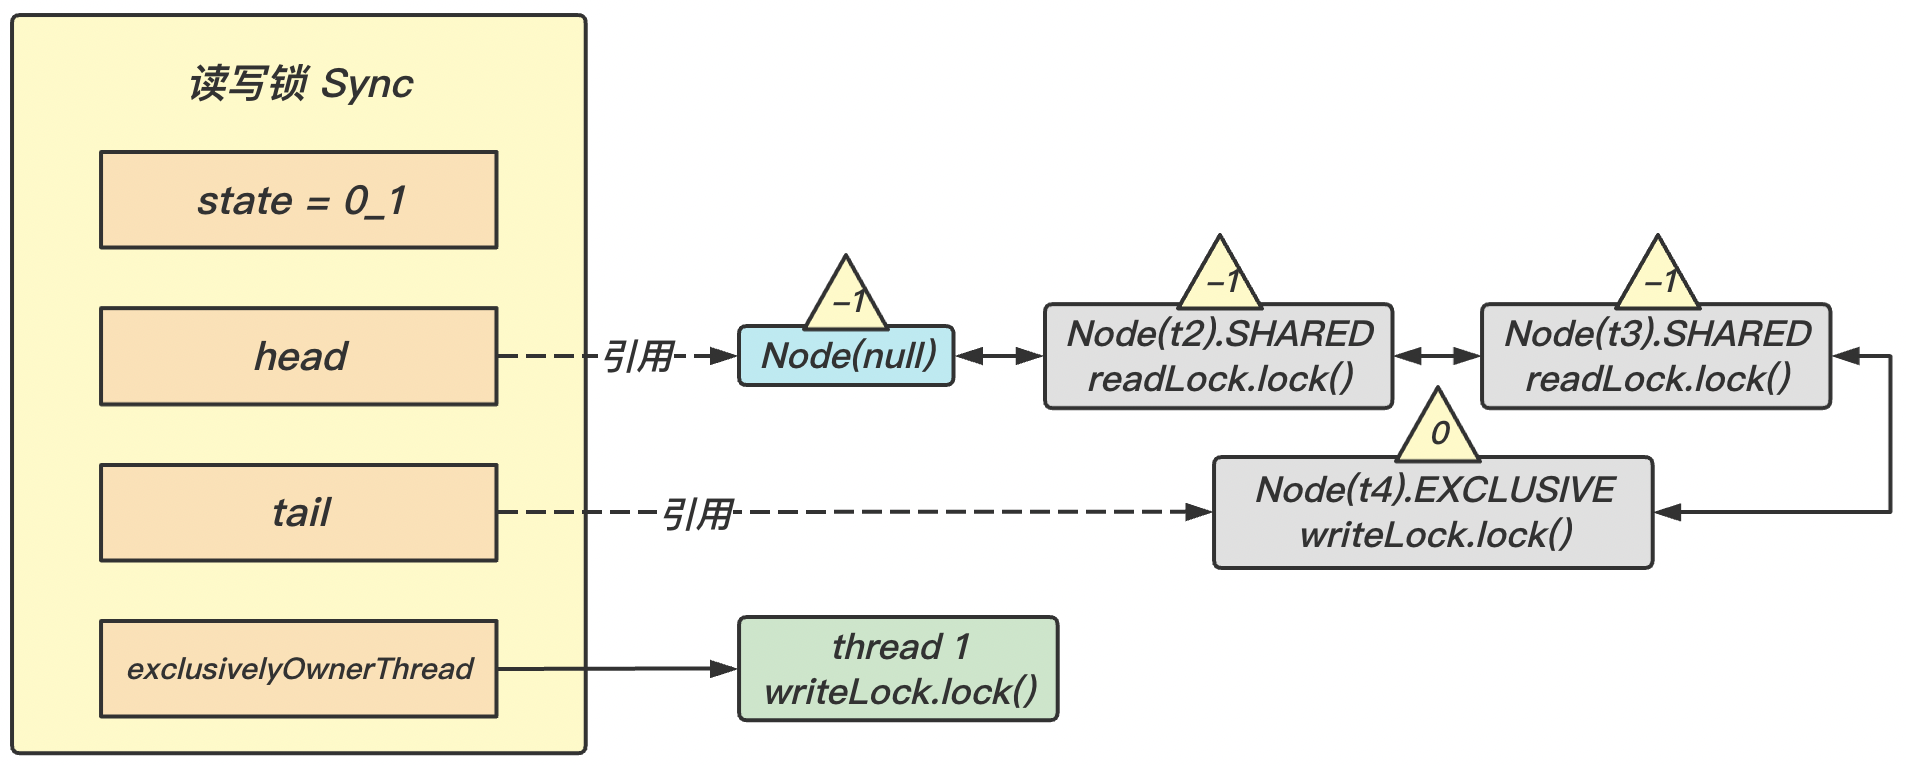
(二)thread_2, thread_3 释放读锁
-
thread_2首先解锁:thread_2进入sync.releaseShared(1)中,调用tryReleaseShared(1),使state高十六位减 1,但此时state高十六位并不为 0;此时就完成了一个读锁的释放。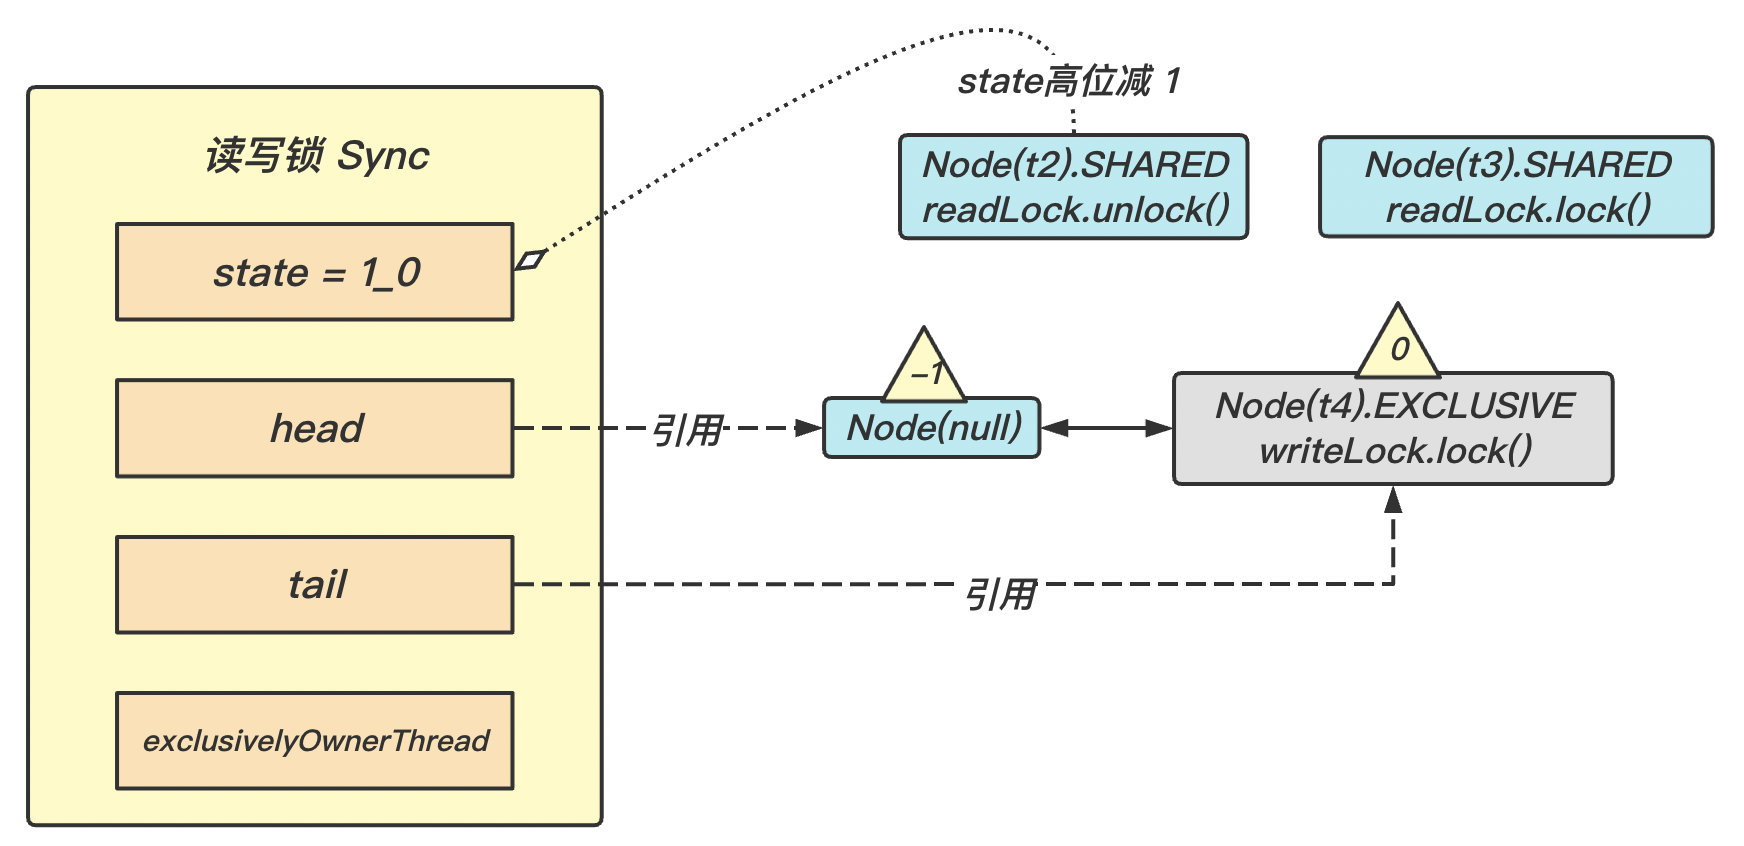
-
thread_3解锁:与上一个流程一致。thread_3进入sync.releaseShared(1)中,调用tryReleaseShared(1),使state高十六位减 1,但此时state高十六位为 0,此时就进入deReleaseShared(1);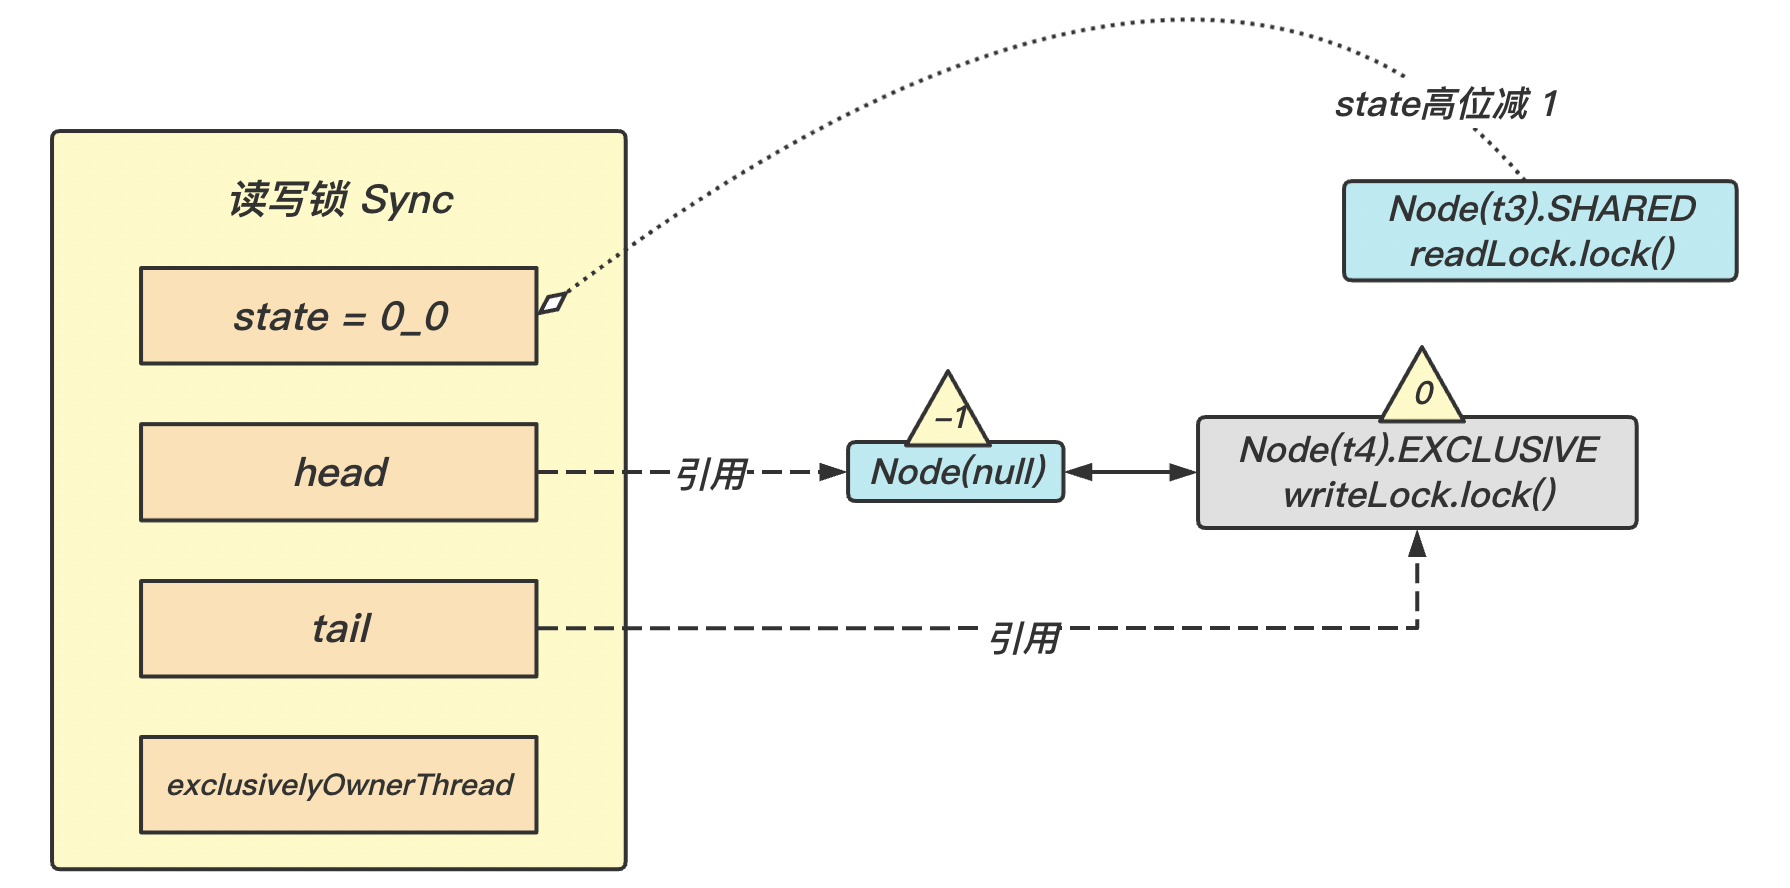
-
thread_3进入deReleaseShared(1)中,检查Node(null)的waitStatus状态是否为 -1,若是,将其改为 0,并唤醒他的后继节点;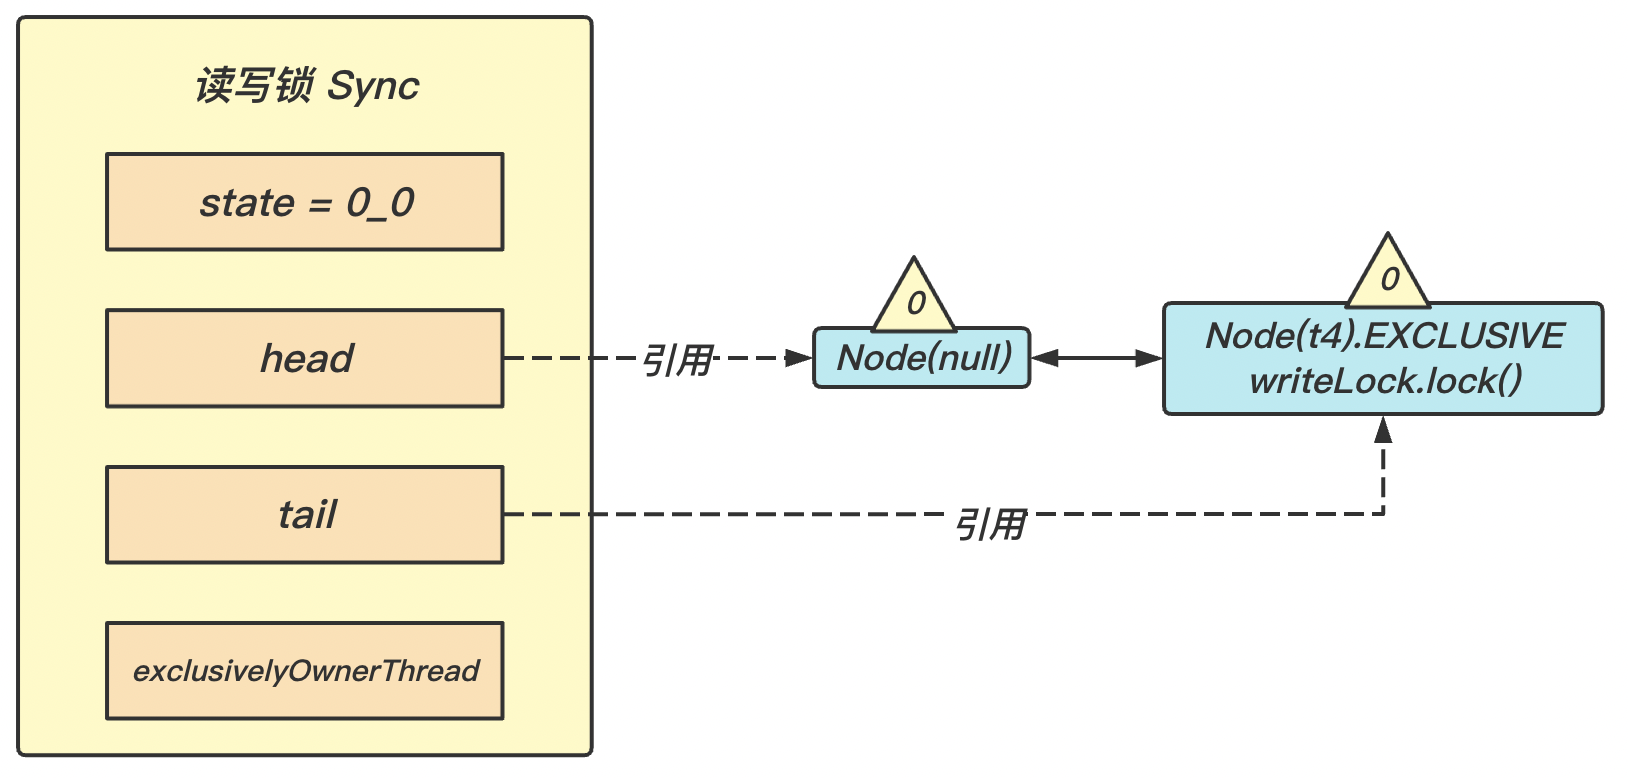
-
thread_4在之前park的地方被唤醒(acquireQueued()的for(;;){}循环中)
-
-
thread_4被唤醒,按照之前的流程尝试加锁。